寫 HTML 時你一定遇過這個狀況:在 Firefox 等符合 W3C 標準的瀏覽器中,外層 DIV 裡的子 DIV 一旦設定了 float,外層容器卻不會被撐開。本文用實例拆解原因,並比較三種解法。
問題重現
<div style="width:200px; border:1px solid red;">
    <div style="float:left; width:80px; height:80px; border:1px solid blue;">TEST DIV</div>
    <div style="float:left; width:80px; height:80px; border:1px solid blue;">TEST DIV</div>
    <div style="float:left; width:80px; height:80px; border:1px solid blue;">TEST DIV</div>
    <div style="float:left; width:80px; height:80px; border:1px solid blue;">TEST DIV</div>
    <div style="float:left; width:80px; height:80px; border:1px solid blue;">TEST DIV</div>
</div>
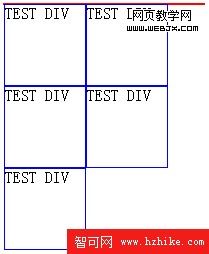
容器 DIV 沒有被撐開
紅色邊框的外層容器完全沒有被撐開。原因是內部的 DIV 一旦 float:left,就等於脫離了正常的文件流,外層容器不再感知它們的高度。
解法一:插入清除元素(直覺但笨拙)
過去我都是用這個方法:
<div style="width:200px; border:1px solid red;">
    <div style="float:left; width:80px; height:80px; border:1px solid blue;">TEST DIV</div>
    <div style="float:left; width:80px; height:80px; border:1px solid blue;">TEST DIV</div>
    <div style="float:left; width:80px; height:80px; border:1px solid blue;">TEST DIV</div>
    <div style="float:left; width:80px; height:80px; border:1px solid blue;">TEST DIV</div>
    <div style="float:left; width:80px; height:80px; border:1px solid blue;">TEST DIV</div>
    <div style="clear:both;"></div>
</div>
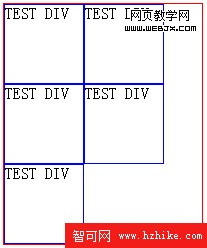
顯示正常了
在容器內所有浮動元素的最後補上一個 <div style="clear:both"></div>,等於在結尾強制執行一次清除。
但我始終覺得這樣多一個 DIV 不妥。第一,它是一個沒有任何語意、純粹為修正樣式而存在的標籤;第二,在搭配 dojo 這類函式庫做 Drag & Drop 時,因為它是容器的直接子節點,一旦被拖動就會引發排版 bug——被拖到它後面的方塊,會因為 clear:both 而被強制換行。所以我一直在找更好的辦法。
解法二:clearfix:after 偽元素(推薦)
在無數次搜尋之後,我找到了〈How To Clear Floats Without Structural Markup〉這篇文章,問題終於有了漂亮的解法。
先定義樣式:
.clearfix:after {
    content: ".";
    display: block;
    height: 0;
    clear: both;
    visibility: hidden;
}
接著讓外層容器套用這個 class:
<div style="width:200px; border:1px solid red;" class="clearfix">
    <div style="float:left; width:80px; height:80px; border:1px solid blue;">TEST DIV</div>
    <div style="float:left; width:80px; height:80px; border:1px solid blue;">TEST DIV</div>
    <div style="float:left; width:80px; height:80px; border:1px solid blue;">TEST DIV</div>
    <div style="float:left; width:80px; height:80px; border:1px solid blue;">TEST DIV</div>
    <div style="float:left; width:80px; height:80px; border:1px solid blue;">TEST DIV</div>
</div>
在 Firefox 中測試,效果確實很好,而且 dojo 的 Drag & Drop 也不再出問題。
原理並不複雜:after 是偽元素,它會在使用 clearfix 的元素結尾插入 content 指定的內容。這裡插入一個句號「.」,把 display 設為 block、高度設為 0、clear 設為 both、visibility 設為 hidden——於是既達到了撐開容器的目的,又不佔用任何視覺空間,也不必污染 HTML 結構。
解法三:補上 IE 專用 hack
問題是 Windows IE 並不支援上述做法,所以要讓 IE 也完美顯示,必須在 clearfix 之後加上專門的 hack:
.clearfix:after {
    content: ".";
    display: block;
    height: 0;
    clear: both;
    visibility: hidden;
}
/* Hides from IE-Mac \ */
* html .clearfix { height: 1%; }
/* End hide from IE-Mac */
因為那段轉義字元「\」,Mac IE 會忽略這段 hack,而 Windows IE 不會——它會套用 * html .clearfix { height: 1%; },藉由觸發 hasLayout 來撐開容器。至於 Mac IE 確實無解,所幸使用者數量實在有限,能保住 Safari 就夠了。
怎麼選
三種做法的取捨很清楚:插入清除元素最直觀,但污染結構且會干擾拖放;clearfix 需要一點偽元素知識,卻能保持 HTML 乾淨,是長期維護的首選。理解 float 為何脫離文件流,比記住任何一套 hack 都重要——畢竟 hack 會隨瀏覽器世代更替而失效,原理不會。
- 上一篇文章: CSS 實例教學:打造「背景彈性 + 內容固寬」的自適應布局
- 下一篇文章: 縮短網站載入時間:CSS Sprites 的六個實務原則