該怎麼用 div+css 設定 p 段落之間的上下間距?需要哪些屬性?CSS 行高又怎麼寫?本文用四個實作範例,帶你徹底搞懂 p 段落的行距與行高設定。
p 是文章段落標籤,而控制段落行距的 CSS 屬性主要有三個:
1、CSS line-height
2、margin
3、padding
其中段落間的上下距離主要由 margin 與 padding 決定,line-height 也有一定影響。接下來用範例說明。
範例描述:為了方便觀察,我們建立四個 DIV 盒子,分別命名為「.thinkcss-a」~「.thinkcss-d」,每個盒子裡放入相同的 p 段落,並對各盒子套用不同的行距設定來比較效果。另外,p 段落預設的 padding 為 0,並統一把 p 文字的 line-height 設為 20px。
案例一:margin 上下設為 0
1、完整 CSS+HTML:
 <!DOCTYPE html>
<html>
<head>
<meta charset="utf-8" />
<title>p行距實例 在線演示 ThinkCSS</title>
<style>
p{ line-height:20px}
.thinkcss-a p{ margin:0 auto}
</style>
</head>
<body>
<div class="thinkcss-a">
<p>第一段</p>
<p>第二段<br />第二段第二行</p>
<p>第三段</p>
</div>
</body>
</html>
把 margin-top 與 margin-bottom 設為 0。
2、效果截圖:
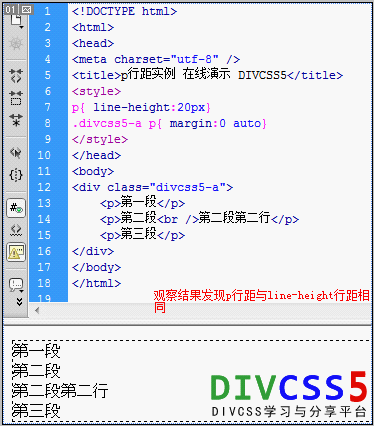
margin 上下為 0 時的段落行距
可見當 margin-top 與 margin-bottom 都設為 0 時,段落間距幾乎消失,效果與 line-height 設定的行距相當。
案例二:margin 上下設為 30px
1、完整 HTML:
 <!DOCTYPE html>
<html>
<head>
<meta charset="utf-8" />
<title>p行距實例 在線演示 ThinkCSS</title>
<style>
p{ line-height:20px}
.thinkcss-b p{ margin:30px auto}
</style>
</head>
<body><div class="thinkcss-b">
<p>第一段</p>
<p>第二段<br />第二段第二行</p>
<p>第三段</p>
</div>
</body>
</html>
這裡對「.thinkcss-b」設 margin:30px auto,等同 margin-top 與 margin-bottom 皆為 30px。
2、效果截圖:
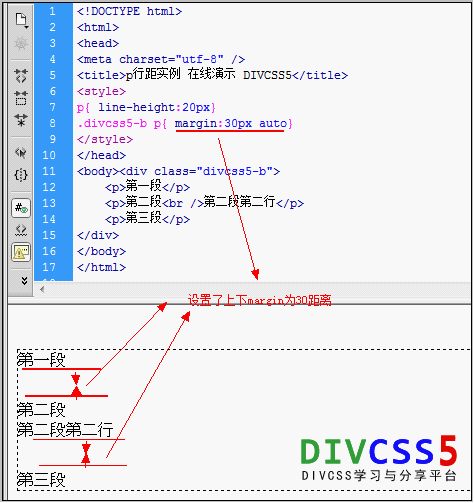
用 margin 調整行距
可見透過 margin 設定,確實能實現段落行距。
案例三:margin 上下為 0,padding 上下為 20px
1、完整 HTML:
 <!DOCTYPE html>
<html>
<head>
<meta charset="utf-8" />
<title>p行距實例 在線演示 ThinkCSS</title>
<style>
p{ line-height:20px}
.thinkcss-c p{ margin:0 auto; padding:20px 0}
</style>
</head>
<body>
<div class="thinkcss-c">
<p>第一段</p>
<p>第二段<br />第二段第二行</p>
<p>第三段</p>
</div>
</body>
</html>
這裡 margin 上下為 0,並把 padding 上下設為 20px。
2、效果截圖:
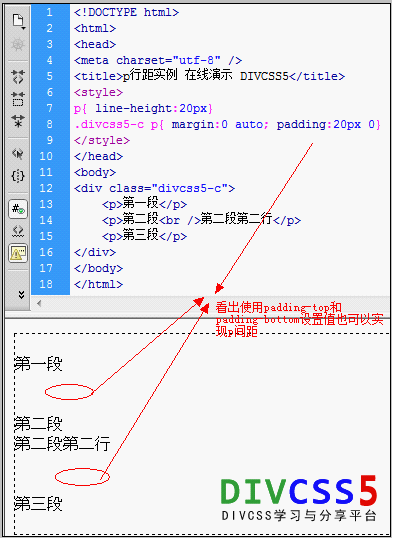
對 p 設 padding 的效果
可見幫 p 設 padding 一樣能實現行距間距。
案例四:margin 與 padding 都不設
完全不幫 p 設 margin 與 padding,觀察它的預設行距。
1、完整程式碼:
 <!DOCTYPE html>
<html>
<head>
<meta charset="utf-8" />
<title>p行距實例 在線演示 ThinkCSS</title>
<style>
p{ line-height:20px}
.thinkcss-d p{ }
</style>
</head>
<body>
<div class="thinkcss-d">
<p>第一段</p>
<p>第二段<br />第二段第二行</p>
<p>第三段</p>
</div>
</body>
</html>
2、效果截圖:
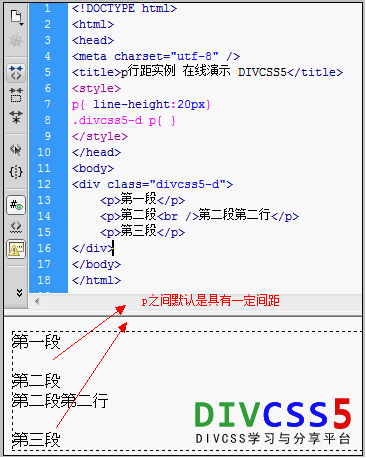
不設任何樣式時 p 的預設行距
此例說明:p 若完全不設樣式,本身就帶有一定的 margin-top 與 margin-bottom,也就是有預設間距。
以上範例線上演示:查看案例
DIV+CSS 範例打包下載:
立即下載 (1.064KB)
- 上一篇文章: div 浮動層與 div 層有何不同?CSS 中的關係解析
- 下一篇文章: div css 文字行高行距:深入理解 CSS 行間距設定