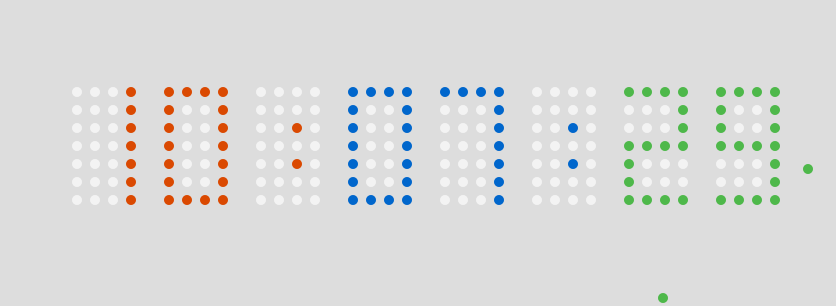
就是這個數字時鐘。當初第一次看到這個創意時就覺得相當有意思,只是遲遲沒有真的動手去做。直到某天同事又在網路上翻到這個案例,覺得實在太酷炫,跑來問我這到底是怎麼做出來的。我稍微在腦中構思了一下實作思路,自己也來了興致,於是花了點時間仿作了一個。
不同之處在於,原作者是使用 div 來堆砌的,而我選擇了 Canvas 來實作。就效能層面而言,Canvas 會更有優勢——畢竟當你要操控數百個點的運動時,用 JavaScript 去控制 DOM 的 style 屬性,跟直接用 JavaScript 操作 Canvas 繪圖相比,效能上勢必會吃虧一些。
先附上我做的 DEMO,接著再簡要說明實作方法。
用字串描述每個數字的樣貌
整個思路其實很直覺:我們用字串把每個數字所對應的點位記錄下來。
var numData = [
    "1111/1001/1001/1001/1001/1001/1111",   // 0
    "0001/0001/0001/0001/0001/0001/0001",   // 1
    "1111/0001/0001/1111/1000/1000/1111",   // 2
    "1111/0001/0001/1111/0001/0001/1111",   // 3
    "1010/1010/1010/1111/0010/0010/0010",   // 4
    "1111/1000/1000/1111/0001/0001/1111",   // 5
    "1111/1000/1000/1111/1001/1001/1111",   // 6
    "1111/0001/0001/0001/0001/0001/0001",   // 7
    "1111/1001/1001/1111/1001/1001/1111",   // 8
    "1111/1001/1001/1111/0001/0001/1111",   // 9
    "0000/0000/0010/0000/0010/0000/0000"    // :
]
這裡面 0 代表沒有像素,1 代表有像素,而斜線 / 只是為了美觀而加的分行符號。舉例來說,數字 0 的樣子就是:
1 1 1 1

1 0 0 1

1 0 0 1

1 0 0 1

1 0 0 1

1 0 0 1

1 1 1 1
這樣就一目了然了吧。從 0 到 9,再加上一個冒號,全部都用字串描述好。
定義粒子(像素點)物件
接著我們來寫一個粒子物件,也就是每一個構成數字的像素點:
var P_radius = 8, Gravity = 9.8;
var Particle = function(){
    this.x = 0;
    this.y = 0;
    this.vx = 0;
    this.vy = 0;
    this.color = "";
    this.visible = false;
    this.drop = false;
}
Particle.prototype = {
    constructors: Particle,
    paint: function(){        // 繪製自身
        ctx.fillStyle = this.color;
        ctx.beginPath();
        ctx.arc(this.x, this.y, P_radius, 0, 2 * Math.PI);
        ctx.fill();
    },
    reset: function(x, y, color){   // 重置(粒子要循環利用,藉此提升效能)
        this.x = x;
        this.y = y;
        this.vx = 0;
        this.vy = 0;
        this.color = color;
        this.visible = true;
        this.drop = false;
    },
    isDrop: function(){       // 落下
        this.drop = true;
        var vx = Math.random() * 20 + 15
        this.vx = Math.random() >= 0.5 ? -vx : vx;
    },
    update: function(time){   // 每一幀的動作
        if (this.drop){
            this.x += this.vx * time;
            this.y += this.vy * time;
            var vy = this.vy + Gravity * time;

            if (this.y >= canvas.height - P_radius){
                this.y = canvas.height - P_radius
                vy = -vy * 0.7;
            }
            this.vy = vy;

            if (this.x < -P_radius || this.x > canvas.width + P_radius || this.y < -P_radius || this.y > canvas.height + P_radius){
                this.visible = false;
            }
        }
    }
}粒子物件的屬性相當單純,不外乎位置、速度,以及是否可見。方法方面:paint 負責繪製,reset 負責重置(由於粒子會循環重用,這樣做能提升效能),isDrop 讓粒子進入自由落體狀態,而 update 則是每一幀的更新邏輯。當粒子運動超出 canvas 繪製區域時,就把它的 visible 設為 false,存回粒子容器中等待下次調用。
先把背景畫好並快取起來
寫好粒子物件後,接著要思考如何依據位置把粒子畫上去,同時在粒子不再需要時,讓它做自由落體動畫。首先我們先把背景(也就是那些沒有像素的白色小點)畫出來:
function drawBg(){
    var tx = (canvas.width - ((P_radius * 2 + X_J) * 4 * 8 + 7 * xjg)) / 2;
    for (var i = 0; i < 8; i++){
        var ty = (canvas.height - ((P_radius + yjg) * 6)) / 2;
        for (var j = 0; j < numData[0].length; j++){
            var tt = numData[0].charAt(j);
            if (tt === "/"){
                ty += yjg;
            } else {
                var x = tx + j % 5 * (P_radius * 2 + X_J),
                    y = ty;
                bgctx.fillStyle = "#FFF";
                bgctx.beginPath();
                bgctx.arc(x, y, P_radius, 0, 2 * Math.PI);
                bgctx.fill();
            }
        }
        tx += xjg + 4 * (P_radius * 2 + X_J);
    }
}
我們先把背景畫到一塊離屏 canvas 中快取起來,之後每一幀重繪時就不必再跑一次邏輯運算,直接把那塊離屏 canvas 貼上去即可。上面的邏輯並不難懂:透過兩層迴圈,先跑過 8 個數字位,再對每個數字逐點繪製;一旦遇到 / 就代表要換行,把 ty 加上換行間距、重設 tx 後繼續畫。就這樣,整片背景點陣便完成了。效果如下:

依據時間畫出數字像素
背景準備好後,就來根據每一秒的時間畫出對應的數字。核心方法如下:
function setTime(time){
    var h = time.getHours() + "",
        m = time.getMinutes() + "",
        s = time.getSeconds() + "";
    hh = h.length === 1 ? "0" + h : h;
    mm = m.length === 1 ? "0" + m : m;
    ss = s.length === 1 ? "0" + s : s;

    var nowdate = h + ":" + m + ":" + s;
    var tx = (canvas.width - ((P_radius * 2 + X_J) * 4 * 8 + 7 * xjg)) / 2, color = "";
    for (var i = 0; i < nowdate.length; i++){
        var n = nowdate.charAt(i) === ":" ? 10 : parseInt(nowdate.charAt(i)),
            text = numData[n];

        var ty = (canvas.height - ((P_radius + yjg) * 6)) / 2;

        switch (i){
            case 0: color = "#4DCB74"; break;
            case 2: color = "#4062E0"; break;
            case 3: color = "#D65050"; break;
            case 5: color = "#4062E0"; break;
            case 6: color = "#797C17"; break;
        }

        for (var j = 0; j < text.length; j++){
            var tt = text.charAt(j);
            if (tt === "/"){
                ty += yjg;
            } else {
                var x = tx + j % 5 * (P_radius * 2 + X_J),
                    y = ty,
                    pp = null,
                    usefullp = null;
                particles.forEach(function(p){
                    if (p.visible & p.x === x & p.y === y){
                        pp = p;
                    } else if (!p.visible & usefullp === null){
                        usefullp = p;
                    }
                });
                if (pp !== null & tt === "0"){
                    pp.isDrop();
                } else if (pp === null & tt === "1"){
                    usefullp.reset(x, y, color);
                }
            }
        }
        tx += xjg + 4 * (P_radius * 2 + X_J);
    }
}
原理同樣不難,跟畫背景幾乎如出一轍:遍歷所有點,再根據當前時間轉成的字串判斷該點是否應該有像素。如果應該有,就進一步檢查該位置是否已經存在粒子——若已有粒子就直接跳過;若沒有,就從粒子容器裡挑一個尚未使用的粒子 reset 到這個位置。還有一種情況是:這個點本不該有像素,卻還留著粒子,那就把這個粒子取出來,讓它自由落體墜落。
驅動舞台的動畫迴圈
時間設定邏輯寫好後,就能來寫舞台更新的程式了:
var timeCount_0 = 0, timeCount_1 = 0, particles = [];
function initAnimate(){
    for (var i = 0; i < 200; i++){
        var p = new Particle();
        particles.push(p);
    }
    timeCount_0 = new Date();
    timeCount_1 = new Date();
    drawBg();
    setTime(timeCount_0)
    animate();
}

function animate(){
    ctx.clearRect(0, 0, canvas.width, canvas.height);
    ctx.drawImage(bgcanvas, 0, 0);

    var timeCount_2 = new Date();

    if (timeCount_1 - timeCount_0 >= 1000){
        setTime(timeCount_1);
        timeCount_0 = timeCount_1;
    }

    particles.forEach(function(p){
        if (p.visible){
            p.update((timeCount_2 - timeCount_1) / 70);
            p.paint();
        }
    });

    timeCount_1 = timeCount_2;

    RAF(animate)
}
在 initAnimate 中進行動畫初始化:先實體化兩百個粒子物件放進容器裡備用,接著更新時間戳、快取背景、設定當前時間,最後呼叫 animate 這個動畫主體開始跑。而 animate 裡的邏輯也很單純:取得時間戳,若與上次的時間差達到或超過 1 秒就呼叫一次 setTime;再往下則是遍歷粒子容器中所有可見粒子並重繪。
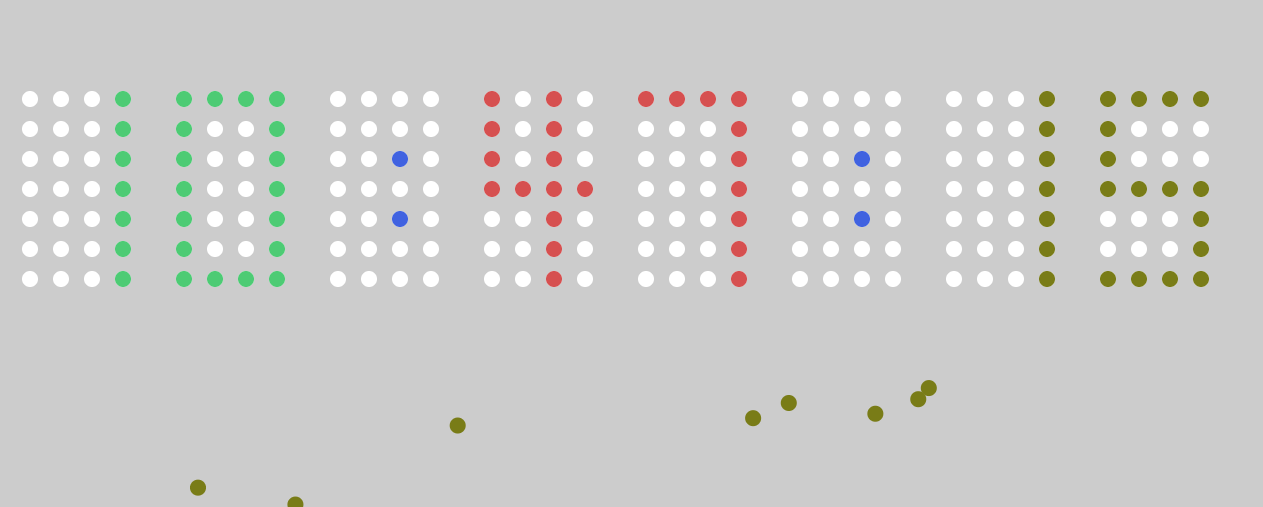
做到這裡就大功告成啦:
還能再優化的空間
這個效果其實還有許多值得打磨的地方。由於時和分變動得很少,我們大可以把這兩段快取起來,在沒有變動時直接貼上快取畫面即可,如此一來便能大幅減少舞台每一幀的繪圖 API 調用次數,效能自然更好。不過考量到粒子數量本就不多,兩三百個粒子物件綽綽有餘,不做優化也能跑得相當順暢,所以這裡就先偷個懶囉。
原始碼可參考:https://github.com/whxaxes/canvas-test/blob/gh-pages/src/Funny-demo/coolClock/index.Html
- 上一篇文章: 用Canvas打造絢爛煙火:HTML5煙火特效完整實作教學
- 下一篇文章: 用HTML5打造刮刮卡塗抹效果:橡皮擦擦除的完整實作教學