本文將分享如何以原生 JavaScript 打造類似淘寶首頁的幻燈片廣告輪播效果,包含自動播放、數字索引切換與平滑位移動畫。以下從效果、程式碼到原理逐一說明。
一、效果預覽
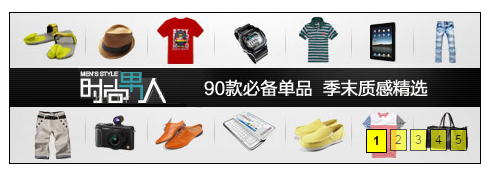
二、JavaScript 部分
這段程式碼提供了三個關鍵函數:getClass 用於取得指定 class 的元素,getStyle 相容不同瀏覽器取得樣式,startmove 則是核心的緩動動畫函數:
function getClass(oParent,name){ var arr=[]; var oBj=oParent.getElementsByTagName("*"); for(var i=0;i<oBj.length;i++){ if(oBj[i].className==name){ arr.push(oBj[i]); } } return arr;}function startmove(obj,json,fnEnd){ var cur=0; clearInterval(obj.timer); obj.timer=setInterval(function(){ var oStop=true; for(var attr in json){ if(attr=='opacity'){ cur=Math.round(parseFloat(getStyle(obj,attr)*100)); } else{ cur=parseInt(getStyle(obj,attr)); } var speed=(json[attr]-cur)/10; speed=speed>0?Math.ceil(speed):Math.floor(speed); if(cur!=json[attr]){ oStop=false; } if(attr=='opacity'){ obj.style[attr]=(cur+speed)/100; obj.style.filter="alpha(opacity:"+(cur+speed)+")"; }else{ obj.style[attr]=cur+speed+"px"; } } if(oStop){ clearInterval(obj.timer); if(fnEnd)fnEnd(); } },30);};function getStyle(obj,name){ if(obj.currentStyle){ return obj.currentStyle[name]; } else{ return getComputedStyle(obj,false)[name]; }};
三、CSS 部分
樣式負責圖片絕對定位、數字索引的樣式與當前狀態的高亮:
*{ margin: 0px; padding: 0px; }img{ border: none; width: 470px; height: 150px; float: left; }.pic_body li{ width: 470px; height: 150px; float: left; z-index: 3001; }ul{ list-style: none; position: absolute; top: 0px; left: 0px; width: 470px; height: 150px; background: yellow; z-index: 3000; }#div1{ border: 1px solid black; width: 470px; height: 150px; position: relative; margin: 100px auto; padding: 0px; overflow: hidden; }#div1 ol{ bottom: 10px; right: 10px; position: absolute; z-index: 9999; }ol li{ background: yellow; float: left; display: inline; margin-right: 3px; padding: 3px 4px; font-size: 12px; cursor: pointer; filter: alpha(opacity:60); opacity: 0.6; border: 1px solid black; }.active{ background: yellow; font-weight: bolder; padding: 4px 6px; filter: alpha(opacity:100); opacity: 1; }
四、HTML 部分
HTML 結構由數字索引 ol 與圖片列表 ul 組成,並在 onload 中完成事件綁定:
<div id="div1"> <ol> <li class="active">1</li> <li>2</li> ... </ol> <ul class="pic_body"> <li><img src="image/1.jpg"></li> ... </ul></div>
腳本邏輯透過 now 變數記錄當前索引,tab 函數負責切換到指定圖片並更新數字高亮,next 函數則實作自動輪播,滑鼠移入時暫停、移出時恢復:
window.onload=function() { var now = 0; var oDiv = document.getElementById('div1'); var oOl = oDiv.getElementsByTagName('ol')[0]; var oLi = oOl.getElementsByTagName('li'); var oUl = getClass(oDiv, 'pic_body')[0]; for(var i=0;i<oLi.length;i++){ oLi[i].index=i; oLi[i].onclick=function(){ now=this.index; tab(); }; } function tab(){ for(var i=0;i<oLi.length;i++){ oLi[i].className=''; } oLi[now].className='active'; startmove(oUl,{top:-150*now}); }; function next(){ now++; if(now==oLi.length){ now=0; } tab(); }; var timer=setInterval(next,3000); oUl.onmouseover=function(){ clearInterval(timer); }; oUl.onmouseout=function(){ timer=setInterval(next,3000); };}
希望本文所述的做法能對大家的 JavaScript 程式設計有所幫助。
- 上一篇文章: 原生 JavaScript 與 jQuery 實作網頁選項卡的對比
- 下一篇文章: 用 jQuery 實作標籤的上移、下移與置頂功能