用 HTML5 Canvas 打造可自訂箭頭的繪圖元件
編輯:關於JavaScript
先看成果:
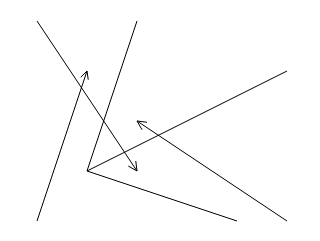
廢話少說,直接看程式碼。
arrow.js
元件設計成建構函式,對外暴露三個方法:set() 設定起終點與強度、setPara() 調整箭頭外觀、paint() 實際繪製。核心數學只有一個:把座標系旋轉到「箭頭方向為 y 軸」的座標系上,就能用簡單的加減算出箭頭兩側的等腰三角形頂點,算完再旋轉回來。
/**
 * 實現兩點間畫箭頭的功能
 * @author mapleque@163.com
 * @version 1.0
 * @date 2013.05.23
 */
;(function (window, document) {
    if (window.mapleque == undefined) window.mapleque = {};
    if (window.mapleque.arrow != undefined) return;

    /** 組件對外接口 */
    var proc = {
        /**
         * 接收 canvas 對象,並在此上畫箭頭(箭頭起止點已經設置)
         * @param context
         */
        paint: function (context) { paint(this, context); },

        /**
         * 設置箭頭起止點
         * @param sp 起點
         * @param ep 終點
         * @param st 強度
         */
        set: function (sp, ep, st) { init(this, sp, ep, st); },

        /**
         * 設置箭頭外觀
         * @param args
         */
        setPara: function (args) {
            this.size  = args.arrow_size;    // 箭頭大小
            this.sharp = args.arrow_sharp;   // 箭頭銳鈍
        }
    };

    var init = function (a, sp, ep, st) {
        a.sp = sp;   // 起點
        a.ep = ep;   // 終點
        a.st = st;   // 強度
    };

    var paint = function (a, context) {
        var sp = a.sp;
        var ep = a.ep;
        if (context == undefined) return;

        // 畫箭頭主線
        context.beginPath();
        context.moveTo(sp.x, sp.y);
        context.lineTo(ep.x, ep.y);

        // 畫箭頭頭部
        var h = _calcH(a, sp, ep, context);
        context.moveTo(ep.x, ep.y);
        context.lineTo(h.h1.x, h.h1.y);
        context.moveTo(ep.x, ep.y);
        context.lineTo(h.h2.x, h.h2.y);

        context.stroke();
    };

    // 計算頭部座標
    var _calcH = function (a, sp, ep, context) {
        var theta = Math.atan((ep.x - sp.x) / (ep.y - sp.y));
        var cep = _scrollXOY(ep, -theta);
        var csp = _scrollXOY(sp, -theta);

        var ch1 = { x: 0, y: 0 };
        var ch2 = { x: 0, y: 0 };
        var l = cep.y - csp.y;      // 主線長度

        ch1.x = cep.x + l * (a.sharp || 0.025);
        ch1.y = cep.y - l * (a.size  || 0.05);
        ch2.x = cep.x - l * (a.sharp || 0.025);
        ch2.y = cep.y - l * (a.size  || 0.05);

        var h1 = _scrollXOY(ch1, theta);
        var h2 = _scrollXOY(ch2, theta);
        return { h1: h1, h2: h2 };
    };

    // 旋轉座標
    var _scrollXOY = function (p, theta) {
        return {
            x: p.x * Math.cos(theta) + p.y * Math.sin(theta),
            y: p.y * Math.cos(theta) - p.x * Math.sin(theta)
        };
    };

    var arrow = new Function();
    arrow.prototype = proc;
    window.mapleque.arrow = arrow;
})(window, document);
arrow.html
<!DOCTYPE html>
<html>
<head>
<meta charset="UTF-8">
<title>sample of the arrow</title>
<script type="text/javascript" src="./arrow.js"></script>
</head>
<body>
<canvas width=800 height=600 id="arrowLine">請使用支援 HTML5 的瀏覽器</canvas>
<script type="text/javascript">
var cont = document.getElementById("arrowLine").getContext('2d');

var a1 = new window.mapleque.arrow();
a1.set({x: 350, y: 300}, {x: 200, y: 200});
a1.paint(cont);

var a2 = new window.mapleque.arrow();
a2.set({x: 100, y: 100}, {x: 200, y: 250});
a2.paint(cont);

var a3 = new window.mapleque.arrow();
a3.set({x: 100, y: 300}, {x: 150, y: 150});
a3.paint(cont);

var a4 = new window.mapleque.arrow();
a4.set({x: 350, y: 150}, {x: 150, y: 250});
a4.setPara({ arrow_size: 0.5, arrow_sharp: 0.5 });
a4.paint(cont);
</script>
</body>
</html>
使用上有兩點要注意:Math.atan 的算法在垂直線(dx 為 0)時會得到無限大而失真,若要更嚴謹建議改用 Math.atan2(dy, dx);另外元件掛在 window.mapleque 命名空間下並以 IIFE 隔離,避免污染全域,這個習慣值得保持。
- 上一篇文章: PHP 讀取 SQLite 資料庫入門實例
- 下一篇文章: JavaScript 取得元素偏移量的四個屬性