JavaScript 公共腳本庫系列(一):跨瀏覽器彈出層腳本
編輯:關於JavaScript
一、摘要
本系列文章的目標,是把通用且跨瀏覽器的腳本方法抽象出來。這一篇講解彈出浮動層的 JavaScript 函式,包含原理說明與使用注意事項。
二、效果預覽
用腳本彈出浮動層是最常用的技巧之一:
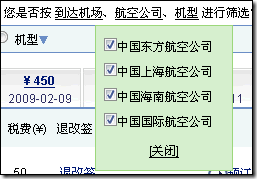
點擊圖中的「航空公司」後,會在其下方彈出浮動層。
網路上的彈出框腳本多如牛毛,各家 JS 框架也都有現成方案。但其中有些過於簡陋,只粗略實現了彈出效果,忽略了靈活性、通用性與跨瀏覽器特性;而為了這麼一個小功能引入整套框架,又殺雞用了牛刀。整理了一些資料後,我寫出了下面 ScriptHelper 的彈出層方法,主要特點是:
- 支援多瀏覽器
- 以物件導向方式封裝
- 使用簡單、通用性強
- 把位置計算等邏輯抽成獨立函式,每個方法都能單獨呼叫,方便依專案需求二次開發
三、腳本方法
/* ==================== ScriptHelper 開始 ==================== */
/* scriptHelper 腳本幫助物件
   主要方法:
   getScroll():       取得滑動距離,相容 XHTML
   getClient():       取得瀏覽器顯示區域尺寸,相容 XHTML
   showDivCommon():   顯示圖層
   closeDivCommon():  隱藏圖層
*/
function scriptHelper() {
}

// 取得滑動距離 scrollTop 與 scrollLeft
scriptHelper.prototype.getScroll = function () {
    var scrollTop = 0, scrollLeft = 0;
    scrollTop = (document.body.scrollTop > document.documentElement.scrollTop)
        ? document.body.scrollTop : document.documentElement.scrollTop;
    if (isNaN(scrollTop) || scrollTop < 0) { scrollTop = 0; }
    scrollLeft = (document.body.scrollLeft > document.documentElement.scrollLeft)
        ? document.body.scrollLeft : document.documentElement.scrollLeft;
    if (isNaN(scrollLeft) || scrollLeft < 0) { scrollLeft = 0; }
    return { scrollTop: scrollTop, scrollLeft: scrollLeft };
}

// 取得瀏覽器當前顯示區域尺寸
scriptHelper.prototype.getClient = function () {
    var isXhtml = true;
    if (document.documentElement == null
     || document.documentElement.clientHeight <= 0) {
        if (document.body.clientHeight > 0) {
            isXhtml = false;
        }
    }
    this.clientHeight = isXhtml
        ? document.documentElement.clientHeight : document.body.clientHeight;
    this.clientWidth = isXhtml
        ? document.documentElement.clientWidth : document.body.clientWidth;
    return { clientHeight: this.clientHeight, clientWidth: this.clientWidth };
}

// 顯示圖層,再次呼叫則隱藏
/* 參數說明:
   sObj        : 事件源物件
   divId       : 圖層 ID
   sObjHeight  : 事件源高度,預設 20。需手動傳入是因為事件源可能是各種
                 HTML 元素,部分元素的高度無法跨瀏覽器通用計算
   moveLeft    : 額外向左位移量,預設 0
   divObjHeight: 彈出層高度。若傳入大於 0 的值,當事件源下方空間不足時
                 會改在上方彈出;不傳則一律在下方彈出
*/
scriptHelper.prototype.showDivCommon = function (sObj, divId, sObjHeight, moveLeft, divObjHeight) {
    // 取消冒泡
    if (typeof (window) != 'undefined' && window != null && window.event != null) {
        window.event.cancelBubble = true;
    } else if (ScriptHelper.showDivCommon.caller.arguments[0] != null) {
        ScriptHelper.showDivCommon.caller.arguments[0].cancelBubble = true;
    }
    // 參數預設值
    if (moveLeft == null) { moveLeft = 0; }
    if (sObjHeight == null) { sObjHeight = 20; }
    if (divObjHeight == null) { divObjHeight = 0; }

    var divObj = document.getElementById(divId);
    var sObjOffsetTop = 0, sObjOffsetLeft = 0;
    var myClient = this.getClient();
    var myScroll = this.getScroll();
    var sWidth = sObj.width;
    var sHeight = sObjHeight;
    var bottomSpace;

    if (sWidth == null) {
        sWidth = 100;        // 無法取得則視為 100
    } else {
        sWidth = sWidth + 1; // 留 1px 間距
    }

    if (divObj.style.display.toLowerCase() != "none") {
        divObj.style.display = "none";   // 已顯示則收合
    } else {
        if (sObj == null) {
            alert("事件源物件為 null");
            return false;
        }
        // 累加 offset 取得事件源的絕對座標
        var tempObj = sObj;
        while (tempObj && tempObj.tagName.toUpperCase() != "BODY") {
            sObjOffsetTop  += tempObj.offsetTop;
            sObjOffsetLeft += tempObj.offsetLeft;
            tempObj = tempObj.offsetParent;
        }
        tempObj = null;

        // 距離視窗底部的剩餘空間
        bottomSpace = parseInt(myClient.clientHeight)
                    - (parseInt(sObjOffsetTop) - parseInt(myScroll.scrollTop))
                    - parseInt(sHeight);

        // 下方不足且上方足夠則向上彈出
        if (divObjHeight > 0 && bottomSpace < divObjHeight
         && sObjOffsetTop > divObjHeight) {
            divObj.style.top = (parseInt(sObjOffsetTop) - parseInt(divObjHeight) - 10) + "px";
        } else {
            divObj.style.top = (parseInt(sObjOffsetTop) + parseInt(sHeight)) + "px";
        }
        divObj.style.left = (parseInt(sObjOffsetLeft) - parseInt(moveLeft)) + "px";
        divObj.style.display = "block";
    }
}

// 關閉圖層
scriptHelper.prototype.closeDivCommon = function (divId) {
    var divObj = document.getElementById(divId);
    if (divObj != null) {
        divObj.style.display = "none";
    }
}

// 建立全域實例
var ScriptHelper = new scriptHelper();
/* ==================== ScriptHelper 結束 ==================== */
四、使用舉例
這個例子是一個菜單,點擊後顯示子菜單圖層。
1. 引用腳本
<script src="ScriptHelper.js" type="text/javascript" defer="defer"></script>
2. 撰寫子菜單
<!-- Sub Menu 1 -->
<div id="subMenu1" style="position:absolute; display:none; background-color:#D7EFCD;
     border:solid 1px #000000; margin:0px; padding:5px; height:100px;">
    <div>1-1</div>
    <div>1-2</div>
</div>
<!-- Sub Menu 2 -->
<div id="subMenu2" style="position:absolute; display:none; background-color:#D7EFCD;
     border:solid 1px #000000; padding:5px;">
    <div>2-1</div>
    <div>2-2</div>
</div>
子菜單最重要的兩個樣式:position:absolute 讓圖層能精確定位;display:none 讓它在載入時不顯示。
3. 撰寫主菜單
<!-- Main Menu -->
<div>
    <a class="cursorHand" onclick="ScriptHelper.showDivCommon(this,'subMenu1', 20, 0, 100)">Menu1</a>
    <a class="cursorHand" onclick="ScriptHelper.showDivCommon(this,'subMenu2', 20, 0)">Menu2</a>
    <a class="cursorHand" href="#">NoSubMenu</a>
</div>
因為 a 元素沒有 href,預設滑鼠移上去不會變成手型,需補一段樣式:
<style type="text/css">
.cursorHand { cursor: pointer; }
</style>
最關鍵的是 onclick。五個參數的意義依序是:this(事件源,用於計算位置)、圖層 Id、向下偏移量(一般取事件源高度,預設 20px)、向左偏移量(預設 0)、以及彈出層高度(傳入後才可能向上彈出,不傳則一律向下)。
4. 完整範例
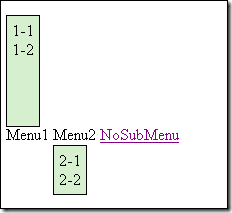
<!DOCTYPE html PUBLIC "-//W3C//DTD XHTML 1.0 Transitional//EN"
  "https://www.w3.org/TR/xhtml1/DTD/xhtml1-transitional.dtd">
<html xmlns="https://www.w3.org/1999/xhtml">
<head>
<title>ScriptHelper 測試頁面</title>
<script src="ScriptHelper.js" type="text/javascript" defer="defer"></script>
<style type="text/css">
.cursorHand { cursor: pointer; }
</style>
</head>
<body style="position:relative;">
<div style="height:200px;"></div>

<!-- Main Menu -->
<div>
    <a class="cursorHand" onclick="ScriptHelper.showDivCommon(this,'subMenu1', 20, 0, 100)">Menu1</a>
    <a class="cursorHand" onclick="ScriptHelper.showDivCommon(this,'subMenu2', 20, 0)">Menu2</a>
    <a class="cursorHand" href="#">NoSubMenu</a>
</div>

<!-- Sub Menu 1 -->
<div id="subMenu1" style="position:absolute; display:none; background-color:#D7EFCD;
     border:solid 1px #000000; margin:0px; padding:5px; height:100px;">
    <div>1-1</div>
    <div>1-2</div>
</div>

<!-- Sub Menu 2 -->
<div id="subMenu2" style="position:absolute; display:none; background-color:#D7EFCD;
     border:solid 1px #000000; padding:5px;">
    <div>2-1</div>
    <div>2-2</div>
</div>
</body>
</html>
五、注意事項
- Body 需加上 position:relative:
<body style="position:relative;">。不加的話在 IE6 下有時無法精準定位事件源,例如在菜單 div 裡多塞幾個 <br/>,彈出位置就會跑掉。若加了仍有偏移,請在事件源的容器元素上也加上同樣樣式。 - 不傳最後一個參數時,彈出層只會出現在事件源下方;傳入後才會計算底部剩餘空間,空間不足且上方足夠時改為向上彈出。
- 頁面務必加上 DOCTYPE,否則部分瀏覽器可能進入 quirks mode 而導致計算錯誤。
六、總結
跨瀏覽器相容向來是件令人頭疼的事。本來只想寫個腳本分析,結果寫作過程中又發現幾個 bug 順手修掉,兼容來兼容去差點把自己也兼容暈了。這也說明一件事:如果專案條件允許,直接採用成熟的腳本庫會是更好的選擇。本系列只是希望打造一個輕量級的腳本類庫,使用中遇到任何問題都歡迎交流。
- 上一篇文章: Easy.Ajax 源碼解析:支援檔案上傳並相容主流瀏覽器
- 下一篇文章: 輸入密碼時即時提示大寫鎖定是否開啟
相關文章
-
原生 JS 與 jQuery 的透明度設定:filter 與 opacity 的跨瀏覽器處理與淡入淡出實作 IE 與 Mozilla 的 XML DOM 差異,以及跨瀏覽器封裝方案 AJAX 與瀏覽器模型:常用 DOM 操作技巧 Ajax 案例研究:Gmail 如何做到跨瀏覽器的非同步呼叫 微軟推出 AJAX 工具包 Atlas,強調跨瀏覽器 XMLHTTP 完全指南:方法、屬性、跨瀏覽器封裝與實戰技巧 12 個經典的 Lightbox 彈出層方案比較:從 Thickbox 到 LITBox 翻譯:使用 XMLHttpRequest 物件(2006.1 版) 使用 XMLHttpRequest 物件的完整指南 無法建立 XMLHTTP 控制項的成因與解決方案