詳解微信小程序開發之下拉刷新 上拉加載
編輯:關於JavaScript
微信小程序中的下拉刷新,上拉加載的功能很常見,目前我知道的有兩種可行的方法,一是scroll-view,二是整個頁面刷新.今天說說第一種,自己造輪子,難免有些瑕疵,日後慢慢完善.
上gif:
原理: scroll-view中有監聽滑動的方法,這個跟Android類似.其中用到了滑動到頂部,滑動到底部的方法.
1.下拉刷新,在滑動到頂部時,bindscrolltoupper被調用,根據自己的業務邏輯請求即可.我的demo只是隨機換了個關鍵字.
2.上拉加載,在滑動到底部時,bindscrolltolower被調用,我這裡是頁數加一,根據自己的業務邏輯修改,然後將獲取到的集合添加到scroll-view的數據集合裡即可.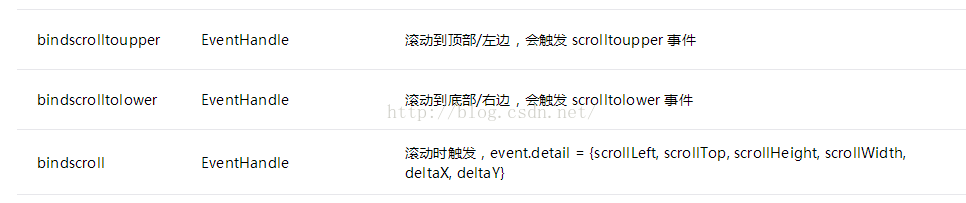
上代碼:
1.index.js
//index.js
//獲取應用實例
var app = getApp()
Page({
 data: {
 words: [],
 windowHeight: 0,//獲取屏幕高度
 refreshHeight: 0,//獲取高度
 refreshing: false,//是否在刷新中
 refreshAnimation: {}, //加載更多旋轉動畫數據
 clientY: 0,//觸摸時Y軸坐標
 },
 onLoad: function () {
 var _this = this;
 //獲取屏幕高度
 wxgetSystemInfo({
  success: function (res) {
  _thissetData({
   windowHeight: reswindowHeight
  })
  consolelog("屏幕高度: " + reswindowHeight)
  }
 })
 //獲取words
 wxrequest({
  url: 'http://apiavatardatacn/ChengYu/Search?key=77f072d28eb141c8b6dda145ca364b92&keyWord=好',
  complete: function (res) {
  if (resdatareason == 'Succes') {
   _thissetData({
   words: resdataresult
   })
  }
  }
 })
 },
 scroll: function () {
 consolelog("滑動了")
 },
 lower: function () {
 var start = 0;
 start += 1;
 consolelog("加載了")
 var _this = this;
 wxrequest({
  url: 'http://apiavatardatacn/ChengYu/Search',
  data: {
  key: '77f072d28eb141c8b6dda145ca364b92', keyWord: '好', page: start
  },
  complete: function (res) {
  if (resdatareason == 'Succes') {
   var words = _thisdatawordsconcat(resdataresult);
   _thissetData({
   words: words
   })
  }
  }
 })
 },
 upper: function () {
 consolelog("下拉了")
 //獲取用戶Y軸下拉的位移

 if (thisdatarefreshing) return;
 thissetData({ refreshing: true });
 updateRefreshIconcall(this);
 var _this = this;
 var i = Mathrandom() //獲得0-1的隨機數
 i = Mathceil(i * 10) //乘以10並向上去整
 var words = ['龍', '一', '萬', '千', '浩', '金', '得', '而', '可', '人'];
 var word = words[i];
 wxrequest({
  url: 'http://apiavatardatacn/ChengYu/Search?key=77f072d28eb141c8b6dda145ca364b92&keyWord=' + word,

  complete: function (res) {
  if (resdatareason == 'Succes') {
   setTimeout(function () {
   _thissetData({
    words: resdataresult
   })
   }, 2000)
  }
  setTimeout(function () {
   _thissetData({
   refreshing: false
   })
  }, 2500)
  }
 })
 },
 start: function (e) {
 var startPoint = etouches[0]
 var clientY = startPointclientY;
 thissetData({
  clientY: clientY,
  refreshHeight: 0
 })
 },
 end: function (e) {
 var endPoint = echangedTouches[0]
 var y = (endPointclientY - thisdataclientY) * 6;
 if (y > 50) {
  y = 50;
 }
 thissetData({
  refreshHeight: y
 })
 },
 move: function (e) {
 consolelog("下拉滑動了")
 }
})

/**
 * 旋轉上拉加載圖標
 */
function updateRefreshIcon() {
 var deg = 0;
 var _this = this;
 consolelog('旋轉開始了')
 var animation = wxcreateAnimation({
 duration: 1000
 });

 var timer = setInterval(function () {
 if (!_thisdatarefreshing)
  clearInterval(timer);
 animationrotateZ(deg)step();//在Z軸旋轉一個deg角度
 deg += 360;
 _thissetData({
  refreshAnimation: animationexport()
 })
 }, 1000);
}
2.index.wxml
<!--indexwxml-->
 <view class="refresh-block" style="height: {{refreshHeight}}px;" wx:if="{{refreshing}}">
 <image animation="{{refreshAnimation}}" src="/images/refreshpng"></image>
 </view>
<scroll-view scroll-y="true" style="height: {{windowHeight}}px;" bindscroll="scroll" bindscrolltolower="lower" bindscrolltoupper="upper"
catchtouchmove="move" catchtouchstart="start" catchtouchend="end"
>
<block wx:for="{{words}}">
  <view class="item-style">{{itemname}}</view>
</block>
</scroll-view>
3.index.wxss
/**indexwxss**/
item-style{
 padding: 30rpx;
 font-size: 40rpx;
 text-align: center;
 border-top: 2rpx solid #eee;
}
refresh-block {
 padding: 15px;
 text-align: center
}
refresh-block image {
 width: 30px;
 height: 30px;
}
demo:下載地址
以上就是本文的全部內容,希望對大家的學習有所幫助,也希望大家多多支持。
小編推薦
熱門推薦