做完錄音那個練習後,我在想小程序的影片播放能不能也玩出花樣,結果發現微信的 video 元件自帶彈幕。那就來試試。

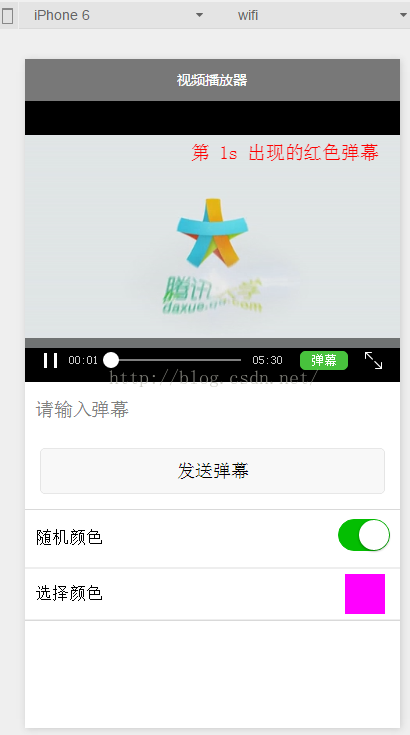
先看畫面。首先是播放器:
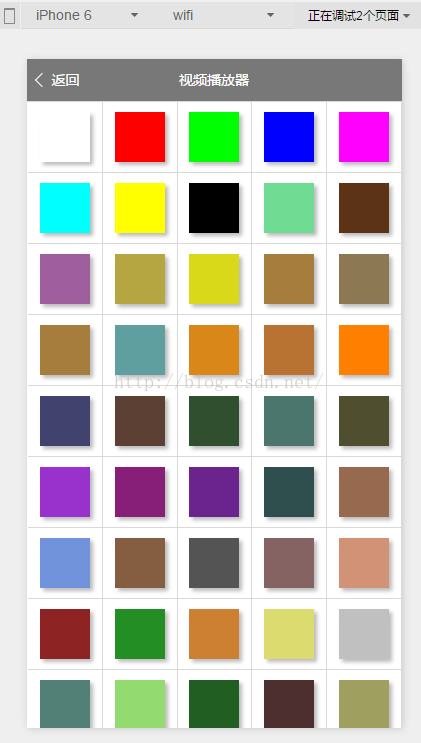
接著選彈幕顏色:
然後彈幕就飄過去了:

video 元件的彈幕設定
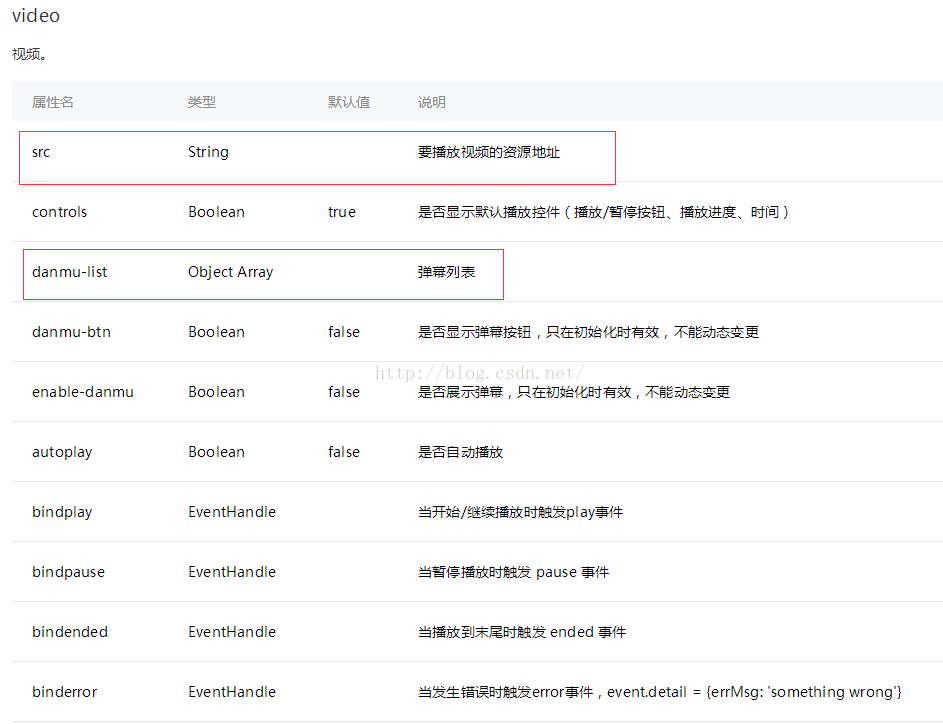
微信封裝得相當完整,這裡只用到幾個屬性。看到 danmu-list 這個屬性時有點意外——只要把彈幕物件塞進陣列就行。
彈幕列表的元素結構:
 {
  text: '第 1s 出現的紅色彈幕', // 文本
  color: '#ff0000',           // 顏色
  time: 1                     // 出現時間(秒)
}
顏色自定義
從上面的結構可以看出,官方給的自定義空間很有限:文字、時間、顏色。也就是說能玩出花樣的只剩顏色。
於是我做了一份常用顏色清單,算是把「自定義彈幕顏色」這件事補完。
index.wxml
 <!--index.wxml-->
<view class="section tc">
  <video id="myVideo"
    style="height:{{videoHeight}}px;width:{{videoWidth}}px"
    src="https://wxsnsdy.tc.qq.com/105/20210/snsdyvideodownload?filekey=..."
    binderror="videoErrorCallback"
    danmu-list="{{danmuList}}"
    enable-danmu danmu-btn controls></video>

  <view class="btn-area">
    <view class="weui-cell weui-cell_input">
      <view class="weui-cell__bd">
        <input class="weui-input" placeholder="請輸入彈幕" bindblur="bindInputBlur" />
      </view>
    </view>
    <button style="margin:30rpx;" bindtap="bindSendDanmu">發送彈幕</button>
  </view>
</view>

<view class="weui-cells weui-cells_after-title">
  <view class="weui-cell weui-cell_switch">
    <view class="weui-cell__bd">隨機顏色</view>
    <view class="weui-cell__ft">
      <switch checked bindchange="switchChange" />
    </view>
  </view>
  <view class="colorstyle" bindtap="selectColor">
    <text>選擇顏色</text>
    <view style="height:80rpx;width:80rpx;line-height:100rpx;margin:10rpx;background-color:{{numberColor}}"></view>
  </view>
</view>
index.wxss
(這段是從別的專案複製過來的 weui 樣式,就不多解釋了)
 /**index.wxss**/
.weui-cells {
  position: relative; margin-top: 1.17647059em;
  background-color: #FFFFFF; line-height: 1.41176471; font-size: 17px;
}
.weui-cells:before {
  content: " "; position: absolute; left: 0; top: 0; right: 0; height: 1px;
  border-top: 1rpx solid #D9D9D9; color: #D9D9D9;
}
.weui-cells:after {
  content: " "; position: absolute; left: 0; bottom: 0; right: 0; height: 1px;
  border-bottom: 1rpx solid #D9D9D9; color: #D9D9D9;
}
.weui-cells_after-title { margin-top: 0; }
.weui-cell__bd { -webkit-box-flex: 1; -webkit-flex: 1; flex: 1; }
.weui-cell__ft { text-align: right; color: #999999; }
.weui-cell {
  padding: 10px 10px; position: relative; display: flex; align-items: center;
}
.weui-cell:before {
  content: " "; position: absolute; top: 0; right: 0; left: 15px; height: 1px;
  border-top: 1rpx solid #D9D9D9; color: #D9D9D9;
}
.weui-cell:first-child:before { display: none; }
.colorstyle {
  border-top: 2px solid #eee; border-bottom: 2px solid #eee;
  padding-left: 10px; padding-right: 10px;
  font-size: 17px; line-height: 100rpx;
  display: flex; flex-direction: row; justify-content: space-between;
}
index.js
幾個重點:enable-danmu 與 danmu-btn 必須加在 video 標籤上;發送彈幕要用 createVideoContext() 取得的 videoContext 呼叫 sendDanmu();video 元件的預設尺寸是 300×225,要自適應得自己按比例算高度。
 //index.js
function getRandomColor() {
  let rgb = []
  for (let i = 0; i < 3; ++i) {
    let color = Math.floor(Math.random() * 256).toString(16)
    color = color.length == 1 ? '0' + color : color
    rgb.push(color)
  }
  return '#' + rgb.join('')
}

Page({
  data: {
    isRandomColor: true,
    src: '',
    numberColor: "#ff0000",
    danmuList: [
      { text: '第 1s 出現的紅色彈幕', color: '#ff0000', time: 1 },
      { text: '第 2s 出現的綠色彈幕', color: '#00ff00', time: 2 }
    ]
  },
  onLoad: function () {
    var _this = this;
    wx.getSystemInfo({
      success: function (res) {
        var windowWidth = res.windowWidth;
        // video 預設 300x225,需自行按比例換算高度
        var videoHeight = (225 / 300) * windowWidth
        _this.setData({ videoWidth: windowWidth, videoHeight: videoHeight })
      }
    })
  },
  onReady: function (res) {
    this.videoContext = wx.createVideoContext('myVideo')
  },
  onShow: function () {
    var _this = this;
    wx.getStorage({
      key: 'numberColor',
      success: function (res) {
        _this.setData({ numberColor: res.data })
      }
    })
  },
  inputValue: '',
  bindInputBlur: function (e) { this.inputValue = e.detail.value },
  bindSendDanmu: function () {
    var color = this.data.isRandomColor ? getRandomColor() : this.data.numberColor;
    this.videoContext.sendDanmu({ text: this.inputValue, color: color })
  },
  videoErrorCallback: function (e) {
    console.log('視頻錯誤信息:')
    console.log(e.detail.errMsg)
  },
  selectColor: function () {
    wx.navigateTo({ url: '../selectColor/selectColor' })
  },
  switchChange: function (e) {
    this.setData({ isRandomColor: e.detail.value })
  }
})
selectColor.wxml
 <!--selectColor.wxml-->
<view class="page">
  <view class="page__bd">
    <view class="weui-grids">
      <block wx:for-items="{{color}}">
        <view class="weui-grid" data-number="{{item.number}}" bindtap="selectColor">
          <view class="weui-grid__icon" style="background:{{item.number}}"/>
        </view>
      </block>
    </view>
  </view>
</view>
selectColor.js
這裡維護一份色票表,點選後用 wx.setStorageSync 存起來,再 navigateBack 回上一頁;上一頁在 onShow 時讀回來套用。用 storage 而非事件傳遞的好處是:即使小程序被背景凍結再恢復,顏色選擇也不會遺失。
 //selectColor.js
var app = getApp()
Page({
  data: {
    color: [
      { key: 1,  color: ' 白色 ',      number: '#FFFFFF' },
      { key: 2,  color: ' 紅色 ',      number: '#FF0000' },
      { key: 3,  color: ' 綠色 ',      number: '#00FF00' },
      { key: 4,  color: ' 藍色 ',      number: '#0000FF' },
      { key: 5,  color: ' 牡丹紅 ',    number: '#FF00FF' },
      { key: 6,  color: ' 青色 ',      number: '#00FFFF' },
      { key: 7,  color: ' 黃色 ',      number: '#FFFF00' },
      { key: 8,  color: ' 黑色 ',      number: '#000000' },
      { key: 9,  color: ' 海藍 ',      number: '#70DB93' },
      { key: 10, color: ' 巧克力色 ',  number: '#5C3317' },
      { key: 11, color: ' 藍紫色 ',    number: '#9F5F9F' },
      { key: 12, color: ' 黃銅色 ',    number: '#B5A642' },
      { key: 13, color: ' 亮金色 ',    number: '#D9D919' },
      { key: 14, color: ' 棕色 ',      number: '#A67D3D' },
      { key: 15, color: ' 青銅色 ',    number: '#8C7853' },
      { key: 20, color: ' 珊瑚紅 ',    number: '#FF7F00' },
      { key: 26, color: ' 深蘭花色 ',  number: '#9932CD' },
      { key: 40, color: ' 鮮黃色 ',    number: '#DBDB70' },
      { key: 41, color: ' 灰色 ',      number: '#C0C0C0' },
      { key: 81, color: ' 橙色 ',      number: '#FF7F00' }
    ]
  },
  onLoad: function () { },
  selectColor: function (e) {
    var number = e.currentTarget.dataset.number;
    try { wx.setStorageSync('numberColor', number) } catch (e) { }
    wx.navigateBack({ delta: 1 })
  }
})
(原始範例的色票有 80 多筆,這裡節錄部分,其餘同構。)
selectColor.wxss
 /**selectColor.wxss**/
.weui-grids {
  border-top: 1rpx solid #D9D9D9;
  border-left: 1rpx solid #D9D9D9;
}
.weui-grid {
  position: relative; float: left;
  padding: 20rpx 20rpx; width: 20%;
  box-sizing: border-box;
  border-right: 1rpx solid #D9D9D9;
  border-bottom: 1rpx solid #D9D9D9;
}
.weui-grid_active { background-color: #ccc; }
.weui-grid__icon {
  display: block; width: 100rpx; height: 100rpx; margin: 0 auto;
  box-shadow: 3px 3px 5px #bbb;
}
.weui-grid__label {
  margin-top: 5px; display: block; text-align: center;
  color: #000000; font-size: 14px;
  white-space: nowrap; text-overflow: ellipsis; overflow: hidden;
}
幾個實作提醒
sendDanmu 只能在 video 已初始化後呼叫。所以 createVideoContext() 放在 onReady 而不是 onLoad,這是範例中刻意安排的位置。
彈幕內容要過濾。使用者輸入直接送進彈幕,別忘了限制長度並濾掉空白字串,否則很容易出現「發送了但什麼都沒看到」的困惑。
wx.getSystemInfo 已列為不建議使用。新專案請改用 wx.getWindowInfo() 取得尺寸、wx.getDeviceInfo() 取得裝置資訊,並用藍牙等能力時搭配 canIUse 做版本判斷。
video 元件是原生元件。在小程序早期版本中原生元件層級最高,會蓋在任何普通元素之上,這也是為什麼彈幕相關的彈層設計要特別小心。後續版本已支援同層渲染,但仍有部分差異,涉及覆蓋效果時建議實機驗證。
- 上一篇文章: 深入 JavaScript 的屬性與特性:數據屬性、訪問器屬性與描述符
- 下一篇文章: 用 iframe 做一個走動但頁面不閃的時鐘