一、Vuex 是什麼
Vuex 是專為 Vue.js 設計的狀態管理模式,用集中式儲存管理所有元件的狀態,並以一套規則保證狀態以可預測的方式變化,特別適合中大型單頁應用。
先從一個最小例子理解「狀態管理模式」
<!DOCTYPE html>
<html>
<head>
<meta charset="utf-8">
<title>Vuex Demo 01</title>
<script src="https://cdn.bootcss.com/vue/1.0.26/vue.min.js"></script>
<script src="https://cdn.bootcss.com/vuex/0.8.2/vuex.min.js"></script>
</head>
<body>
<!-- view:映射到視圖的資料 counterValue -->
<h3>Count is {{ counterValue }}</h3>
<div>
  <button @click="increment">Increment +1</button>
  <button @click="decrement">Decrement -1</button>
</div>
<script>
var app = new Vue({
  el: 'body',
  store: new Vuex.Store({
    // state:驅動應用的資料源
    state: { count: 0 },
    mutations: {
      INCREMENT: function (state, amount) { state.count = state.count + amount },
      DECREMENT: function (state, amount) { state.count = state.count - amount }
    }
  }),
  vuex: {
    getters: {
      counterValue: function (state) { return state.count }
    },
    // actions:響應 view 上使用者輸入導致的狀態變化
    actions: {
      increment: function ({ dispatch, state }) { dispatch('INCREMENT', 1) },
      decrement: function ({ dispatch, state }) { dispatch('DECREMENT', 1) }
    }
  }
})
</script>
</body>
</html>
三個角色很清楚:state 是資料源,view 是映射到畫面的 counterValue,actions 負責響應使用者的操作。單向的資料流讓狀態變化完全可控。

中大型應用幾乎都會遇到兩個場景:多個視圖依賴同一份狀態,以及來自不同視圖的行為需要修改同一份狀態。解法就是把共享狀態抽出來,用全域單例管理,並明確定義各種概念、強制遵守規則——這正是 Vuex 背後的基本思想,它借鑑了 Flux、Redux 與 The Elm Architecture,但因為是為 Vue 而生,得以利用 Vue 細粒度的資料響應機制做高效更新。

五個核心概念
1)State:單一狀態樹,用一個物件包含全部應用層級狀態,作為唯一資料源(SSOT),每個應用只有一個 store 實例。
2)Getters:store 中的計算屬性。
3)Mutations:類似事件,每個 mutation 有字串型別與回呼函式,回呼收到的第一個參數就是 state,是唯一能改狀態的地方。
4)Actions:與 mutation 相似,但提交的是 mutation 而非直接改狀態,且可包含任意異步操作。
5)Modules:把龐大的 store 按職能切開,每個模組擁有自己的 state、mutation、action、getter,甚至可嵌套子模組。
接下來就靠實作把這些概念串起來。
二、環境建置
用 vue-cli 起專案:
vue init webpack vue-notes-demo
cd vue-notes-demo
npm install      // 安裝相依套件
npm run dev      // 啟動開發伺服器


啟動成功後畫面如下:

預設目錄結構:
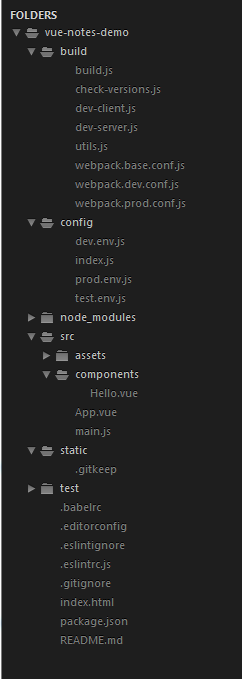
三、功能盤點
先看成品的樣子:

要做的功能只有三項:新增計劃(新增後編輯區顯示空白的計劃內容)、移除計劃(刪除後列表少一筆)、統計所有計劃的總時長。
四、目錄與元件劃分
調整後的目錄結構:

元件部分
首頁 Home.vue 只負責導引:
<template>
<div class="jumbotron">
  <h1>我的備忘錄</h1>
  <p><strong><router-link to="/time-entries">創建一個計劃</router-link></strong></p>
</div>
</template>
側邊的總時長 Sidebar.vue,直接從 store 讀值:
<template>
<div class="panel panel-default">
  <div class="panel-heading">
    <h3 class="text-center">所有計劃的總時長: {{ time }} 小時</h3>
  </div>
</div>
</template>
<script>
export default {
  computed: {
    time() { return this.$store.state.totalTime }
  }
}
</script>
計劃列表 TimeEntries.vue 負責渲染與刪除:
<template>
<div>
  <router-link v-if="$route.path !== '/time-entries/log-time'"
               to="/time-entries/log-time" class="btn create-plan">創建</router-link>
  <router-view></router-view>
  <div class="time-entries">
    <p v-if="!plans.length"><strong>還沒有任何計劃,快去創建吧</strong></p>
    <div class="list-group">
      <a class="list-group-item" v-for="(plan,index) in plans">
        <div class="row">
          <div class="col-sm-2 user-details">
            <img :src="plan.avatar" class="avatar img-circle img-responsive" />
            <p class="text-center"><strong>{{ plan.name }}</strong></p>
          </div>
          <div class="col-sm-2 text-center time-block">
            <p class="total-time">計劃總時間:{{ plan.totalTime }}</p>
            <p class="label label-primary text-center">開始時間:{{ plan.date }}</p>
          </div>
          <div class="col-sm-7 comment-section"><p>備註信息:{{ plan.comment }}</p></div>
          <button class="btn btn-xs delete-button" @click="deletePlan(index)">X</button>
        </div>
      </a>
    </div>
  </div>
</div>
</template>
<script>
export default {
  name: 'TimeEntries',
  computed: {
    plans () { return this.$store.state.list }
  },
  methods: {
    deletePlan(idx) {
      // 先扣掉總時間,再刪除該筆
      this.$store.dispatch('decTotalTime', this.plans[idx].totalTime)
      this.$store.dispatch('deletePlan', idx)
    }
  }
}
</script>
新增表單 LogTime.vue 使用 v-model 收集輸入,送出時觸發兩個 action:
<template>
<div class="form-horizontal">
  <div class="form-group">
    <div class="col-sm-6">
      <label>開始日期:</label>
      <input type="date" class="form-control" v-model="date" placeholder="Date" />
    </div>
    <div class="col-sm-6">
      <label>總時間 :</label>
      <input type="number" class="form-control" v-model="totalTime" placeholder="Hours" />
    </div>
  </div>
  <div class="form-group">
    <div class="col-sm-12">
      <label>備註 :</label>
      <input type="text" class="form-control" v-model="comment" placeholder="Comment" />
    </div>
  </div>
  <button class="btn btn-primary" @click="save()">保存</button>
  <router-link to="/time-entries" class="btn btn-danger">取消</router-link>
</div>
</template>
<script>
export default {
  name: 'LogTime',
  data() {
    return { date: '', totalTime: '', comment: '' }
  },
  methods: {
    save() {
      const plan = {
        name: 'eraser',
        image: 'https://pic.cnblogs.com/avatar/504457/20161108225210.png',
        date: this.date,
        totalTime: this.totalTime,
        comment: this.comment
      };
      this.$store.dispatch('savePlan', plan)
      this.$store.dispatch('addTotalTime', this.totalTime)
      this.$router.go(-1)
    }
  }
}
</script>
Vuex 部分
先初始化 store,這裡只 new 了一次 Vuex.Store,符合單一狀態樹的要求:
import Vue from 'vue'
import Vuex from 'vuex'
import mutations from './mutations'
import actions from './actions'
Vue.use(Vuex);

const state = {
  totalTime: 0,
  list: []
};

export default new Vuex.Store({ state, mutations, actions })
actions.js 只負責觸發事件並帶入參數:
import * as types from './mutation-types'
export default {
  addTotalTime({ commit }, time) { commit(types.ADD_TOTAL_TIME, time) },
  decTotalTime({ commit }, time) { commit(types.DEC_TOTAL_TIME, time) },
  savePlan({ commit }, plan) { commit(types.SAVE_PLAN, plan) },
  deletePlan({ commit }, plan) { commit(types.DELETE_PLAN, plan) }
};
實務上常用 ES2015 的參數解構簡化,特別是 commit 出現很多次時:
actions: {
  increment ({ commit }) {
    commit('increment')
  }
}
mutations.js 才是真正改狀態的地方:
import * as types from './mutation-types'
export default {
  [types.ADD_TOTAL_TIME] (state, time) {
    state.totalTime = state.totalTime + time
  },
  [types.DEC_TOTAL_TIME] (state, time) {
    state.totalTime = state.totalTime - time
  },
  [types.SAVE_PLAN] (state, plan) {
    // 先給預設值,之後接上登入就能直接讀使用者暱稱與頭像
    const avatar = 'https://pic.cnblogs.com/avatar/504457/20161108225210.png';
    state.list.push(Object.assign({ name: 'eraser', avatar: avatar }, plan))
  },
  [types.DELETE_PLAN] (state, idx) {
    state.list.splice(idx, 1);
  }
};
用常數取代 mutation 事件名稱是各個 Flux 實作的常見手法,好處是 linter 能發揮作用,而集中放在單一檔案也讓團隊對所有 mutation 一目了然:
// mutation-types.js
export const SOME_MUTATION = 'SOME_MUTATION'

mutations: {
  // 用 ES2015 的計算屬性命名,把常數當成方法名
  [SOME_MUTATION] (state) {
    // mutate state
  }
}
本專案用到的四個事件名:
export const ADD_TOTAL_TIME = 'ADD_TOTAL_TIME';
export const DEC_TOTAL_TIME = 'DEC_TOTAL_TIME';
export const SAVE_PLAN = 'SAVE_PLAN';
export const DELETE_PLAN = 'DELETE_PLAN';
入口與初始化
index.html 很單純,只留一個掛載點:
<!DOCTYPE html>
<html>
<head><meta charset="utf-8"><title>vue-notes-demo</title></head>
<body>
<div id="app"><router-view></router-view></div>
</body>
</html>
main.js 註冊外掛、設定路由,並把 store 掛到根實例:
import Vue from 'vue';
import App from './App';
import Home from './components/Home';
import TimeEntries from './components/TimeEntries.vue'
import VueRouter from 'vue-router';
import VueResource from 'vue-resource';
import store from './vuex/index';

Vue.use(VueResource);
Vue.use(VueRouter);

const routes = [
  { path: '/home', component: Home },
  {
    path: '/time-entries',
    component: TimeEntries,
    children: [{
      path: 'log-time',
      // 懶加載
      component: resolve => require(['./components/LogTime.vue'], resolve),
    }]
  },
  { path: '*', component: Home }
]
const router = new VueRouter({ routes });

const app = new Vue({
  router,
  store,
  ...App,     // 等同 render: h => h(App)
}).$mount('#app');
根元件 App.vue 負責整體骨架與 Sidebar 的掛載,樣式則用傳統 CSS 手刻(導覽列、卡片、按鈕等):
<template>
<div id="wrapper">
  <nav class="navbar navbar-default">
    <div class="container">
      <a class="navbar-brand" href="#"><i class="glyphicon glyphicon-time"></i> 備忘錄 </a>
      <ul class="nav navbar-nav">
        <li><router-link to="/home">首頁</router-link></li>
        <li><router-link to="/time-entries">計劃列表</router-link></li>
      </ul>
    </div>
  </nav>
  <div class="container">
    <div class="col-sm-9"><router-view></router-view></div>
    <div class="col-sm-3"><sidebar></sidebar></div>
  </div>
</div>
</template>
<script>
import Sidebar from './components/Sidebar.vue'
export default {
  components: { 'sidebar': Sidebar },
}
</script>
樣式部分(節錄關鍵幾段):
.navbar { height: 60px; line-height: 60px; background: #333; }
.navbar-brand { display: inline-block; width: 100px; text-align: center; font-size: 28px; color: #fff; }
.col-sm-9 { float: right; width: 700px; min-height: 200px; background: #ffcccc; padding: 60px; }
.create-plan { font-size: 26px; color: #fff; width: 100px; text-align: center;
  height: 40px; line-height: 40px; background: #99cc99; }
.btn-primary { width: 80px; text-align: center; background: #99cc99;
  border-radius: 4px; border: none; color: #fff; }
.delete-button { position: absolute; top: 10px; right: 10px; }
.panel-default { position: absolute; top: 140px; right: 60px; }
做到這裡,整個流程就跑通了:元件只負責觸發 action,action 提交 mutation,mutation 改 state,畫面自動更新。這正是 Vuex 想推廣的心智模型。原理層面仍有細節值得深挖,但作為第一個 Vuex 2 實作,這個備忘錄已經足夠把五個核心概念走過一遍。
源碼與延伸參考:vue2.0 構建單頁應用最佳實戰、vuex2.0 官方文件,以及〈關於 Vue.js 2.0 的 Vuex 2.0 你需要更新的知識庫〉。
以上就是本文的全部內容,希望對大家的學習有所幫助。