本文一步一步示範如何用 Vue.js 搭配 Vuex,做出一個專門用來收藏微信公眾號的應用。
專案地址:https://github.com/jrainlau/wechat-subscriptor
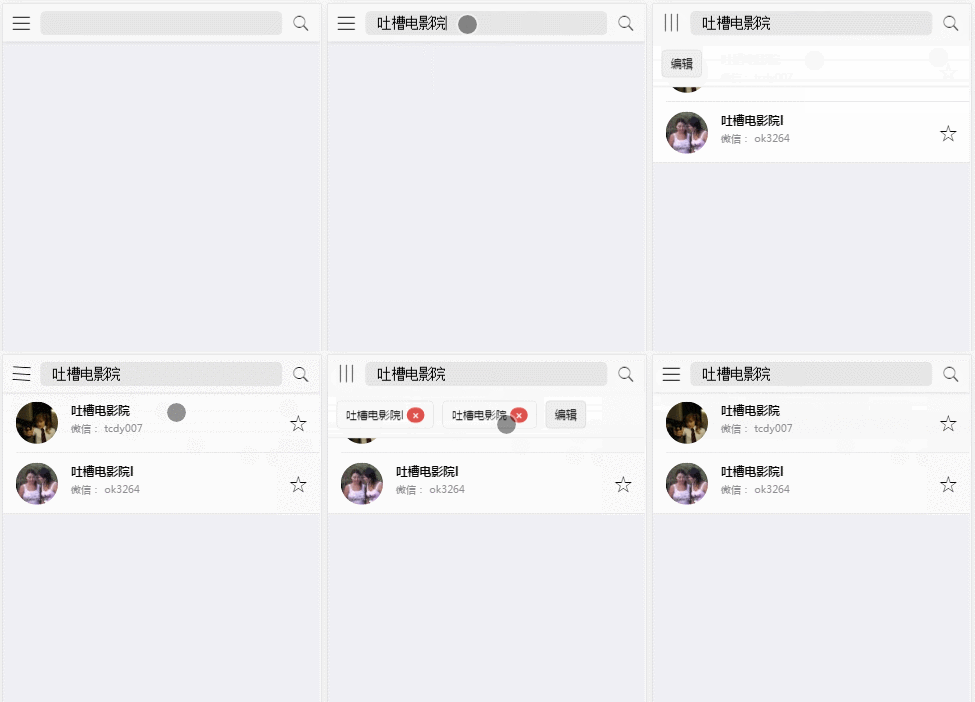
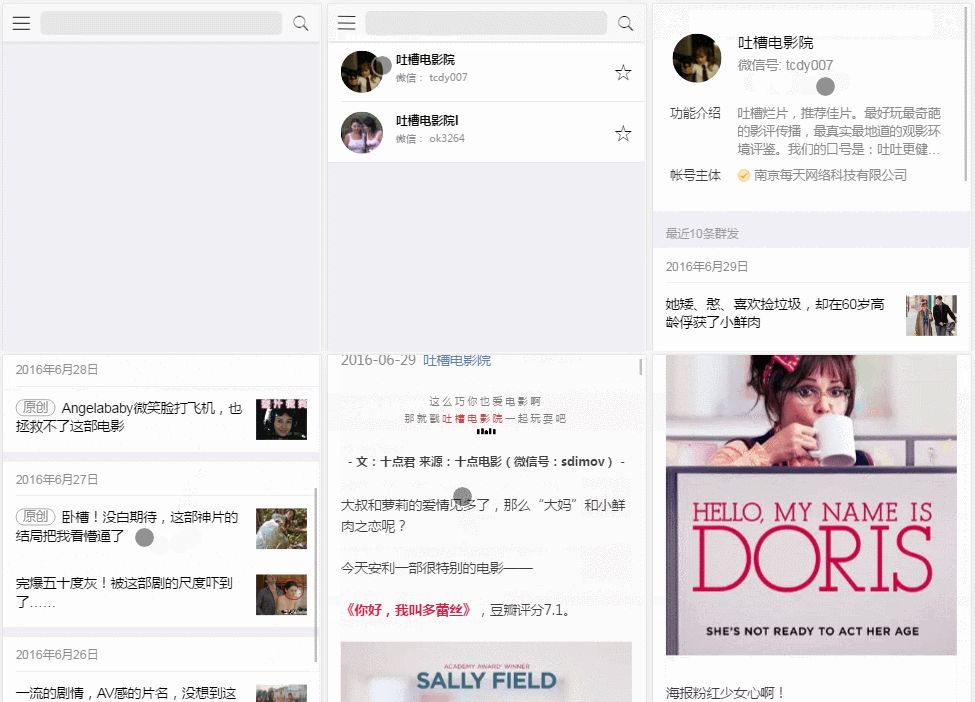
下載與執行
git clone git@github.com:jrainlau/wechat-subscriptor.git
cd wechat-subscriptor && npm install
npm run dev                    # 以開發模式啟動
cd backend-server && node crawler.js   # 啟動爬蟲服務

# 在瀏覽器開啟 localhost:8080
為什麼要做這個專案
我在微信上追了不少公眾號,也常翻閱裡頭的內容。但閱讀的時候總被各種訊息打斷,得切出去回覆,再一路點回公眾號、重新打開文章,來回折騰,實在麻煩。
後來想到微信與搜狗有合作,可以透過搜狗直接檢索公眾號。那不如就用這個資源做一個收藏公眾號的應用:搜尋到喜歡的公眾號就存起來,想看的時候直接開啟。想法不複雜,於是從架構開始構思。
整體架構
先看架構圖:
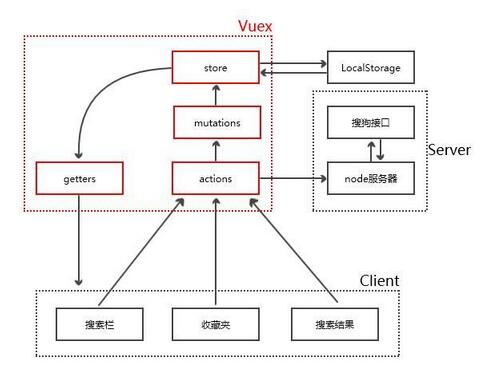
技術選型如下:
- 以搜狗的介面作為查詢公眾號的資料來源。
- 由於存在跨域限制,改由 Node 寫一個爬蟲服務代理請求。
- 前端使用 Vue 開發,Vuex 負責狀態管理。
- UI 採用 mui,方便日後打包成手機 App。
- 用 vue-cli 初始化專案,並以 webpack 建置。
先分析架構圖紅框中的 Vuex 部分,它是整個 App 的核心,也是所有資料的處理中心。
客戶端所有元件都在 action 中完成流入資料的處理(例如非同步請求),再由 action 觸發 mutation 去修改 state,state 經過 getter 分發給各元件。這符合「單向資料流」的特性,也正是官方推薦的做法:
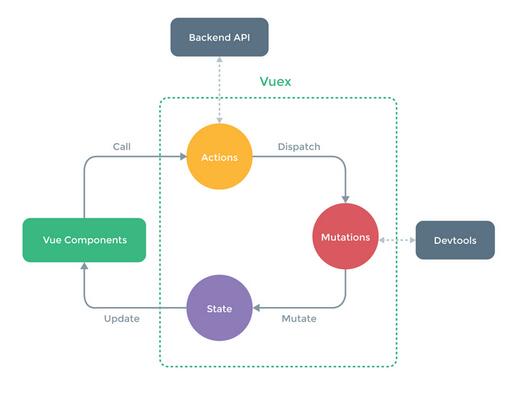
理解 Vuex 之後,其餘部分就順理成章了。箭頭代表資料流向:LocalStorage 負責保存收藏夾內容,讓下次開啟時資料不會遺失;Node 服務器負責依關鍵字抓取搜狗提供的資料。
初始化專案
npm install vue-cli -g
vue init webpack wechat-subscriptor
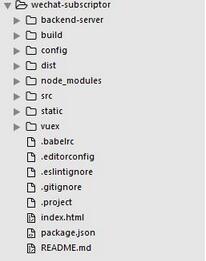
依提示逐步設定並安裝相依套件,進入專案目錄稍作調整後,最終結構如下:
服務器與爬蟲
進入 /backend-server,新增 crawler-server.js:
/*** crawler-server.js ***/
'use strict'

const http = require('http')
const url = require('url')
const superagent = require('superagent')
const cheerio = require('cheerio')

const onRequest = (req, res) => {
  // 簡單的 CORS 設定
  res.writeHead(200, {
    'Content-Type': 'text/plain; charset=utf-8',
    'Access-Control-Allow-Origin': '*'
  })

  // 從 query string 取出關鍵字
  const keyWord = encodeURI(url.parse(req.url, true).query.query)

  if (!keyWord) return res.end()

  const resultArr = []

  superagent
    .get('https://weixin.sogou.com/weixin?type=1&query=' + keyWord + '&ie=utf8')
    .end((err, response) => {
      if (err) {
        console.log(err)
        return res.end()
      }

      const $ = cheerio.load(response.text)

      $('.mt7 .wx-rb').each((index, item) => {
        const resultObj = {
          title: $(item).find('h3').text(),
          wxNum: $(item).find('label').text(),
          link:  $(item).attr('href'),
          pic:   $(item).find('img').attr('src')
        }
        resultArr.push(resultObj)
      })

      res.write(JSON.stringify(resultArr))
      res.end()
    })
}

http.createServer(onRequest).listen(process.env.PORT || 8090)
console.log('Server Start!')
這是一個相當樸素的爬蟲:接收客戶端傳來的關鍵字,向搜狗發出請求,再用 cheerio 解析回傳的 HTML 取出需要的欄位。搜狗的公眾號搜尋入口在 https://weixin.sogou.com/,你可以自己試試。服務啟動後,只要帶上參數請求 localhost:8090 就能取得資料。
用 Vuex 做狀態管理
官方文件:https://vuex.vuejs.org/en/index.html。建議直接讀英文版,內容比較完整。
進入 /vuex 資料夾,建立核心的 store.js:
/*** store.js ***/
import Vue from 'vue'
import Vuex from 'vuex'

Vue.use(Vuex)

const state = {
  collectItems: [],
  searchResult: {}
}

// 從 localStorage 還原收藏清單
const cached = localStorage.getItem('collectItems')
if (cached) {
  state.collectItems = cached.split(',')
}

const mutations = {
  SET_RESULT (state, result) {
    state.searchResult = result
  },
  COLLECT_IT (state, name) {
    state.collectItems.push(name)
    localStorage.setItem('collectItems', state.collectItems)
  },
  DELETE_COLLECTION (state, name) {
    state.collectItems.splice(state.collectItems.indexOf(name), 1)
    localStorage.setItem('collectItems', state.collectItems)
  }
}

export default new Vuex.Store({ state, mutations })
幾個重點:
我們先定義 state 物件,其中兩個屬性分別對應收藏夾內容與搜尋結果。整個 App 的資料都存在這裡,隨取隨用。
接著定義 mutations,可以理解為「用來改變 state 的一連串方法」。在 Vuex 的設計裡,state 只能透過 mutation 修改,這樣做的好處是狀態變化被集中管理,可追蹤、可除錯,而不是把資料亂丟在各個元件裡。
三個 mutation 的職責分別是:
SET_RESULT:把搜尋結果寫入 state
COLLECT_IT:加入收藏夾(同時同步 localStorage)
DELETE_COLLECTION:從收藏夾移除(同時同步 localStorage)
元件端的資料處理
App 共有兩個元件:SearchBar.vue 與 SearchResult.vue,分別對應搜尋區塊與結果區塊。由於收藏夾併入了搜尋元件,也可以說是三部分。
搜尋元件 SearchBar.vue
/*** SearchBar.vue ***/
vuex: {
  getters: {
    collectItem (state) {
      return state.collectItems
    }
  },
  actions: {
    deleteCollection: ({ dispatch }, name) => {
      dispatch('DELETE_COLLECTION', name)
    },
    searchFun: ({ dispatch }, keyword) => {
      $.get('https://localhost:8090', { query: keyword }, (data) => {
        dispatch('SET_RESULT', JSON.parse(data))
      })
    }
  }
}
getters 負責取出 store 中的資料供元件使用;actions 的兩個方法則把資料分發到 store,交給 mutation 處理。
官方範例裡向 action 傳參的寫法看起來有點繁瑣,其實完全可以先用 methods 整理參數,在觸發 action 時一併帶入。
結果元件 SearchResult.vue
/*** SearchResult.vue ***/
vuex: {
  getters: {
    wordValue (state) {
      return state.keyword
    },
    collectItems (state) {
      return state.collectItems
    },
    searchResult (state) {
      return state.searchResult
    }
  },
  actions: {
    collectIt: ({ dispatch }, name, collectArr) => {
      for (const item of collectArr) {
        if (item === name) return false   // 避免重複收藏
      }
      dispatch('COLLECT_IT', name)
    }
  }
}
結果元件以展示為主,唯一需要觸發 action 的地方就是加入收藏。這裡刻意用 for...of 先檢查一次,避免同一個公眾號被重複加入。
打包與收尾
核心邏輯分析完畢,這個 App 本質上就是這樣。UI 部分不多贅述,看專案原始碼或者自己動手改都可以。若要打包成手機 App,下載 HBuilder 直接打包即可,搭配 mui 效果會更完整。
最後提醒兩件事:搜狗提供的介面能力很強,但不要請求得太頻繁,否則 IP 會被限制——我的就已經被擋掉了。另外,如果你在意長期維護,值得留意搜狗並未提供公開 API,這類非官方介面隨時可能變動或收緊,正式專案最好做好降級方案。
Weex 當時已經問世,可以用來構建 Native 應用。有興趣的話,後續也可以把這個專案改寫成 Weex 版本試試。