圖片裁剪是後台系統裡的高頻需求,頭像上傳、商品主圖、海報切圖幾乎都繞不開它。本文記錄我用原生 JavaScript 完整實現一遍裁剪元件的思路與代碼,不依賴任何第三方庫。
先明確要做成什麼樣
最終交付的元件需要具備這麼幾個能力:
- 在圖片上按住鼠標拖曳,直接畫出裁剪框;
- 裁剪框生成後可以繼續拖動位置、拖動八個控制點調整大小;
- 點擊遮罩空白處可取消當前裁剪;
- 點擊「確定」按鈕,把裁剪區域的坐標與尺寸回傳給後續邏輯。
技術路線的取捨
實現拖拽效果的思路大致有兩條:一是使用 HTML5 新增的 drag、drop 系列拖拽事件;二是沿用傳統的 mousedown、mousemove、mouseup 鼠標事件組合。前者語義清晰,但主要面向「元素之間搬運數據」的場景,用來做像素級的框選反而束手束腳。因此這裡選擇第二種方案,自己掌控每一次鼠標移動。
裁剪框是怎麼「長」出來的
裁剪框的本質是一個絕對定位的 div,它的寬高直接由鼠標的位移量決定:鼠標往哪個方向移動了多少,框就往那個方向長多少。
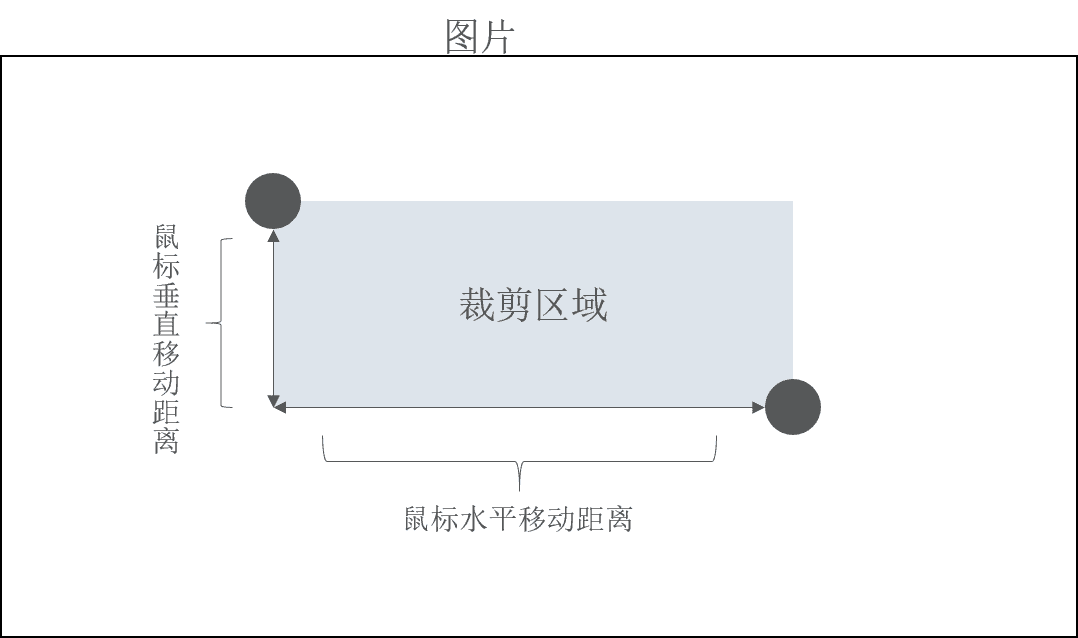
如上圖,鼠標的橫向位移構成寬度,縱向位移構成高度。具體數值怎麼取?在 mousedown 觸發時,通過 event 對象記錄下起始坐標;後續 mousemove 每次觸發再取一次坐標,兩次差值就是位移量。鼠標坐標可以通過 clientX 與 clientY 獲得。
遮罩層的繪製
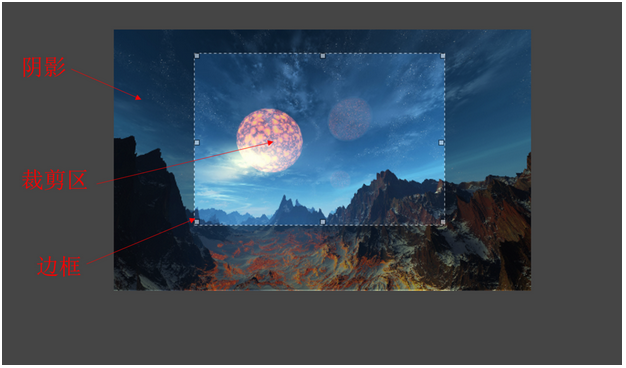
裁剪框以外的區域需要壓暗,這樣用戶才能看清保留範圍。這部分並非必須,但對體驗提升明顯。我把遮罩拆成上、下、左、右四塊 div,分別定位:
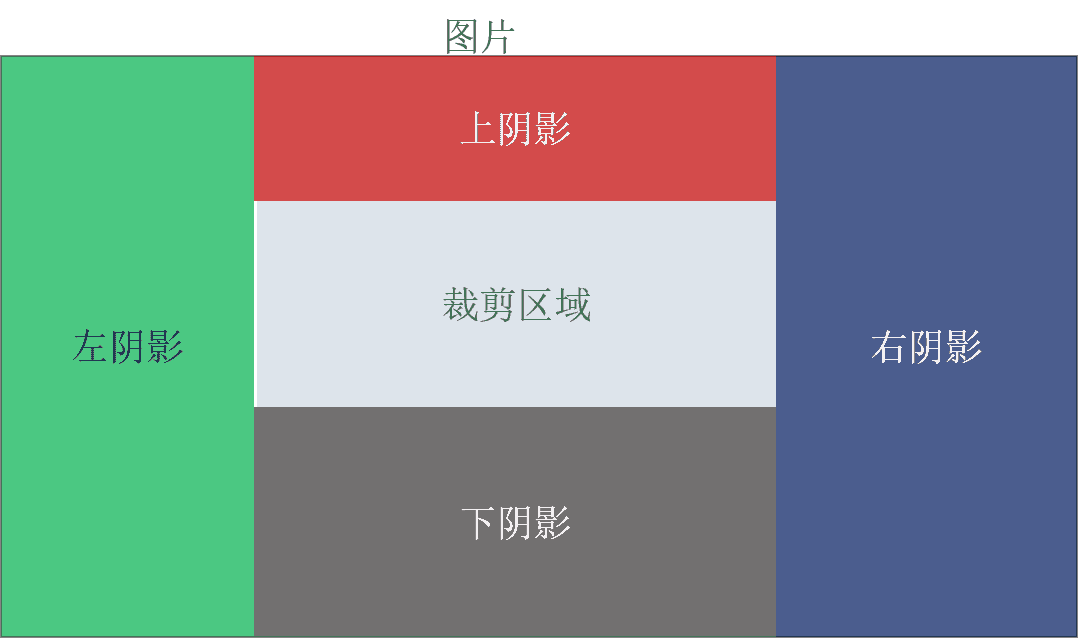
計算方式並不複雜,核心是偏移量的加減:裁剪框的左偏移減去圖片的左偏移,得到左遮罩寬度;裁剪框的上偏移減去圖片的上偏移,得到上遮罩高度。左、上兩塊確定之後,右、下兩塊用總尺寸減去已知部分即可推出。
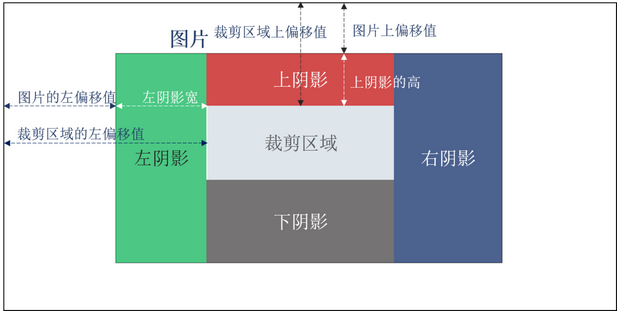
取偏移值的兩種方式
獲取元素位置有兩條路,各有短板:
- 使用
offsetLeft/offsetTop。缺點是元素一旦帶有 border、margin,這些值會被一并算進去。 - 讀取 computed style 中的 left / top。缺點是依賴樣式預定義,如果 CSS 裡根本沒寫 left、top,就拿不到值。
實戰中要根據具體布局靈活挑選,或者在兩者之間做兼容處理。
越界問題的兩種情形
因為裁剪框尺寸完全由鼠標位移推算,鼠標一旦跑出圖片範圍,框自然就超界了。這種情況又要細分為兩類。
情形一:繪製過程中越界
拖曳時鼠標衝出了圖片邊界:
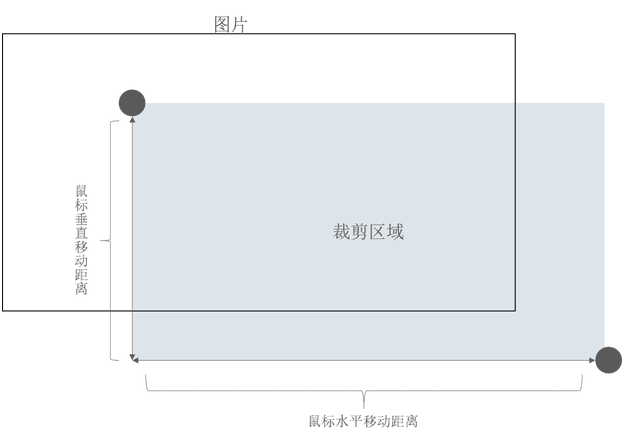
處理辦法是實時比較:裁剪框右側相對於視窗左側的位置,不能超過圖片右側相對於視窗左側的位置;裁剪框底部同理不能超過圖片底部。一旦越界,就把位移量強制改成一個安全值。
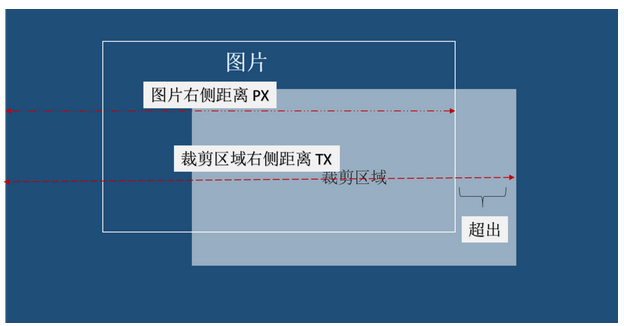
當 TX >= PX 時,令 TX 等於圖片右邊界:
TX = oTailor.offsetWidth + oTailor.offsetLeft;
PX = oPicture.offsetWidth + oPicture.offsetLeft;
左側、上側、下側越界同理判斷,不再贅述。
情形二:移動裁剪框時越界
框已經畫好,接著拖動它移動時也可能跑出圖片。這個判斷和常規的 DOM 拖拽限制一致:比對鼠標位移與圖片可用範圍即可,不需要額外插圖說明。
動手前的準備工作
頁面結構
磨刀不誤砍柴工,先把骨架搭好。關鍵結構如下:
<img src="./images/img_2.jpg" alt="">
<div class="img_box">
  <div class="box_border1"></div>
  <div class="box_border2"></div>
  <div class="box_border3"></div>
  <div class="box_border4"></div>
  <div class="box_handle" id="box_1"></div>
  <div class="box_handle" id="box_2"></div>
  <div class="box_handle" id="box_3"></div>
  <div class="box_handle" id="box_4"></div>
  <div class="box_handle" id="box_5"></div>
  <div class="box_handle" id="box_6"></div>
  <div class="box_handle" id="box_7"></div>
  <div class="box_handle" id="box_8"></div>
</div>
<!-- 左 --><div class="outer"></div>
<!-- 上 --><div class="outer"></div>
<!-- 右 --><div class="outer"></div>
<!-- 下 --><div class="outer"></div>
<button class="confirm">確定</button>
其中 img_box 是裁剪框本體,四個 box_border 是走馬燈效果的邊框,八個 box_handle 是四角與四邊中點的控制點,outer 則是四塊遮罩。
樣式
* { padding:0; margin:0; }
body { background: #454545; }
.main { width: 500px; margin:50px auto; }
.main img { width: 500px; position: absolute; left: 450px; top: 50px; }
.img_box { overflow: hidden; position: absolute; top:0px; left: 0px; z-index: 2; }
.outer { overflow: hidden; background: #000; opacity: 0.4; position: absolute; top:0px; left: 0px; z-index: 0; }
.box_border1, .box_border2, .box_border3, .box_border4 { opacity: 0.5; }
.box_border1 { background: url(./images/border-anim-v.gif) repeat-y left top; }
.box_border2 { background: url(./images/border-anim-h.gif) repeat-x left top; }
.box_border3 { background: url(./images/border-anim-v.gif) repeat-y right top; }
.box_border4 { background: url(./images/border-anim-h.gif) repeat-x right bottom; }
.box_handle { background: #fff; border: 1px solid #000; opacity: 0.5; }
.confirm { width: 80px; height: 35px; }
三個通用工具函數
整個元件裡要反覆取元素、取樣式、寫樣式,先把這些動作封裝起來能省不少力氣。
第一個是仿 jQuery 的選擇器:
/* 仿 Jquery 的 Dom 獲取 */
function $(dom) {
  function getDom(dom) {
    var str = dom.charAt(0);
    switch (str) {
      case '.':
        this.ele = document.getElementsByClassName(dom.substring(1)) || null;
        break;
      case '#':
        this.ele = document.getElementById(dom.substring(1)) || null;
        break;
      default:
        if (document.getElementsByTagName(dom).length) {
          this.ele = document.getElementsByTagName(dom);
        } else if (document.getElementsByName(dom).length) {
          this.ele = document.getElementsByName(dom);
        } else {
          this.ele = null;
        }
    }
    return this;
  }
  getDom.prototype.get = function (num) {
    return this.ele[num] || this.ele;
  };
  getDom.prototype.insert = function (value, num) {
    this.ele[num].innerHTML = value;
  };
  return new getDom(dom);
}
第二個是跨瀏覽器的樣式讀取,IE 走 currentStyle,其餘瀏覽器走 getComputedStyle:
/* Css 獲取 */
function getCss(o, key) {
  return o.currentStyle ? o.currentStyle[key] : document.defaultView.getComputedStyle(o, false)[key];
}
第三個是樣式賦值的語法糖:
/**
 * 賦值函數
 * @param obj    被賦值對象
 * @param option 操作類型
 * @param value  賦值內容
 */
function setAssign(obj, option, value) {
  switch (option) {
    case 'width':    obj.style.width = value; break;
    case 'height':   obj.style.height = value; break;
    case 'top':      obj.style.top = value; break;
    case 'left':     obj.style.left = value; break;
    case 'position': obj.style.position = value; break;
    case 'cursor':   obj.style.cursor = value; break;
  }
}
第一步:畫出裁剪框
在圖片上掛 mousedown,在 document 上掛 mousemove 與 mouseup。之所以把移動監聽掛在 document 上,是為了保證鼠標移出圖片後仍能持續響應。
// 鼠標點擊圖片觸發
oPicture.onmousedown = function (ev) {
  var oEvent = ev || window.event;
  // 記錄初始鼠標位置
  var tempX = oEvent.clientX;
  var tempY = oEvent.clientY;
  // 把裁剪框的起點對齊到鼠標
  oTailor.style.left = oEvent.clientX + 'px';
  oTailor.style.top = oEvent.clientY + 'px';

  document.onmousemove = function (ev) {
    var oEvent = ev || window.event;
    // 當前位置減去起始位置 = 位移量
    var sLeft = oEvent.clientX - tempX;
    var sTop = oEvent.clientY - tempY;

    // 裁剪越界限制:只需處理右側與下側
    if ((oTailor.offsetLeft + oTailor.offsetWidth) >= (oPicture.offsetLeft + oPicture.offsetWidth)) {
      sLeft = oPicture.offsetLeft + oPicture.offsetWidth - oTailor.offsetLeft;
    }
    if ((oTailor.offsetTop + oTailor.offsetHeight) >= (oPicture.offsetTop + oPicture.offsetHeight)) {
      sTop = oPicture.offsetTop + oPicture.offsetHeight - oTailor.offsetTop;
    }

    // 繪製裁剪框
    oTailor.style.width = sLeft + 'px';
    oTailor.style.height = sTop + 'px';
    oTailor.style.display = 'block';

    // 顯示遮罩
    for (var i = 0; i < oShadow.length; i++) {
      oShadow[i].style.display = 'block';
    }
    shadow(oPicture, oTailor, oShadow);
    tailorBorder(oDiv, oHandle, oTailor);

    oEvent.preventDefault();
  };

  document.onmouseup = function (ev) {
    var oEvent = ev || window.event;
    document.onmousemove = null;
    oEvent.preventDefault();
  };
  oEvent.preventDefault();
}
第二步:繪製四塊遮罩
/**
 * @param oPicture 圖片 dom
 * @param oTailor  裁剪框 dom
 * @param oShadow  遮罩 dom 集合
 */
function shadow(oPicture, oTailor, oShadow) {
  // 左側
  setAssign(oShadow[0], 'width', (parseInt(getCss(oTailor, 'left')) - parseInt(getCss(oPicture, 'left'))) + 'px');
  setAssign(oShadow[0], 'height', parseInt(getCss(oPicture, 'height')) + 'px');
  setAssign(oShadow[0], 'left', parseInt(getCss(oPicture, 'left')) + 'px');
  setAssign(oShadow[0], 'top', parseInt(getCss(oPicture, 'top')) + 'px');

  // 右側
  setAssign(oShadow[2], 'width', (parseInt(getCss(oPicture, 'width')) - parseInt(getCss(oTailor, 'width')) - parseInt(getCss(oShadow[0], 'width'))) + 'px');
  setAssign(oShadow[2], 'height', parseInt(getCss(oPicture, 'height')) + 'px');
  setAssign(oShadow[2], 'left', (parseInt(getCss(oTailor, 'left')) + parseInt(getCss(oTailor, 'width'))) + 'px');
  setAssign(oShadow[2], 'top', parseInt(getCss(oPicture, 'top')) + 'px');

  // 上側
  setAssign(oShadow[1], 'width', parseInt(getCss(oTailor, 'width')) + 'px');
  setAssign(oShadow[1], 'height', (parseInt(getCss(oTailor, 'top')) - parseInt(getCss(oPicture, 'top'))) + 'px');
  setAssign(oShadow[1], 'left', (parseInt(getCss(oPicture, 'left')) + parseInt(getCss(oShadow[0], 'width'))) + 'px');
  setAssign(oShadow[1], 'top', parseInt(getCss(oPicture, 'top')) + 'px');

  // 下側
  setAssign(oShadow[3], 'width', parseInt(getCss(oTailor, 'width')) + 'px');
  setAssign(oShadow[3], 'height', (parseInt(getCss(oPicture, 'height')) - parseInt(getCss(oTailor, 'height')) - parseInt(getCss(oShadow[1], 'height'))) + 'px');
  setAssign(oShadow[3], 'left', (parseInt(getCss(oPicture, 'left')) + parseInt(getCss(oShadow[0], 'width'))) + 'px');
  setAssign(oShadow[3], 'top', (parseInt(getCss(oTailor, 'top')) + parseInt(getCss(oTailor, 'height'))) + 'px');
}
這裡有個坑要提醒:如果實際項目中圖片的 CSS 沒有顯式聲明 left 或 top,上面這段代碼會取到 NaN 而報錯。此時應改用 offsetLeft / offsetTop。
第三步:邊框與八個控制點
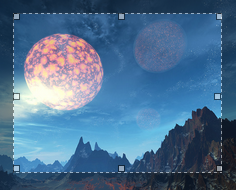
四角與四邊的小方塊不只是為了美觀,它們同時是後續縮放的抓取熱區。布局中 class 為 box_handle 的 div 前四個對應四角,後四個對應四邊中點,均按順時針排列。
/**
 * 裁剪邊框繪制
 * @param oDiv    所有邊框對象
 * @param oHandle 控制點
 * @param oTailor 裁剪框
 */
function tailorBorder(oDiv, oHandle, oTailor) {
  for (var i = 0; i < oDiv.length; i++) {
    setAssign(oDiv[i], 'position', 'absolute');
    setAssign(oDiv[i], 'top', '0px');
    setAssign(oDiv[i], 'left', '0px');
    setAssign(oDiv[i], 'width', parseInt(getCss(oTailor, 'width')) + 'px');
    setAssign(oDiv[i], 'height', parseInt(getCss(oTailor, 'height')) + 'px');
  }

  // 四角控制點
  for (var i = 0; i < 4; i++) {
    setAssign(oHandle[i], 'position', 'absolute');
    setAssign(oHandle[i], 'width', '5px');
    setAssign(oHandle[i], 'height', '5px');
    if (i % 2 == 0) {
      // 左側兩個
      setAssign(oHandle[i], 'left', '0px');
      setAssign(oHandle[i], 'top', (i == 0 ? '0px' : (parseInt(getCss(oTailor, 'height')) - 8) + 'px'));
    } else {
      // 右側兩個
      setAssign(oHandle[i], 'left', (parseInt(getCss(oTailor, 'width')) - 6) + 'px');
      setAssign(oHandle[i], 'top', (i == 1 ? '0px' : parseInt(getCss(oTailor, 'height')) - 8) + 'px');
    }
  }

  // 四邊中點控制點
  for (var i = 4; i < oHandle.length; i++) {
    setAssign(oHandle[i], 'position', 'absolute');
    setAssign(oHandle[i], 'width', '5px');
    setAssign(oHandle[i], 'height', '5px');
    if (i % 2 == 0) {
      // 上、下
      setAssign(oHandle[i], 'left', parseInt(getCss(oTailor, 'width')) / 2 + 'px');
      setAssign(oHandle[i], 'top', (i == 4 ? '0px' : (parseInt(getCss(oTailor, 'height')) - 8) + 'px'));
    } else {
      // 左、右
      setAssign(oHandle[i], 'top', parseInt(getCss(oTailor, 'height')) / 2 + 'px');
      setAssign(oHandle[i], 'left', (i == 5 ? '0px' : parseInt(getCss(oTailor, 'width')) - 8) + 'px');
    }
  }
}
第四步:點擊遮罩取消裁剪
// 點擊遮罩區域時,重置裁剪框與遮罩
for (var i = 0; i < oShadow.length; i++) {
  oShadow[i].index = i;
  oShadow[i].onmousedown = function () {
    oTailor.style.display = 'none';
    oTailor.style.width = '0px';
    oTailor.style.height = '0px';
    for (var i = 0; i < oShadow.length; i++) {
      oShadow[i].style.display = 'none';
      oShadow[i].style.left = '0px';
      oShadow[i].style.top = '0px';
    }
  };
}
第五步:鼠標手勢切換
鼠標懸停在不同的控制點上時,光標形狀應該給出對應提示。控制點數量多,這裡採用事件委託掛在裁剪框上,根據 event.target 的 id 分派:
oTailor.onmousemove = function (ev) {
  var oEvent = ev || window.event;
  var oTarget = oEvent.target;
  switch (oTarget.id) {
    case 'box_1': setAssign(oTailor, 'cursor', 'nw-resize'); break; // 左上
    case 'box_2': setAssign(oTailor, 'cursor', 'ne-resize'); break; // 右上
    case 'box_3': setAssign(oTailor, 'cursor', 'sw-resize'); break; // 左下
    case 'box_4': setAssign(oTailor, 'cursor', 'se-resize'); break; // 右下
    case 'box_5': setAssign(oTailor, 'cursor', 'n-resize');  break; // 上
    case 'box_6': setAssign(oTailor, 'cursor', 'w-resize');  break; // 左
    case 'box_7': setAssign(oTailor, 'cursor', 's-resize');  break; // 下
    case 'box_8': setAssign(oTailor, 'cursor', 'e-resize');  break; // 右
    default:      setAssign(oTailor, 'cursor', 'move');      break; // 框內表示可移動
  }
}
第六步:縮放裁剪框
縮放的关键在于「往哪個方向拖」決定了要改哪幾個值。核心邏輯是先讀取光標形狀,再根據形狀增減寬高與偏移。
oTailor.onmousedown = function (ev) {
  var oEvent = ev || window.event;
  var oCur = getCss(oTailor, 'cursor'); // 讀取當前光標狀態
  var sTmpX = oEvent.clientX;
  var sTmpY = oEvent.clientY;

  // 保存裁剪框初始屬性,避免多次讀取
  oAttrs.left = getCss(oTailor, 'left');
  oAttrs.top = getCss(oTailor, 'top');
  oAttrs.width = getCss(oTailor, 'width');
  oAttrs.height = getCss(oTailor, 'height');

  document.onmousemove = function (ev) {
    var oEvent = ev || window.event;
    var sLeftT = oEvent.clientX - sTmpX;
    var sTopT = oEvent.clientY - sTmpY;
    var oTmpHeight = '';
    var oTmpTop = '';
    var oTmpWidth = '';
    var oTmpLeft = '';

    switch (oCur) {
      case 'nw-resize': // 左上
        oTmpWidth  = parseInt(oAttrs.width) - sLeftT;
        oTmpHeight = parseInt(oAttrs.height) - sTopT;
        oTmpLeft   = parseInt(oAttrs.left) + sLeftT;
        oTmpTop    = parseInt(oAttrs.top) + sTopT;
        break;
      case 'ne-resize': // 右上,只改 top
        oTmpWidth  = parseInt(oAttrs.width) + sLeftT;
        oTmpHeight = parseInt(oAttrs.height) - sTopT;
        oTmpTop    = parseInt(oAttrs.top) + sTopT;
        break;
      case 'sw-resize': // 左下,只改 left
        oTmpWidth  = parseInt(oAttrs.width) - sLeftT;
        oTmpHeight = parseInt(oAttrs.height) + sTopT;
        oTmpLeft   = parseInt(oAttrs.left) + sLeftT;
        break;
      case 'se-resize': // 右下,只改寬高
        oTmpWidth  = parseInt(oAttrs.width) + sLeftT;
        oTmpHeight = parseInt(oAttrs.height) + sTopT;
        break;
      case 'n-resize':
        oTmpHeight = parseInt(oAttrs.height) - sTopT;
        oTmpTop    = parseInt(oAttrs.top) + sTopT;
        break;
      case 'w-resize':
        oTmpWidth = parseInt(oAttrs.width) - sLeftT;
        oTmpLeft  = parseInt(oAttrs.left) + sLeftT;
        break;
      case 's-resize':
        oTmpHeight = parseInt(oAttrs.height) + sTopT;
        break;
      case 'e-resize':
        oTmpWidth = parseInt(oAttrs.width) + sLeftT;
        break;
      default: // 落在框內,執行移動
        tailorMove(oEvent, oTailor, oPicture, oShadow);
        break;
    }

    // 向上/向下拉出邊界時收斂
    if (parseInt(getCss(oTailor, 'top')) <= oPicture.offsetTop) {
      oTmpHeight = parseInt(getCss(oPicture, 'height')) - (oPicture.offsetTop + parseInt(getCss(oPicture, 'height')) - parseInt(getCss(oTailor, 'top')) - parseInt(getCss(oTailor, 'height')));
      oTmpTop = oPicture.offsetTop;
    } else if (oPicture.offsetTop + parseInt(getCss(oPicture, 'height')) <= (parseInt(getCss(oTailor, 'top')) + parseInt(getCss(oTailor, 'height')))) {
      oTmpHeight = oPicture.offsetTop + parseInt(getCss(oPicture, 'height')) - parseInt(getCss(oTailor, 'top'));
    }

    // 向左/向右拉出邊界時收斂
    if (parseInt(getCss(oTailor, 'left')) <= oPicture.offsetLeft) {
      oTmpWidth = parseInt(getCss(oPicture, 'width')) - (oPicture.offsetLeft + parseInt(getCss(oPicture, 'width')) - parseInt(getCss(oTailor, 'left')) - parseInt(getCss(oTailor, 'width')));
      oTmpLeft = oPicture.offsetLeft;
    } else if (parseInt(getCss(oTailor, 'width')) + parseInt(getCss(oTailor, 'left')) >= (oPicture.offsetLeft + oPicture.offsetWidth)) {
      oTmpWidth = oPicture.offsetLeft + oPicture.offsetWidth - parseInt(getCss(oTailor, 'left'));
    }

    if (oTmpWidth)  { setAssign(oTailor, 'width',  oTmpWidth + 'px'); }
    if (oTmpHeight) { setAssign(oTailor, 'height', oTmpHeight + 'px'); }
    if (oTmpLeft)   { setAssign(oTailor, 'left',   oTmpLeft + 'px'); }
    if (oTmpTop)    { setAssign(oTailor, 'top',    oTmpTop + 'px'); }

    shadow(oPicture, oTailor, oShadow);
    tailorBorder(oDiv, oHandle, oTailor);
  };

  document.onmouseup = function (ev) {
    var oEvent = ev || window.event;
    document.onmousemove = null;
    oEvent.preventDefault();
  };
  oEvent.preventDefault();
};
為什麼向左上拉伸要同時改 left/top
這是新手最容易踩的坑。以左上角為例,鼠標向左上移動時算出的位移是負數,所以新寬高要用原值「減去」這個負數。與此同時,裁剪框的 left、top 必須同步增加相同的量,否則視覺上會變成裁剪框往右下方向長大,而不是往左上擴展。
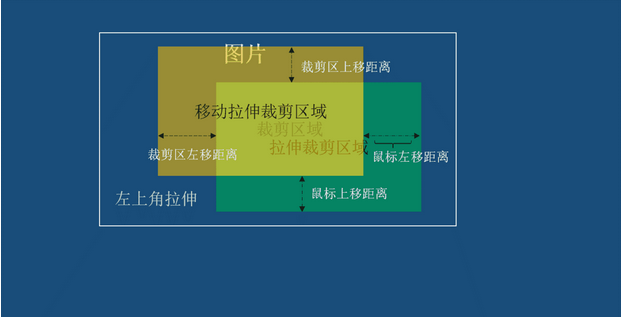
上圖中綠色部分是只改寬高、未做偏移修正的結果,黃色部分是修正後的結果,兩者重疊處正是原始裁剪框。左下角及其餘方向同理套用即可。越界判斷沿用前面講過的方法。
第七步:移動裁剪框
鼠標落在框內且光標為 move 時觸發移動。做法是先記下鼠標與框左上角之間的相對偏移,移動時用鼠標位置減去這個偏移,避免框「跳」一下。
/* 裁剪區域的移動 */
function tailorMove(ev, oTailor, oPicture, oShadow) {
  var oEvent = ev || window.event;
  var oTmpx = oEvent.clientX - oTailor.offsetLeft;
  var oTmpy = oEvent.clientY - oTailor.offsetTop;

  document.onmousemove = function (ev) {
    var oEvent = ev || window.event;
    var oLeft = oEvent.clientX - oTmpx;
    var oTop  = oEvent.clientY - oTmpy;

    if (oLeft < oPicture.offsetLeft) {
      oLeft = oPicture.offsetLeft;
    } else if (oLeft > (oPicture.offsetLeft + oPicture.offsetWidth - oTailor.offsetWidth)) {
      oLeft = oPicture.offsetLeft + oPicture.offsetWidth - oTailor.offsetWidth;
    }
    if (oTop < oPicture.offsetTop) {
      oTop = oPicture.offsetTop;
    } else if (oTop > (oPicture.offsetTop + oPicture.offsetHeight - oTailor.offsetHeight)) {
      oTop = oPicture.offsetTop + oPicture.offsetHeight - oTailor.offsetHeight;
    }

    oTailor.style.left = oLeft + 'px';
    oTailor.style.top  = oTop + 'px';
    shadow(oPicture, oTailor, oShadow);
  };
}
最後一步:把結果交出去
後端做裁剪(例如 PHP 的 GD 庫)需要的是四個值:起點 x、起點 y、寬、高。封裝一個方法返回即可:
function getEle() {
  var oPicture = $('img').get(0);
  var oTailor = $('.img_box').get(0);
  oAttrs.LeftX   = parseInt(getCss(oTailor, 'left')) - oPicture.offsetLeft;
  oAttrs.LeftY   = parseInt(getCss(oTailor, 'top'))  - oPicture.offsetTop;
  oAttrs.Twidth  = parseInt(getCss(oTailor, 'width'));
  oAttrs.Theight = parseInt(getCss(oTailor, 'height'));
  return oAttrs;
}
一個容易被忽略的細節
如果頁面上展示的圖片是被 CSS 縮放過的,那麼上面拿到的坐標和尺寸都是「顯示尺寸」,直接丟給後端會對不上原圖:原圖較大時裁出來的範圍偏小,原圖較小時反而偏大。解法是拿到原圖的真實寬高,按顯示尺寸與原始尺寸的比例做一次換算,再提交給後端。
到這裡,一個可用的裁剪元件就完成了,剩下的就是把數據通過 ajax 送到後端處理。