實作帶即時驗證的 Bootstrap 登入彈出視窗
編輯:關於JavaScript
需求拆解
做後台時常需要「訪問受保護頁面才彈出登入框」的機制。行為規格是:不需要登入時隱藏、需要時彈出、登入成功後自動收起,同時欄位要能即時檢查格式。
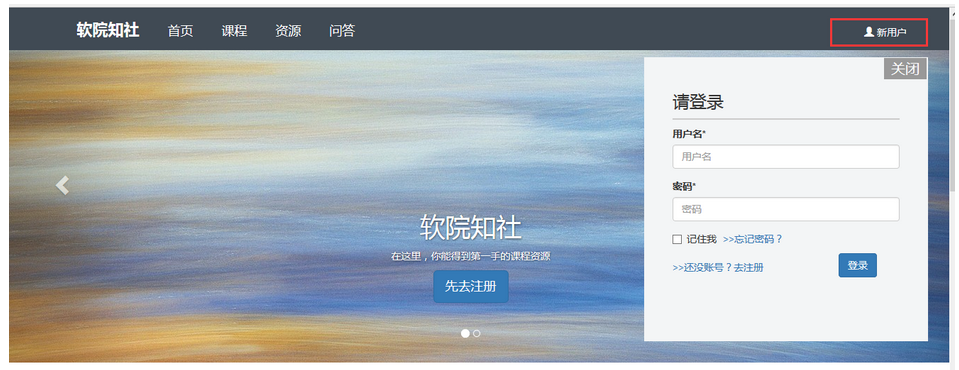
實作思路
在 body 結束標籤前放一個登入用的 div,定位方式設為 fixed(相對於視窗定位,捲動時不會跑掉),預設 display: none;觸發登入時改成 block。
核心結構
<style>
#log{ display:none; width:400px; padding:30px 40px; background-color:#F3F5F6;
      position:fixed; top:70px; right:30px; }
.error{ float:right; color:red; margin-right:10px; }
#close span{ padding:3px 10px; background:#999; color:#fff; cursor:pointer; }
</style>

<button onclick="document.getElementById('log').style.display='block'">彈出登錄框</button>

<div id="log">
  <form action="../control/logincheck.php" method="post">
    <h3>請登錄</h3>
    <div class="form-group">
      <label for="username">用戶名*</label>
      <span id="user" class="error"></span>
      <input type="text" class="form-control" id="username" onblur="checkName()" required>
    </div>
    <div class="form-group">
      <label for="password">密碼*</label>
      <span id="psword" class="error"></span>
      <input type="password" class="form-control" id="password" onblur="checkPassword()" required>
    </div>
    <input type="submit" class="btn btn-primary" value="登錄">
  </form>
  <div id="close"><span onclick="document.getElementById('log').style.display='none'">關閉</span></div>
</div>
即時驗證
var checkName = function() {
  document.getElementById("user").innerHTML = "";
  var name = document.getElementById('username').value;
  if (name.length > 20 || name.length < 1) {
    document.getElementById("user").innerHTML = "用戶名長度在 1-20 之間!";
  }
};

var checkPassword = function() {
  document.getElementById("psword").innerHTML = "";
  var pwd = document.getElementById('password').value;
  if (pwd.length > 12 || pwd.length < 6) {
    document.getElementById("psword").innerHTML = "密碼長度在 6-12 之間!";
  }
};
用 onblur 而非 onclick,是為了讓檢查在離開欄位時發生,不干擾打字過程。原範例用 eval(document.getElementById('username')) 取值,其實多此一舉——eval 對一個 already 是物件的參數只是原樣回傳,直接拿 .value 就好,而且能避免不必要的風險。
另一條路:用 AngularJS 做驗證
如果專案已導入 AngularJS,驗證與提示可以完全宣告式處理,不必寫 if:
<form ng-app="myApp" ng-controller="validateCtrl" name="myForm" novalidate>
  <p>用戶名:
    <input type="text" name="user" ng-model="user" required>
    <span style="color:red" ng-show="myForm.user.$dirty && myForm.user.$invalid">
      <span ng-show="myForm.user.$error.required">用戶名是必填的。</span>
    </span>
  </p>
  <p>郵箱:
    <input type="email" name="email" ng-model="email" required>
    <span style="color:red" ng-show="myForm.email.$dirty && myForm.email.$invalid">
      <span ng-show="myForm.email.$error.required">郵箱是必填的。</span>
      <span ng-show="myForm.email.$error.email">非法的郵箱地址。</span>
    </span>
  </p>
  <p><input type="submit" ng-disabled="myForm.user.$invalid || myForm.email.$invalid"></p>
</form>

<script>
var app = angular.module('myApp', []);
app.controller('validateCtrl', function($scope) {
  $scope.user = '';
  $scope.email = '';
});
</script>
$dirty 確保「使用者碰過才提示」,避免一打開頁面就一片紅;$invalid 則直接驅動送出按鈕的 disabled 狀態。這比手寫驗證函式少掉大量樣板程式碼,也更難出錯。
補充:別忘了後端
無論用哪種前端方案,登入彈出框都只是入口。真正的帳密驗證、session 建立、以及「未登入就存取受保護資源」的攔截,都必須在伺服器端完成。前端負責體驗,後端負責安全,這條界線不要跨越。
- 上一篇文章: Bootstrap 導覽列:讓下拉選單同時支援點擊連結與滑鼠懸停展開
- 下一篇文章: 用 jQuery 做一個最簡單的留言功能
相關文章
-
後台郵箱頁面實作:修改、批量刪除、排序與分頁整合示例 用 AngularJS 動手做一個互動式工資計算器 AngularJS ng-repeat 遍歷輸出的用法與內建變數說明 AngularJS ng-click 傳參的正確寫法與常見錯誤 AngularJS 動態插入的 HTML 中 ng-click 失效怎麼辦?用 $compile 解決 深入理解 AngularJS:scope 的髒檢查機制(一) AngularJS 自訂指令與控制器之間的資料傳遞 AngularJS 下拉選單渲染 HTML 的三種做法 jQuery 表單驗證實戰:從必填標記到即時提醒的完整流程 不靠插件:用原生 jQuery 手寫一個表單驗證