JS 實作多色 Tab 標籤切換效果
編輯:關於JavaScript
本文分享一個每個頁籤各自擁有專屬顏色的切換效果:點擊哪一個頁籤,該頁籤的邊框與底部線就跟著換成對應的顏色,內容區同步切換。
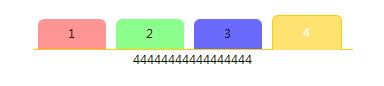
完整程式碼:
 <html>
<head>
<title>不同顏色選項卡</title>
<meta http-equiv="Content-Type" content="text/html; charset=gb2312"/>
<style type="text/css">
* { margin: 0; padding: 0; }
body { font: 12px/20px 'microsoft yahei', 'arial'; word-break: break-all; word-wrap: break-word; }
.clearfix:after { content: '.'; display: block; clear: both; height: 0; visibility: hidden; }
.clearfix { display: inline-block; }
* html .clearfix { height: 1%; }
.clearfix { display: block; }
#wrap { width: 320px; margin: 2em auto; }
.card_List { height: 30px; border-bottom: 1px solid #f00; position: relative; }
.card_List li {
  float: left; width: 68px; text-align: center; height: 30px; line-height: 30px;
  margin: 0 5px; display: inline;
  border-top-left-radius: 6px; border-top-right-radius: 6px;
}
.card_List li.current {
  height: 34px; line-height: 34px; margin-top: -4px;
  border: 1px solid #F00; background: #FF9494; border-bottom: none; color: #fff;
}
#oLi li:nth-child(1){ background: #FF9494; }
#oLi li:nth-child(2){ background: #8CFE8C; }
#oLi li:nth-child(3){ background: #6969FB; }
#oLi li:nth-child(4){ background: #FFE26F; }
.card_content div { display: none; height: 100px; text-align: center; color: #000; }
.card_content div:first-child { background: #fff; }
</style>
<script type="text/javascript">
window.onload = function () {
  var colorArr = { 0: "#f00", 1: "#0f0", 2: "#00f", 3: "#FC0" };
  var bgColorArr = { 0: "#fff", 1: "#fff", 2: "#fff", 3: "#fff" };
  var oL = document.getElementById("oLi");
  var oLi = oL.getElementsByTagName("li");
  var oUl = document.getElementById("oUl").getElementsByTagName("div");
  for (var i = 0; i < oLi.length; i++) {
    oLi[i].index = i;
    oLi[i].onclick = function () {
      for (var j = 0; j < oLi.length; j++) {
        oLi[j].className = "";
        oLi[j].style.border = "none";
      }
      this.className = "current";
      this.style.border = "1px solid " + colorArr[this.index];
      this.style.borderBottom = "none";
      oL.style.borderBottom = "1px solid " + colorArr[this.index];
      for (var j = 0; j < oUl.length; j++) {
        oUl[j].style.display = "none";
        oUl[this.index].style.display = "block";
        oUl[j].style.backgroundColor = bgColorArr[this.index];
      }
    };
  }
};
</script>
</head>
<body>
<div id="wrap">
<ul id="oLi" class="card_List clearfix">
<li class="current">1</li>
<li>2</li>
<li>3</li>
<li>4</li>
</ul>
<div id="oUl" class="card_content">
<div style="display:block;"> 11111111111111 </div>
<div> 22222222222 </div>
<div> 3333333333333 </div>
<div> 44444444444444444 </div>
</div>
</div>
</body>
</html>
幾個值得學的細節:替每個 li 掛上 index 屬性記住自己的序號,點擊時就能對應到 colorArr 的顏色與 oUl 的內容;用 .current 搭配負 margin 讓選中頁籤向上凸出,視覺上和內容區連成一體;CSS 裡的 nth-child 負責頁籤底色,JS 則負責邊框與底部線,兩者分工明確。整個效果沒有依賴任何套件,是練習原生 DOM 操作的好題目。
- 上一篇文章: JS 實作人民幣小寫金額轉大寫(含完整程式碼)
- 下一篇文章: JS 產生器實作:姓名、手機、身分證、卡號一次搞定
熱門推薦
HTML5 + JavaScript 檔案上傳實作:樣式客製與實務上的幾個坑
instanceof 與 typeof 的差別:為什麼 "red" instanceof String 是 false
DIV 隨滾動條移動的實作方式
window.open() 參數完整解析:從最簡單彈窗到 Cookie 控制只跳一次
JavaScript 實現同一頁面多個運動效果的方法
深入理解 JavaScript(29):設計模式之裝飾者模式
自製 substring、人民幣大小寫轉換、數字反轉與正則優化筆記
停止事件冒泡與阻止預設行為:IE 與標準瀏覽器的雙寫法
用 JS 自訂物件實作 Map:把 Java 的 Key-Value 容器搬進瀏覽器