用 oCanvas 打造簡易線上畫板:完整實作與原始碼下載
編輯:關於JavaScript
想在網頁上快速做出一塊能自由塗寫的白板?本文以 oCanvas 這套輕量的 Canvas 封裝庫為基礎,示範如何完成一個支援滑鼠與觸控、可切換顏色與筆觸粗細、並能一鍵清空的白板。
為什麼挑 oCanvas
oCanvas 把原生的 Canvas 2D API 包裝成物件化的操作方式,畫圓、畫線、綁事件都只要幾行程式,官方網站為 https://ocanvas.org/ 。對於「把筆跡畫出來」這類需求,它省下了大量 getContext、beginPath 的瑣碎工作。
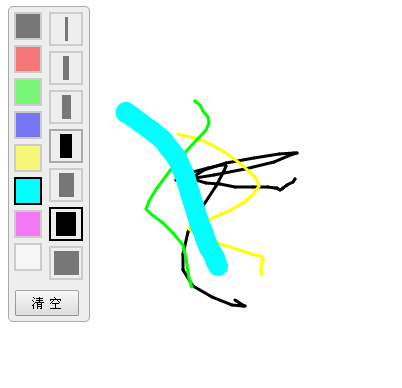
成品如下:
工具列與全域狀態
左側工具列分成色盤、筆粗兩組,外加一個清空按鈕。點選顏色或粗細時,只需更新全域的 line_color 與 line_size,同時同步游標指示圓的填色與半徑即可。
 <!DOCTYPE html>
<html>
<head>
<meta charset="UTF-8" />
<title>oCanvas Example</title>
<meta name="robots" content="noindex, nofollow">
<meta name="viewport" content="width=device-width, initial-scale=1.0, maximum-scale=1.0, user-scalable=no" />
<meta name="apple-mobile-web-app-capable" content="yes" />
<meta name="apple-mobile-web-app-status-bar-style" content="black" />
<script src="https://libs.useso.com/js/zepto/1.1.3/zepto.min.js"></script>
<script>
var line_color = '#000';
var line_size = 3;
$(function(){
  $('.tool .color div').click(function(){
    $('.tool .color div').removeClass('active');
    $(this).addClass('active');
    line_color = $(this).data('color');
    mouseDot.fill = line_color;
  });
  $('.tool .size div').click(function(){
    $('.tool .size div').removeClass('active');
    $(this).addClass('active');
    line_size = $(this).data('size');
    mouseDot.radius = Math.max(line_size / 2, 3);
  });
});
</script>
<style>
body, html {padding:0; margin:0; overflow:hidden;}
.tool{position:absolute; top:10px; left:10px; border:solid 1px #aaa; background-color:#eee; border-radius:5px; padding-right:5px;}
.tool .color {float:left; margin:5px; width:30px;}
.tool .color div{width:24px; height:24px; border:solid 2px #aaa; margin-bottom:5px; opacity:0.5;}
.tool .color div:hover{opacity:1; cursor:pointer;}
.tool .color .active{opacity:1; border:solid 2px #000;}
.tool .size {float:left; margin:5px; width:30px; margin-left:0;}
.tool .size div{width:30px; height:30px; border:solid 2px #aaa; margin-bottom:5px; opacity:0.5;}
.tool .size div:hover{opacity:1; cursor:pointer;}
.tool .size .active{opacity:1; border:solid 2px #000;}
.tool .size span{display:block; margin:3px auto; height:24px; background-color:black;}
.btn {clear:both; margin-bottom:5px; text-align:center;}
.btn input {padding:3px 15px;}
</style>
</head>
<body>
<canvas id="canvas" width="200" height="100"></canvas>
<div class="tool">
  <div class="color">
    <div style="background:#000;" data-color="#000" class="active"></div>
    <div style="background:#f00;" data-color="#f00"></div>
    <div style="background:#0f0;" data-color="#0f0"></div>
    <div style="background:#00f;" data-color="#00f"></div>
    <div style="background:#ff0;" data-color="#ff0"></div>
    <div style="background:#0ff;" data-color="#0ff"></div>
    <div style="background:#f0f;" data-color="#f0f"></div>
    <div style="background:#fff;" data-color="#fff"></div>
  </div>
  <div class="size">
    <div class="active" data-size="3" ><span style="width:3px;" ></span></div>
    <div data-size="6" ><span style="width:6px;" ></span></div>
    <div data-size="9" ><span style="width:9px;" ></span></div>
    <div data-size="12"><span style="width:12px;"></span></div>
    <div data-size="15"><span style="width:15px;"></span></div>
    <div data-size="20"><span style="width:20px;"></span></div>
    <div data-size="25"><span style="width:25px;"></span></div>
  </div>
  <div class="btn">
    <input type="button" value="清 空" onclick="clearAll();" />
  </div>
</div>
<script src="js/ocanvas-2.7.3.min.js"></script>
<script>
var c = document.querySelector("#canvas"), ctx = c.getContext("2d");
c.width = window.innerWidth;
c.height = window.innerHeight;
c.addEventListener("touchmove", function (e) { e.preventDefault(); }, false);
var cs = oCanvas.create({ canvas: "#canvas", background: "#fff", fps: 30, disableScrolling: true });
var isDraw = false;
var xx = 0;
var yy = 0;
var mouseDot;
clearAll();
cs.bind('mousedown', function(){
  drawBegin(cs.mouse.x, cs.mouse.y);
}).bind('touchstart tap', function(){
  drawBegin(cs.touch.x, cs.touch.y);
}).bind('mouseup touchend', function(){
  isDraw = false;
}).bind('mousemove', function(){
  drawMove(cs.mouse.x, cs.mouse.y);
}).bind('touchmove', function(){
  drawMove(cs.touch.x, cs.touch.y);
});
function drawBegin(x, y) {
  isDraw = true;
  xx = x; yy = y;
  var dot = cs.display.arc({ x: x, y: y, radius: line_size / 2, start: 0, end: 360, fill: line_color });
  cs.addChild(dot);
}
function drawMove(x, y) {
  if (isDraw) {
    var line = cs.display.line({
      start: { x: xx, y: yy },
      end: { x: x, y: y },
      stroke: '' + line_size + 'px ' + line_color,
      cap: "round"
    });
    cs.addChild(line);
    xx = x; yy = y;
  } else {
    mouseDot.moveTo(x, y);
    cs.addChild(mouseDot);
    cs.draw.redraw();
  }
}
function clearAll() {
  cs.reset();
  cs.mouse.hide();
  mouseDot = cs.display.arc({ x: -100, y: -100, radius: Math.max(line_size / 2, 3), start: 0, end: 360, fill: line_color, shadow: '0 0 5px #333' });
  cs.addChild(mouseDot);
}
</script>
</body>
</html>
幾個容易忽略的細節
- 行動裝置上必須同時用 disableScrolling 與 touchmove 的 preventDefault 抑制頁面滑動,否則一畫就整頁跑位。
- 線段端點設為 round,轉折處才不會出現尖角。
- 清空時呼叫 cs.reset() 重繪,再把代表游標的圓點重新掛回畫布。
更多 JavaScript 主題可參考本站相關專題彙整,完整範例可至本站下載。希望本文對你的 JavaScript 開發有所幫助。