用 JavaScript 模擬微信聊天界面
編輯:關於JavaScript
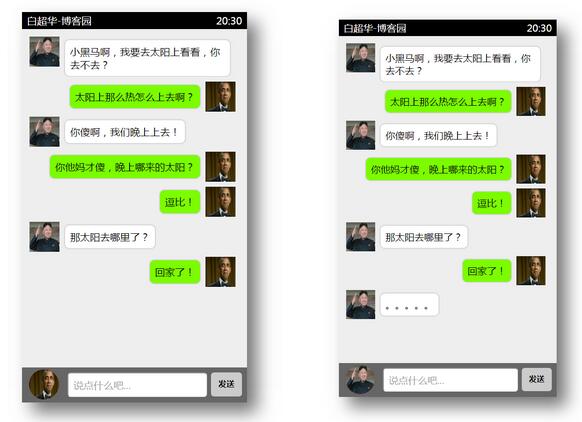
下面這個例子用原生 JavaScript 做了一個類似微信的聊天面板:點擊左下角頭像可以切換說話人,輸入內容後點擊「發送」,對話框裡就會追加一條消息,並且根據說話人不同,氣泡分別靠左或靠右顯示。
實現思路
頁面上放一個 ul 作為消息容器,每條消息對應一個 li,由 JavaScript 動態生成並追加。真正的關鍵在 CSS 佈局:需要預先準備好左右兩套樣式——頭像和氣泡靠右的是「我」,靠左的是「對方」。生成 li 時,根據當前頭像所代表的角色,給 img 和 span 分別加上 imgright/spanright 或 imgleft/spanleft 類即可。
完整代碼
<!DOCTYPE html>
<html lang="en">
<head>
<meta charset="UTF-8">
<title>模擬短信發送</title>
<style>
* { margin: 0; padding: 0; list-style: none; font-family: '微軟雅黑'; }
#container {
    width: 450px;
    height: 780px;
    background: #eee;
    margin: 80px auto 0;
    position: relative;
    box-shadow: 20px 20px 55px #777;
}
.header { background: #000; height: 34px; color: #fff; line-height: 34px; font-size: 20px; padding: 0 10px; }
.footer { width: 430px; height: 50px; background: #666; position: absolute; bottom: 0; padding: 10px; }
.footer input {
    width: 275px; height: 45px;
    outline: none; font-size: 20px; text-indent: 10px;
    position: absolute; border-radius: 6px; right: 80px;
}
.footer span {
    display: inline-block;
    width: 62px; height: 48px;
    background: #ccc; font-weight: 900;
    line-height: 45px; cursor: pointer; text-align: center;
    position: absolute; right: 10px; border-radius: 6px;
}
.footer span:hover { color: #fff; background: #999; }
#icon {
    display: inline-block;
    background: red;
    width: 60px; height: 60px;
    border-radius: 30px;
    position: absolute; bottom: 6px; left: 14px;
    cursor: pointer; overflow: hidden;
}
img { width: 60px; height: 60px; }
.content { font-size: 20px; width: 435px; height: 662px; overflow: auto; padding: 5px; }
.content li { margin-top: 10px; padding-left: 10px; width: 412px; display: block; clear: both; overflow: hidden; }
.content li span {
    background: #7cfc00;
    padding: 10px;
    border-radius: 10px;
    float: left;
    margin: 6px 10px 0 10px;
    max-width: 310px;
    border: 1px solid #ccc;
    box-shadow: 0 0 3px #ccc;
}
.content li img.imgleft   { float: left; }
.content li img.imgright  { float: right; }
.content li span.spanleft { float: left;  background: #fff; }
.content li span.spanright{ float: right; background: #7cfc00; }
</style>
<script>
window.onload = function () {
    var arrIcon = ['img/1.jpg', 'img/2.jpg'];
    var num = 0;    // 控制頭像切換
    var iNow = -1;  // 用於定位新插入的 img / span

    var icon = document.getElementById('icon').getElementsByTagName('img');
    var btn = document.getElementById('btn');
    var text = document.getElementById('text');
    var content = document.getElementsByTagName('ul')[0];
    var img, span;

    // 點擊頭像切換說話人
    icon[0].onclick = function () {
        if (num == 0) { this.src = arrIcon[1]; num = 1; }
        else { this.src = arrIcon[0]; num = 0; }
    };

    btn.onclick = function () {
        if (text.value == '') {
            alert('發送內容不能為空');
            return;
        }
        content.innerHTML += '<li><img src="' + arrIcon[num] + '"><span>' + text.value + '</span></li>';
        iNow;

        img = content.getElementsByTagName('img');
        span = content.getElementsByTagName('span');
        iNow++;

        if (num == 0) {
            img[iNow].className += ' imgright';
            span[iNow].className += ' spanright';
        } else {
            img[iNow].className += ' imgleft';
            span[iNow].className += ' spanleft';
        }
        text.value = '';
    };
};
</script>
</head>
<body>
<div id="container">
    <div class="header">
        <span style="float: left;">白超華-博客園</span>
        <span style="float: right;">20:30</span>
    </div>
    <ul class="content"></ul>
    <div class="footer">
        <div id="icon"><img src="img/1.jpg" alt=""></div>
        <input id="text" type="text" placeholder="說點什麼吧...">
        <span id="btn">發送</span>
    </div>
</div>
</body>
</html>
幾個值得注意的地方
為什麼每次都要重新 getElementsByTagName?因為用 innerHTML += 追加內容會重建整個子節點列表,之前保存的 img、span 集合就失效了。所以要在追加之後重新獲取,再用 iNow 定位到剛插入的那一對元素。
innerHTML += 的代價。它每次都會重新解析並替換全部內容,消息多了一定會卡。更好的做法是 createElement 逐個創建節點再 appendChild,同時也能順便解決下面這個問題。
安全問題。直接把 text.value 拼進 HTML 字符串,如果用戶輸入 <img onerror=...> 就會形成 XSS。正式項目中應當用 textContent 寫入文本,或對內容做轉義。
這個例子雖然簡單,但把「動態 DOM 生成 + 左右分佈佈局 + 狀態切換」這幾個要點都串了起來,稍加擴充就能做成完整的聊天 demo。
本文涉及的技巧已整理進《JavaScript 微信開發技巧匯總》,有興趣的朋友可以延伸閱讀《微信小程序開發教程》。