WebWork 的核心工作,說穿了就是「把客戶端送來的 web 參數重新包裝,交給業務 Action 執行,再把結果回饋出去」。本文從三個角度拆解這個過程:框架類別關係、web 參數的取得與包裝,以及 DefaultActionProxyFactory/DefaultActionProxy/DefaultActionInvocation 三兄弟的協作。
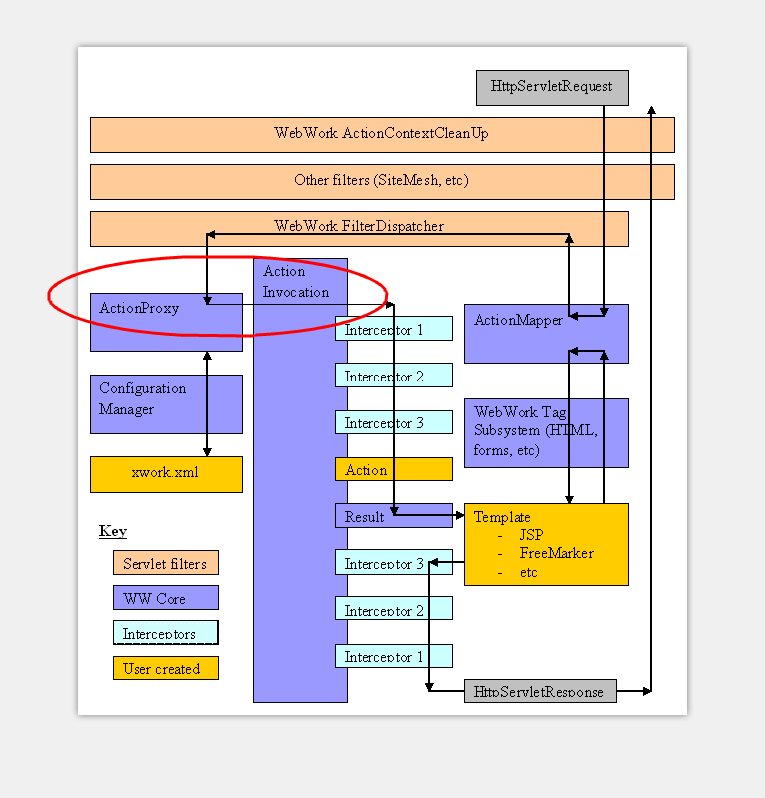
以下對應 WebWork 框架流轉圖中標示為紅色的區段。
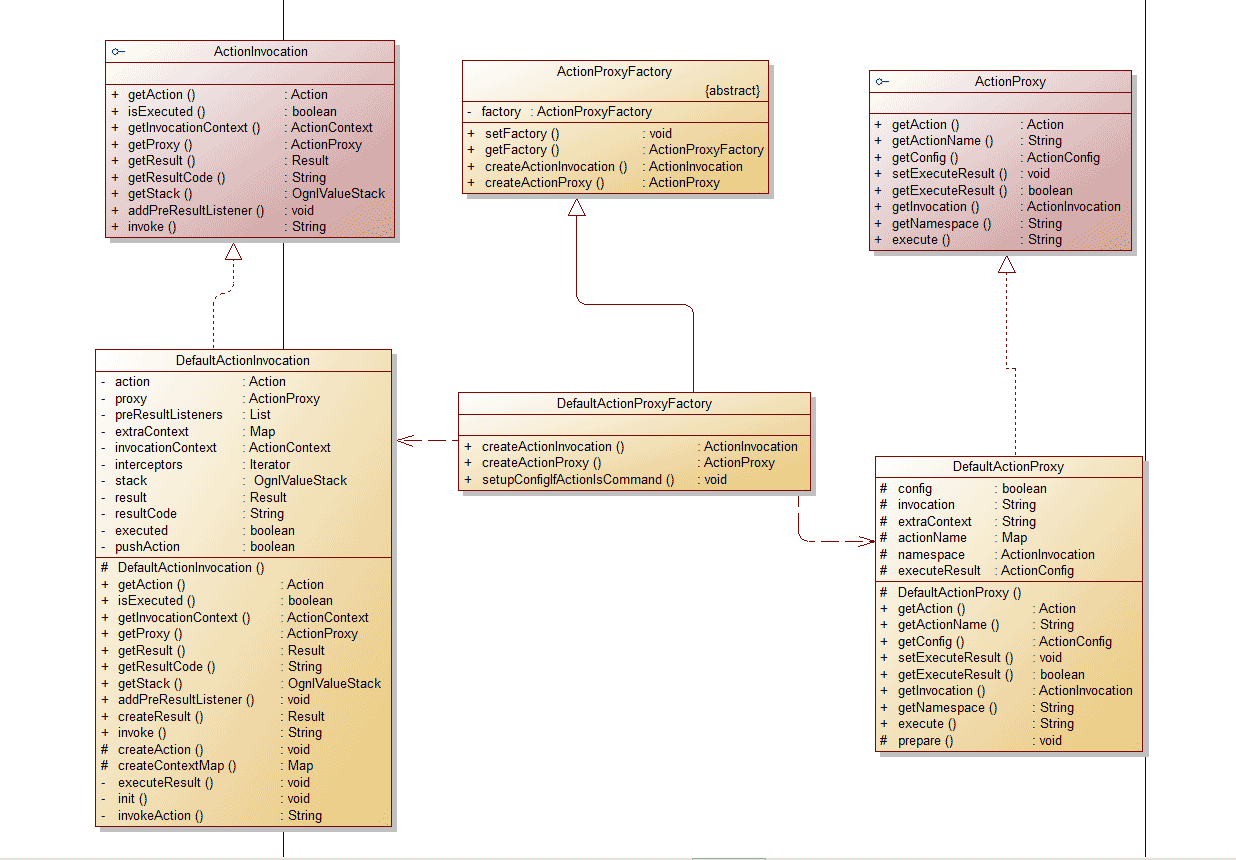
一、類別關係
二、Web 參數的取得與包裝
幾乎每個 Web 框架都會對請求參數做一層包裝以方便自己使用,WebWork 也不例外。每次響應請求的入口是 ServletDispatcher.service():
public void service(HttpServletRequest request, HttpServletResponse response) throws ServletException {
    try {
        if (encoding != null) {
            try { request.setCharacterEncoding(encoding); } catch (Exception localException) { }
        }
        if (locale != null) { response.setLocale(locale); }
        if (this.paramsWorkaroundEnabled) { request.getParameter("foo"); }

        request = wrapRequest(request);   // 包裝 request

        serviceAction(request, response,
            getNameSpace(request), getActionName(request),
            getRequestMap(request), getParameterMap(request),
            getSessionMap(request), getApplicationMap());
    } catch (IOException e) {
        String message = "Could not wrap servlet request with MultipartRequestWrapper!";
        log.error(message, e);
        sendError(request, response, 500, new ServletException(message, e));
    }
}
這裡的 wrapRequest 主要針對多媒體請求(檔案上傳、各類檔案匯出)做特殊處理。包裝完成後,接著呼叫 serviceAction,並以六個 get 方法把各種 map 準備好——這算是 Action 業務邏輯真正跑起來之前的「前戲」。
getNameSpace:取得 Action 所屬命名空間
例如 /my/MyAction.action 會回傳 /my:
protected String getNameSpace(HttpServletRequest request) {
    String servletPath = request.getServletPath();
    return getNamespaceFromServletPath(servletPath);
}
public static String getNamespaceFromServletPath(String servletPath) {
    servletPath = servletPath.substring(0, servletPath.lastIndexOf("/"));
    return servletPath;
}
getActionName:取得 Action 名稱
例如 MyAction.action 回傳 MyAction:
protected String getActionName(HttpServletRequest request) {
    String servletPath = (String) request.getAttribute("javax.servlet.include.servlet_path");
    if (servletPath == null) {
        servletPath = request.getServletPath();
    }
    return getActionName(servletPath);
}
protected String getActionName(String name) {
    int beginIdx = name.lastIndexOf("/");
    int endIdx = name.lastIndexOf(".");
    return name.substring(beginIdx == -1 ? 0 : beginIdx + 1,
                          endIdx   == -1 ? name.length() : endIdx);
}
四個 Map:把 Servlet 的容器統一成 Map
// 請求中的所有屬性
protected Map getRequestMap(HttpServletRequest request) {
    return new RequestMap(request);
}

// 請求中的所有參數
protected Map getParameterMap(HttpServletRequest request) throws IOException {
    return request.getParameterMap();
}

// session 中的所有屬性
protected Map getSessionMap(HttpServletRequest request) {
    return new SessionMap(request);
}

// Application 中的所有屬性
protected Map getApplicationMap() {
    return new ApplicationMap(getServletContext());
}
WebWork 之所以要把 request 的屬性與參數、session 屬性、application 屬性都包裝成 Map,唯一目的就是「自己用起來順手」——Action 可以用一致的方式存取不同來源的資料,不必到處寫 getServletContext().getAttribute()。
serviceAction:組裝上下文並建立代理
public void serviceAction(HttpServletRequest request, HttpServletResponse response,
        String namespace, String actionName, Map requestMap, Map parameterMap,
        Map sessionMap, Map applicationMap) {

    HashMap extraContext = createContextMap(requestMap, parameterMap, sessionMap,
                                            applicationMap, request, response, getServletConfig());
    extraContext.put("com.opensymphony.xwork.dispatcher.ServletDispatcher", this);

    OgnlValueStack stack = (OgnlValueStack) request.getAttribute("webwork.valueStack");
    if (stack != null) {
        extraContext.put("com.opensymphony.xwork.util.OgnlValueStack.ValueStack", new OgnlValueStack(stack));
    }

    try {
        ActionProxy proxy = ActionProxyFactory.getFactory()
                              .createActionProxy(namespace, actionName, extraContext);
        request.setAttribute("webwork.valueStack", proxy.getInvocation().getStack());
        proxy.execute();
        if (stack != null) {
            request.setAttribute("webwork.valueStack", stack);
        }
    } catch (ConfigurationException e) {
        log.error("Could not find action", e);
        sendError(request, response, 404, e);
    } catch (Exception e) {
        log.error("Could not execute action", e);
        sendError(request, response, 500, e);
    }
}
流程是:先 createContextMap 建立 Action 上下文(extraContext),把 Servlet 相關物件包裝進去;接著檢查上一個請求是否留有可用的值堆疊,有的話一併放進 extraContext 供本次使用;最後才建立代理並執行。
幾個關鍵類別的角色:
- ActionContext:Action 執行期間的上下文,可視為一個存放所需物件的容器(本質上就是 Map)。
- ServletActionContext:直接繼承 ActionContext,額外提供直接存取 Java Servlet 相關物件的能力。
- OgnlValueStack:主要功能是透過表達式語言存取物件屬性。
三、三兄弟登場:Factory、Proxy、Invocation
前戲結束,真正執行業務的關鍵就是這三行:
ActionProxy proxy = ActionProxyFactory.getFactory().createActionProxy(namespace, actionName, extraContext);
request.setAttribute("webwork.valueStack", proxy.getInvocation().getStack());
proxy.execute();
寫法與設計思路,和先前分析 xwork.xml 讀取時看到的相當類似。
ActionProxy 是介面,ActionProxyFactory 是抽象類別,預設由 DefaultActionProxy 與 DefaultActionProxyFactory 負責實作。
Factory 中的靜態實例:
static ActionProxyFactory factory = new DefaultActionProxyFactory();
public static void setFactory(ActionProxyFactory factory) { factory = factory; }
public static ActionProxyFactory getFactory() { return factory; }
建立代理:
public ActionProxy createActionProxy(String namespace, String actionName, Map extraContext) throws Exception {
    setupConfigIfActionIsCommand(namespace, actionName);
    return new DefaultActionProxy(namespace, actionName, extraContext, true);
}
DefaultActionProxy 的建構子:
protected DefaultActionProxy(String namespace, String actionName, Map extraContext, boolean executeResult) throws Exception {
    if (LOG.isDebugEnabled()) {
        LOG.debug("Creating an DefaultActionProxy for namespace " + namespace + " and action name " + actionName);
    }
    this.actionName = actionName;
    this.namespace = namespace;
    this.executeResult = executeResult;
    this.extraContext = extraContext;

    // 依命名空間與 Action 名稱取得設定
    this.config = ConfigurationManager.getConfiguration()
                    .getRuntimeConfiguration().getActionConfig(namespace, actionName);

    if (this.config == null) {
        String message;
        if ((namespace != null) && (namespace.trim().length() > 0)) {
            message = LocalizedTextUtil.findDefaultText("xwork.exception.missing-package-action",
                Locale.getDefault(), new String[] { namespace, actionName });
        } else {
            message = LocalizedTextUtil.findDefaultText("xwork.exception.missing-action",
                Locale.getDefault(), new String[] { actionName });
        }
        throw new ConfigurationException(message);
    }
    prepare();
}
建構子把傳入的命名空間與 Action 名稱存下,透過 ConfigurationManager 取得該請求對應的 Action 設定(找不到就丟 ConfigurationException),最後呼叫 prepare() 建立 ActionInvocation 並存入自己的 invocation 屬性。之後的 execute() 就是透過操作這個 invocation,間接完成對使用者所寫 Action 的呼叫。
protected void prepare() throws Exception {
    this.invocation = ActionProxyFactory.getFactory().createActionInvocation(this, this.extraContext);
}
整條鏈條回顧
把上面的片段串起來:Servlet 請求進入 ServletDispatcher.service → wrapRequest 包裝多媒體請求 → 六個 get 方法把各種容器正規化成 Map → createContextMap 組出 extraContext → DefaultActionProxyFactory 依設定檔建立 DefaultActionProxy → 建構子中 prepare() 產生 ActionInvocation → proxy.execute() 觸發業務邏輯。這層間接性看似繁複,換來的正是攔截器鏈、結果頁面跳轉與設定驅動這幾項能力的彈性。