zip.js 實戰:在網頁端直接產生 ZIP 壓縮檔
編輯:關於JavaScript
zip.js 是什麼
專案網址:https://gildas-lormeau.github.io/zip.js/
本文示範如何在 zip.js 之上再包一層,做成一個能在瀏覽器裡產生 ZIP 的元件:直接在網頁中建立含資料夾與檔案的壓縮檔,自訂檔名後下載。
使用步驟
1. 載入 zip.js
2. 載入 jQuery
3. 載入自行封裝的 ZipArchive.js(zip.js 原生 API 較繁瑣,因此另外封裝)
4. 載入 mime-types.js
最精簡的用法只需三行:
<!DOCTYPE html>
<html>
<head lang="en">
<meta charset="UTF-8">
<title></title>
<script src="https://gildas-lormeau.github.io/zip.js/demos/zip.js"></script>
<script src="https://gildas-lormeau.github.io/zip.js/demos/mime-types.js"></script>
<script src="https://apps.bdimg.com/libs/jquery/1.9.0/jquery.js"></script>
<script src="https://files.cnblogs.com/files/diligenceday/ZipArchive.js"></script>
</head>
<body>
<script>
var z = new ZipArchive;
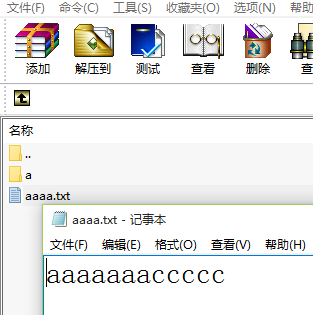
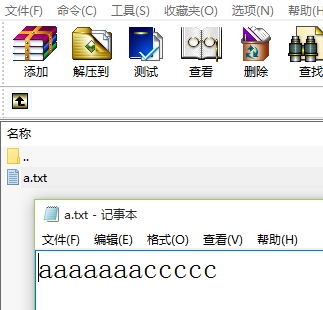
z.addFile("a/a.txt", "aaaaaaacontent");
z.addFile("aaaa.txt", "aaaaaaaccccc");
z.export("nono");
</script>
</body>
</html>
執行後下載到的檔案結構如下:
建立壓縮檔與資料夾的完整原始碼
<!DOCTYPE html>
<html>
<head lang="en">
<meta charset="UTF-8">
<title></title>
<script src="https://gildas-lormeau.github.io/zip.js/demos/zip.js"></script>
<script src="https://gildas-lormeau.github.io/zip.js/demos/mime-types.js"></script>
<script src="https://apps.bdimg.com/libs/jquery/1.9.0/jquery.js"></script>
<style> code{ display: block; padding: 10px; background: #eee; } </style>
</head>
<body>
<div>
<h1>相容性</h1>
<p>zip.js 可在所有 Chrome 與 Firefox 上執行,Safari 6 與 IE10 以上亦可使用。</p>
<p>若要在 IE9 與 Safari 上執行,需要兩個設定:</p>
<code>1:zip.useWebWorkers == false</code>
<code>2:另外載入 https://bitbucket.org/lindenlab/llsd/raw/7d2646cd3f9b/js/typedarray.js</code>
</div>
<script>
zip.workerScriptsPath = "https://gildas-lormeau.github.io/zip.js/demos/";

/** @desc 壓縮檔案;可掛 onprogress / onend / onerror */
var ZipArchive = function () {
    function noop() {};
    this.name = "未命名檔案";
    this.zippedBlob = {};
    var _this = this;
    this.length = 0;
    this.onend = noop;
    this.onerror = noop;
    this.onprogress = noop;
    var def = this.defer = new $.Deferred();   // 建立延遲物件
    zip.createWriter(new zip.BlobWriter("application/zip"), function (zipWriter) {
        _this.zipWriter = zipWriter;
        def.resolve();
    }, this.error);
};

ZipArchive.blob = function (filename, content) {
    return new Blob([content], { type: zip.getMimeType(filename) });
};

$.extend(ZipArchive.prototype, {
    /**
     * @desc 加入檔案
     * @param filename 檔名
     * @param content 內容
     * @param options 例如 { level: 0 } 壓縮等級 0~9、{ comment: "提示文字" }、{ lastModDate: 最後修改時間 }
     */
    "addFile": function (filename, content, options) {
        var _this = this;
        blob = ZipArchive.blob(filename, content);
        // 為了形成鏈式呼叫,把 deferrer 重新指向新的 defer
        this.defer = this.defer.then(function () {
            var def = $.Deferred();
            _this.zipWriter.add(filename, new zip.BlobReader(blob), function () {
                def.resolve();
            }, function (size, total) {
                _this.onend(filename, blob, total);
                _this.length += total;
            }, function () {
                _this.onprogress(filename, blob, total);
            }, options || {});
            return def;
        });
    },
    /** @desc 建立資料夾:目前效果不佳,建議直接用 addFile("dir/file.txt", ...) 帶出資料夾 */
    "_addFolder": function (foldername, options) {
        return this;
    },
    "size": function () { return this.length; },
    /** @desc 取得 Blob */
    "get": function () { return this.zippedBlob; },
    /** @desc 匯出為 zip 檔案 */
    "export": function (name) {
        name = name || this.name;
        var _this = this;
        this.defer.then(function () {
            _this.zipWriter.close(function (zippedBlob) {
                if (typeof name === "string" || typeof name === "number") {
                    var downloadButton = document.createElement("a"),
                        URL = window.webkitURL || window.mozURL || window.URL;
                    downloadButton.href = URL.createObjectURL(zippedBlob);
                    downloadButton.download = name + ".zip";
                    downloadButton.click();
                } else {
                    name(zippedBlob);
                }
            });
        });
    },
    "error": function () {
        this.onerror(this);
        throw new Error("壓縮檔建立失敗");
    }
});
</script>
<script>
var z = new ZipArchive;
z.addFile("a/a.txt", "aaaaaaacontent");
z.addFile("aaaa.txt", "aaaaaaaccccc");
z.export("nono");
</script>
</body>
</html>
實務上要特別注意:addFile 的呼叫是佇列化的,export() 會等所有寫入完成後才觸發下載,因此多檔案的順序與時機都由 defer 鏈控制。另外資料夾本身無法直接建立,只能靠「目錄路徑/檔名」的形式間接產生。
- 上一篇文章: 用 JavaScript 做一個「複製本頁網址」按鈕
- 下一篇文章: 用 img 標籤搭配 JSP 統計靜態頁面的瀏覽次數