原生 JavaScript 打造省/市/區三級聯動下拉選單
編輯:關於JavaScript
網購填寫收貨地址時那種「選了省份,城市自動跟著變」的互動,就是所謂的三級聯動。本文示範如何只用原生 JavaScript(搭配一點 jQuery 做 DOM 操作)實作這套邏輯:選定省後動態載入對應城市清單,選定城市後再載入縣區清單,一層扣一層。
先看上圖示範的執行結果:
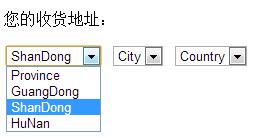
完整程式碼如下:
 <!DOCTYPE html>
<html>
<head lang="en">
<meta charset="UTF-8">
<title>三級聯動測試</title>
<script src="jquery-2.1.4.min.js"></script>
<script type="text/javascript">
//用來獲得option元素中selected屬性為true的元素的id
function Get_Selected_Id(place){
  var pro = document.getElementById(place);
  var Selected_Id = pro.options[pro.selectedIndex].id;
  return Selected_Id; //返回selected屬性為true的元素的id
}
//改變下一個級聯的option元素的內容,即加載市或縣
function Get_Next_Place(This_Place_ID,Action){
  var Selected_Id = Get_Selected_Id(This_Place_ID); //Selected_Id用來記錄當前被選中的省或市的ID
  if(Action=='Get_city') //從而可以在下一個級聯中加載相應的市或縣
    Add_city(Selected_Id);
  else if(Action=='Get_country')
    Add_country(Selected_Id);
}
//用來存儲省市區的數據結構
var Place_dict = {
  "GuangDong":{
    "GuangZhou":["PanYu","HuangPu","TianHe"],
    "QingYuan":["QingCheng","YingDe","LianShan"],
    "FoShan":["NanHai","ShunDe","SanShui"]
  },
  "ShanDong":{
    "JiNan":["LiXia","ShiZhong","TianQiao"],
    "QingDao":["ShiNan","HuangDao","JiaoZhou"]
  },
  "HuNan":{
    "ChangSha":["KaiFu","YuHua","WangCheng"],
    "ChenZhou":["BeiHu","SuXian","YongXian"]
  }
};
//加載城市選項
function Add_city(Province_Selected_Id){
  $("#city").empty();
  $("#city").append("<option>City</option>");
  $("#country").empty();
  $("#country").append("<option>Country</option>");
  //上面的兩次清空與兩次添加是為了保持級聯的一致性
  var province_dict = Place_dict[Province_Selected_Id]; //獲得一個省的字典
  for(city in province_dict){ //取得省的字典中的城市
    //添加內容的同時在option標簽中添加對應的城市ID
    var text = "<option"+" id='"+city+"'>"+city+"</option>";
    $("#city").append(text);
    console.log(text); //用來觀察生成的text數據
  }
}
//加載縣區選項
function Add_country(City_Selected_Id){
  $("#country").empty();
  $("#country").append("<option>Country</option>");
  //上面的清空與添加是為了保持級聯的一致性
  var Province_Selected_ID = Get_Selected_Id("province"); //獲得被選中省的ID,從而方便在字典中加載數據
  var country_list = Place_dict[Province_Selected_ID][City_Selected_Id]; //獲得城市列表
  for(index in country_list){
    ////添加內容的同時在option標簽中添加對應的縣區ID
    var text = "<option"+" id=\'"+country_list[index]+"\'>"+country_list[index]+"</option>";
    $("#country").append(text);
    console.log(text); //用來觀察生成的text數據
  }
}
</script>
</head>
<body>
<p>您的收貨地址:</p>
<select id="province" onchange="Get_Next_Place('province','Get_city')">
  <option id="Not_data1">Province</option>
  <option id="GuangDong" value="GuangDong">GuangDong</option>
  <option id="ShanDong" value="ShanDong">ShanDong</option>
  <option id="HuNan" value="HuNan">HuNan</option>
</select>
<select id="city" onchange="Get_Next_Place('city','Get_country')">
  <option id="Not_data2">City</option>
</select>
<select id="country">
  <option id="Not_data3">Country</option>
</select>
<br/>
</body>
</html>
程式碼要點
整份實作可以拆成三個角色:
- Get_Selected_Id():透過
selectedIndex取出目前選中項的id。這裡刻意把資料識別碼放在id屬性而不是value上,讓後續查字典時能直接拿 key 使用。 - Place_dict:用巢狀物件模擬三層結構,第一層是省,第二層是市,第三層是縣區陣列。資料與邏輯分離,日後要換成完整行政區資料只需替換這個物件。
- Add_city()/Add_country():先清空下游選單並補回一個佔位 option,保持三層的一致性,再依上層選擇把新選項 append 進去。
觸發時機則掛在 onchange 上:省份選單變動呼叫 Get_Next_Place('province','Get_city'),城市選單變動呼叫 Get_Next_Place('city','Get_country'),透過 Action 參數決定要重建哪一層。
若換省份時沒有清空城市與縣區,就會出現「廣東省配上一個在山東才有的城市」這類髒資料,所以每次更新都要記得把下游整條清掉——這是聯動選單最常踩的坑。
想 further 深入下拉選單的其他變化,可以參考 jQuery 下拉選單效果彙總與 JavaScript 下拉選單效果彙總等專題。這個範例的情境就跟在電商網站填收貨地址一模一樣,掌握之後不妨試著改寫進自己的專案,把示範用的假資料換成真實的區域名稱。