用 JavaScript 與 CSS 打造仿天貓風格的側邊分類選單
編輯:關於JavaScript
本篇為大家整理了一份以原生 JavaScript 搭配 CSS 實作的仿天貓側邊選單範例,內容相當適合前端入門者參考動手做。
這是一份自製的仿天貓導覽選單,二級分類的展開邏輯已經完成,只是尚未進行視覺美化,有興趣的朋友可以自行延伸修飾。JS 互動部分也已就緒:當滑鼠移到主分類上時,對應的二級選單會向右側滑出展開。這類效果在淘寶、天貓、京東等大型電商網站的導覽列上相當常見。測試時請先點一下選單,主選單才會顯示出來。
如下方所示的執行結果截圖:
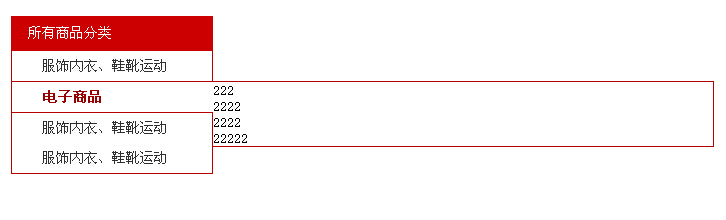
線上展示網址:
https://demo.jb51.net/js/2015/js-css-ftamil-web-menu-style-codes/
完整程式碼如下:
<!DOCTYPE html PUBLIC "-//W3C//DTD XHTML 1.0 Transitional//EN" "https://www.w3.org/TR/xhtml1/DTD/xhtml1-transitional.dtd"> <html xmlns="https://www.w3.org/1999/xhtml"> <head> <meta http-equiv="Content-Type" content="text/html; charset=utf-8" /> <title>仿天貓側邊網頁菜單</title> <style type="text/css"> *{margin:0; padding:0;} body{ font-size:14px; font-family:"宋體";} h1, h2, h3{ font-size:14px; font-weight:normal;} li{ list-style:none;} a{ color:#333; text-decoration:none;} #nav{ width:202px; height:35px; background:#C00; margin:50px 0 0 20px;} #nav h1{ padding-left:17px; line-height:35px; color:#fff; margin-right:17px;} #box{ width:200px; border:1px solid #B00; border-top:none; margin-left:20px; display:none;} #subnav{width:200px;} #subnav .list{ width:200px; height:30px;} #subnav .list h2{ width:160px; height:30px; padding-left:30px; line-height:30px; margin-right:10px;} #subnav .list a:hover, #subnav .active a:hover{ color:#900; font-weight:bold;} #subnav .active{ width:200px; height:30px; border-bottom:1px solid #b00; border-top:1px solid #b00; position:relative;} #subnav .active h2{ width:170px; height:30px; padding-left:30px; line-height:30px; background:#fff; position:absolute; left:1px; top:0; z-index:4;} #subnav .list_nav{ width:500px; overflow:hidden; border:1px solid #b00; position:absolute; left:200px; top:-1px; z-index:3; display:none;} </style> <script type="text/javascript"> window.onload=function() { var oNav=document.getElementById('nav'); var oBox=document.getElementById('box'); var oSubnav=document.getElementById('subnav'); var aLi=oSubnav.getElementsByTagName('li'); var i=0; oNav.onclick=function() { if(oBox.style.display=='block') { oBox.style.display='none'; } else { oBox.style.display='block'; } } for(i=0;i<aLi.length;i++) { if(aLi[i].className=='list') { aLi[i].onmousemove=function() { for(i=0;i<aLi.length;i++) { var aDivList=this.getElementsByTagName('div')[0]; aDivList.style.display='block'; this.className='active'; } } aLi[i].onmouseout=function() { for(i=0;i<aLi.length;i++) { var aDivList=this.getElementsByTagName('div')[0]; aDivList.style.display='none'; this.className='list'; } } } } }; </script> </head> <body> <div id="nav"> <h1>所有商品分類</h1> </div> <div id="box"> <ul id="subnav"> <li class="list"> <h2><a href="#">服飾內衣、鞋靴運動</a></h2> <div class="list_nav"> <ul> <li>1</li> <li>1</li> <li>1</li> <li>1</li> </ul> </div> </li> <li class="list"> <h2><a href="#">電子商品</a></h2> <div class="list_nav"> <ul> <li>222</li> <li>2222</li> <li>2222</li> <li>22222</li> </ul> </div> </li> <li class="list"> <h2><a href="#">服飾內衣、鞋靴運動</a></h2> <div class="list_nav"> <ul> <li>3333</li> <li>3333</li> <li>3333</li> <li>3333</li> </ul> </div> </li> <li class="list"> <h2><a href="#">服飾內衣、鞋靴運動</a></h2> <div class="list_nav"> <ul> <li>1</li> <li>1</li> <li>1</li> <li>1</li> </ul> </div> </li> </ul> </div> </body> </html>
希望這份分享能對大家在 JavaScript 程式設計上有所幫助。