本文主要說明如何在 React Native 專案中整合第三方平台分享功能,同時覆蓋 Android 與 iOS 兩端。分享是 App 傳播最直接的途徑,而雙平台的原生配置差異不小,因此把流程完整走一遍很有必要。
範例源碼已開放在 Github 上,搜尋 react-native-share 即可取得(一行代碼,雙平台分享)。目前支援的管道包含 QQ、QQ 空間、微信、朋友圈、微博與 FaceBook,歡迎自行取用。
Android 平台配置
1. 在 app 目錄下建立 libs 資料夾,加入相依檔案(直接複製源碼中的 libs 目錄即可)。
2. 在 app/src/main 目錄下建立 jniLibs 目錄,加入 JNI 檔案(同樣可直接複製源碼內容)。
3. 在包名目錄下引入互動所需的程式碼,包含 apshare、wxapi、WBShareActivity 與 module,注意 import 路徑是否正確。
4. 在 AndroidMainfest.xml 中補上權限宣告:
<uses-permission android:name="android.permission.INTERNET" /> <uses-permission android:name="android.permission.ACCESS_NETWORK_STATE" /> <uses-permission android:name="android.permission.ACCESS_WIFI_STATE" /> <uses-permission android:name="android.permission.READ_PHONE_STATE" /> <uses-permission android:name="android.permission.WRITE_EXTERNAL_STORAGE"/> <uses-permission android:name="android.permission.READ_EXTERNAL_STORAGE"/> <uses-permission android:name="android.permission.ACCESS_FINE_LOCATION" /> <uses-permission android:name="android.permission.ACCESS_COARSE_LOCATION" /> <uses-permission android:name="android.permission.ACCESS_LOCATION_EXTRA_COMMANDS" />
5. 在 <application></application> 節點內註冊各分享平台的 Activity 與 Service:
<activity android:name=".WBShareActivity" android:configChanges="keyboardHidden|orientation" android:screenOrientation="portrait" > <intent-filter> <action android:name="com.sina.weibo.sdk.action.ACTION_SDK_REQ_ACTIVITY" /> <category android:name="android.intent.category.DEFAULT" /> </intent-filter> </activity> <activity android:name="com.sina.weibo.sdk.component.WeiboSdkBrowser" android:configChanges="keyboardHidden|orientation" android:windowSoftInputMode="adjustResize" android:exported="false" > </activity> <service android:name="com.sina.weibo.sdk.net.DownloadService" android:exported="false"></service> <activity android:name=".wxapi.WXEntryActivity" android:configChanges="keyboardHidden|orientation|screenSize" android:exported="true" android:screenOrientation="portrait" android:theme="@android:style/Theme.Translucent.NoTitleBar" /> <activity android:name="com.tencent.tauth.AuthActivity" android:launchMode="singleTask" android:noHistory="true" > <intent-filter> <action android:name="android.intent.action.VIEW" /> <category android:name="android.intent.category.DEFAULT" /> <category android:name="android.intent.category.BROWSABLE" /> <data android:scheme="tencent100424468" /> <= 改為自己申請的QQkey </intent-filter> </activity> <activity android:name="com.tencent.connect.common.AssistActivity" android:screenOrientation="portrait" android:theme="@android:style/Theme.Translucent.NoTitleBar" android:configChanges="orientation|keyboardHidden|screenSize"/> <activity android:name=".apshare.ShareEntryActivity" android:configChanges="keyboardHidden|orientation|screenSize" android:exported="true" android:screenOrientation="portrait" android:theme="@android:style/Theme.Translucent.NoTitleBar" /> <meta-data android:name="UMENG_APPKEY" android:value="561cae6ae0f55abd990035bf" > <= 改為自己申請的友盟Key </meta-data>
6. 產簽名檔案。使用 keytool -genkey -v -keystore my-release-key.keystore -alias my-key-alias -keyalg RSA -keysize 2048 -validity 10000 產出後,把檔案放進 app 目錄。多數社群平台會驗證簽名,這一步不能省略。
7. 在 gradle.properties 中填寫簽名資訊:
MYAPP_RELEASE_STORE_FILE=my-release-key.keystore MYAPP_RELEASE_KEY_ALIAS=my-key-alias MYAPP_RELEASE_STORE_PASSWORD=123456(填寫自己設置的密碼) MYAPP_RELEASE_KEY_PASSWORD=123456 (填寫自己設置的密碼)
8. 在 app/build.gradle 中補上簽名設定:
android { ... defaultConfig { ... } signingConfigs { release { storeFile file(MYAPP_RELEASE_STORE_FILE) storePassword MYAPP_RELEASE_STORE_PASSWORD keyAlias MYAPP_RELEASE_KEY_ALIAS keyPassword MYAPP_RELEASE_KEY_PASSWORD } } buildTypes { release { ... signingConfig signingConfigs.release } } }
9. 在 MainApplication 中註冊分享模組並初始化平台參數:
@Override protected List<ReactPackage> getPackages() { return Arrays.<ReactPackage>asList( new MainReactPackage(), new SharePackage() <= 添加引用 ); }
@Override public void onCreate() { super.onCreate(); SoLoader.init(this,false); Config.shareType = "react native"; UMShareAPI.get(this); } // 配置平台 { PlatformConfig.setWeixin("wx083bf496cbc48aec", "750e9075fa521c82274a9d548c399825"); PlatformConfig.setQQZone("1106207359", "3JjbG8aXMuh5w0sV"); PlatformConfig.setSinaWeibo("2733400964", "fac50980a44e3e3afd4bc968ea572887", "www.baidu.com"); }
10. 在 MainActivity 中綁定分享回調:
@Override protected void onCreate(Bundle savedInstanceState) { super.onCreate(savedInstanceState); ShareModule.initActivity(this); }
iOS 平台配置
1. 把源碼 ios 目錄下的 UMSocial 直接拖進 Xcode 專案即可。
2. 選取 TARGET 下的專案,在 Build Setting 中找到 Other Linker Flags 加入 -ObjC。特別注意大小寫,寫成 -Objc 是無效的。
3. 加入 U-Share SDK 所需的系統庫:
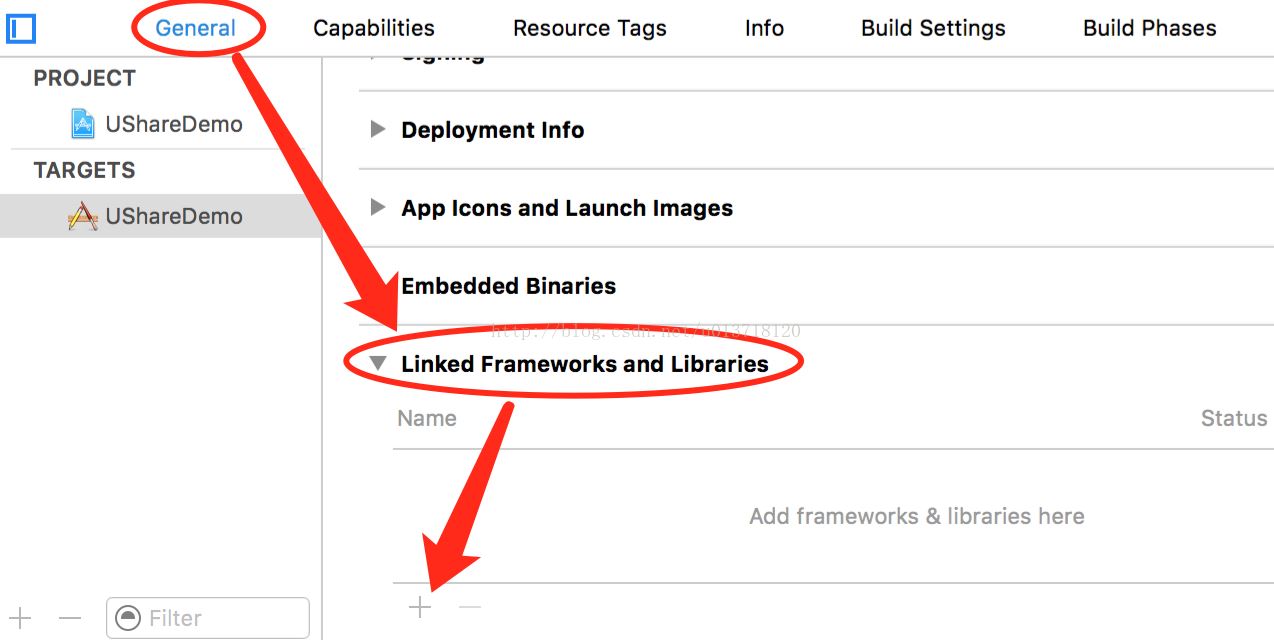
依序加入:SystemConfiguration.framework、CoreGraphics.framework、CoreTelephony.framework、ImageIO.framework、libsqlite3.tbd、libc++.tbd、libz.tbd。
4. 在 Info.plist 中設定 SSO 白名單:
<key>LSApplicationQueriesSchemes</key> <array> <!-- 微信 URL Scheme 白名單--> <string>wechat</string> <string>weixin</string> <!-- 新浪微博 URL Scheme 白名單--> <string>sinaweibohd</string> <string>sinaweibo</string> <string>sinaweibosso</string> <string>weibosdk</string> <string>weibosdk2.5</string> <!-- QQ、Qzone、TIM URL Scheme 白名單--> <string>mqqapi</string> <string>mqq</string> <string>mqqOpensdkSSoLogin</string> <string>mqqconnect</string> <string>mqqopensdkdataline</string> <string>mqqopensdkgrouptribeshare</string> <string>mqqopensdkfriend</string> <string>mqqopensdkapi</string> <string>mqqopensdkapiV2</string> <string>mqqopensdkapiV3</string> <string>mqqopensdkapiV4</string> <string>mqzoneopensdk</string> <string>wtloginmqq</string> <string>wtloginmqq2</string> <string>mqqwpa</string> <string>mqzone</string> <string>mqzonev2</string> <string>mqzoneshare</string> <string>wtloginqzone</string> <string>mqzonewx</string> <string>mqzoneopensdkapiV2</string> <string>mqzoneopensdkapi19</string> <string>mqzoneopensdkapi</string> <string>mqqbrowser</string> <string>mttbrowser</string> <string>tim</string> <string>timapi</string> <string>timopensdkfriend</string> <string>timwpa</string> <string>timgamebindinggroup</string> <string>timapiwallet</string> <string>timOpensdkSSoLogin</string> <string>wtlogintim</string> <string>timopensdkgrouptribeshare</string> <string>timopensdkapiV4</string> <string>timgamebindinggroup</string> <string>timopensdkdataline</string> <string>wtlogintimV1</string> <string>timapiV1</string> <!-- Facebook URL Scheme 白名單--> <string>fbapi</string> <string>fb-messenger-api</string> <string>fbauth2</string> <string>fbshareextension</string> </array>
5. 配置 URL Scheme,這是回跳的關鍵:
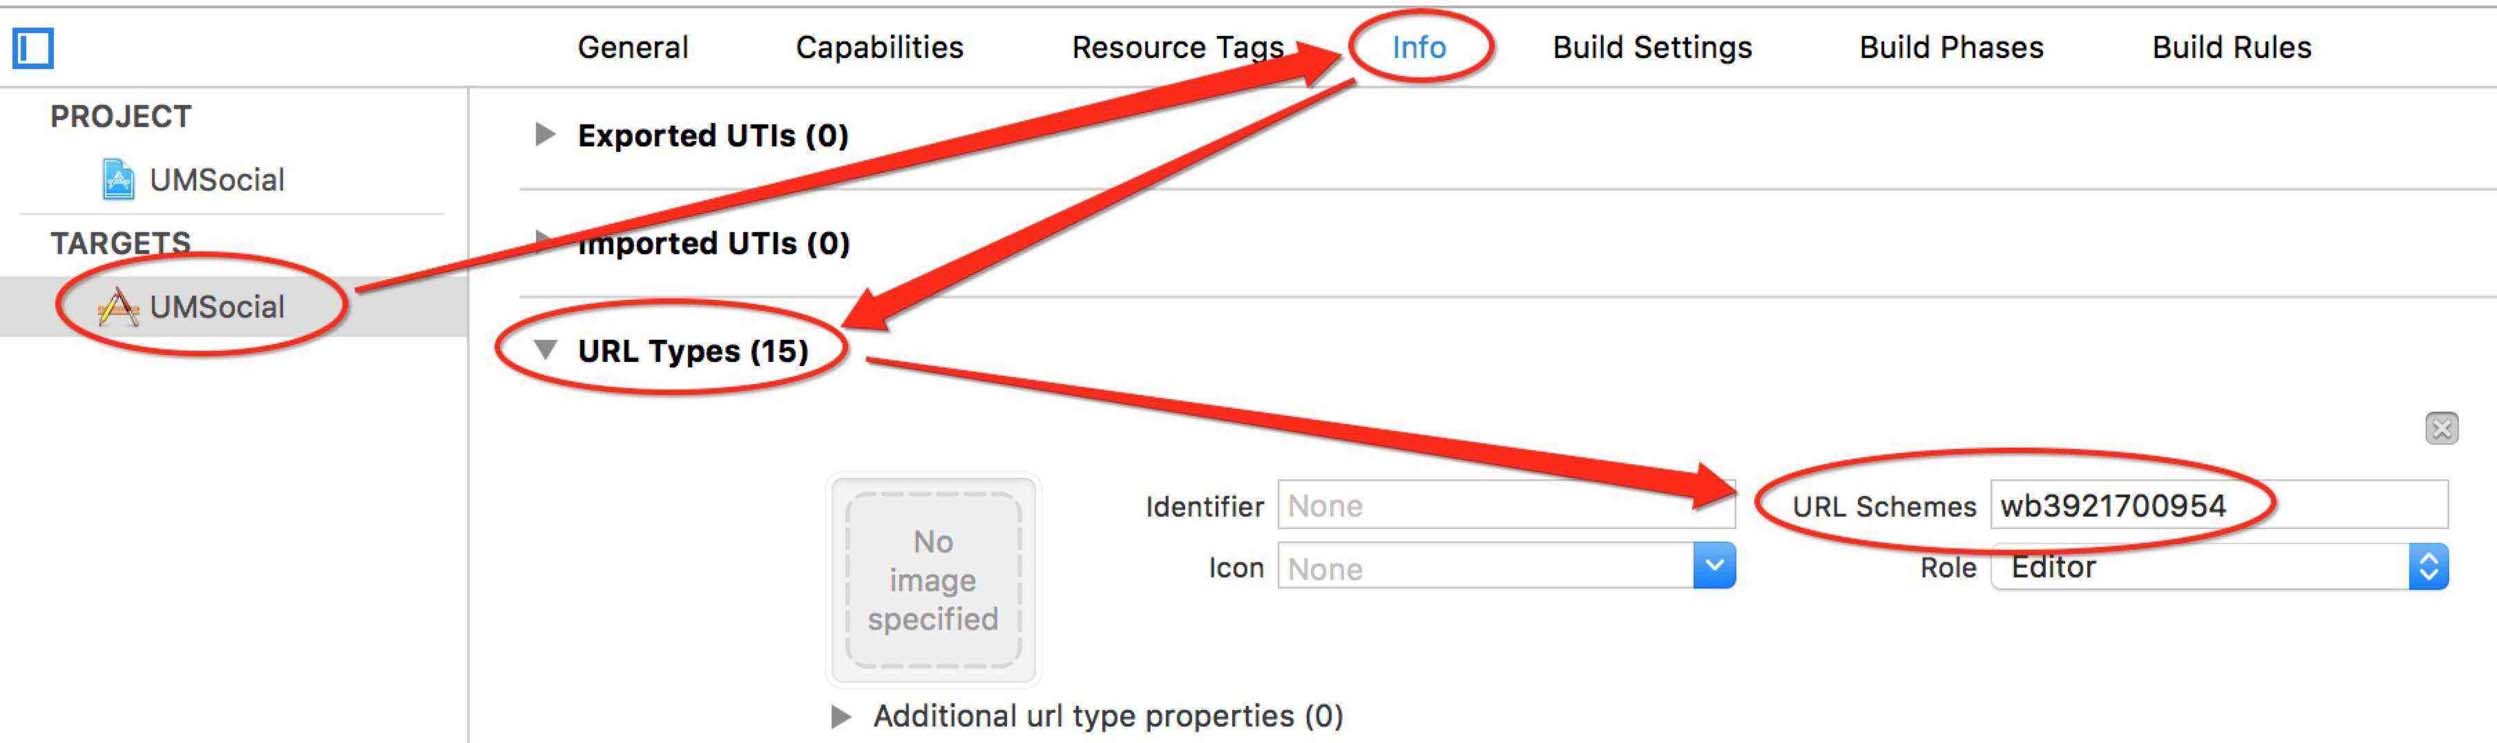
微信填入 appKey,例如 wxdc1e388c3822c80b。QQ/Qzone/TIM 則需要兩項:一是「tencent」加上騰訊 QQ 互聯的 appID,二是「QQ」加上該 appID 轉成十六進位(不足 8 位前方補 0)。以 appID 100424468 為例,第一項是 tencent100424468,第二項則是 QQ05fc5b14。新浪微博的規則是「wb」加上新浪 appKey,例如 wb3921700954。
6. 在 AppDelegate.m 中初始化 U-Share 與各平台。
(1)引入標頭檔 #import<UMSocialCore/UMSocialCore.h>。
(2)在 launchOptions 中設定友盟 Key:
/* 打開調試日志 */ [[UMSocialManager defaultManager] openLog:YES]; /* 設置友盟appkey */ [[UMSocialManager defaultManager] setUmSocialAppkey:USHARE_DEMO_APPKEY]; [self configUSharePlatforms]; [self confitUShareSettings];
(3)實際寫入你的 appkey 並載入平台設定:
/* 打開調試日志 */ [[UMSocialManager defaultManager] openLog:YES]; /* 設置友盟appkey */ [[UMSocialManager defaultManager] setUmSocialAppkey:@"59783b11f29d981b2f000984"]; [self configUSharePlatforms]; [self confitUShareSettings];
- (void)confitUShareSettings { /* * 打開圖片水印 */ //[UMSocialGlobal shareInstance].isUsingWaterMark = YES; /* * 關閉強制驗證https,可允許http圖片分享,但需要在info.plist設置安全域名 <key>NSAppTransportSecurity</key> <dict> <key>NSAllowsArbitraryLoads</key> <true/> </dict> */ [UMSocialGlobal shareInstance].isUsingHttpsWhenShareContent = NO; }
- (void)configUSharePlatforms { /* 設置微信的appKey和appSecret [微信平台從U-Share 4/5升級說明]https://dev.umeng.com/social/ios/%E8%BF%9B%E9%98%B6%E6%96%87%E6%A1%A3#1_1 */ [[UMSocialManager defaultManager] setPlaform:UMSocialPlatformType_WechatSession appKey:@"wxdc1e388c3822c80b" appSecret:@"3baf1193c85774b3fd9d18447d76cab0" redirectURL:nil]; /* * 移除相應平台的分享,如微信收藏 */ //[[UMSocialManager defaultManager] removePlatformProviderWithPlatformTypes:@[@(UMSocialPlatformType_WechatFavorite)]]; /* 設置分享到QQ互聯的appID * U-Share SDK為了兼容大部分平台命名,統一用appKey和appSecret進行參數設置,而QQ平台僅需將appID作為U-Share的appKey參數傳進即可。 100424468.no permission of union id [QQ/QZone平台集成說明]https://dev.umeng.com/social/ios/%E8%BF%9B%E9%98%B6%E6%96%87%E6%A1%A3#1_3 */ [[UMSocialManager defaultManager] setPlaform:UMSocialPlatformType_QQ appKey:@"1105821097"/*設置QQ平台的appID*/ appSecret:nil redirectURL:@"https://mobile.umeng.com/social"]; /* 設置新浪的appKey和appSecret [新浪微博集成說明]https://dev.umeng.com/social/ios/%E8%BF%9B%E9%98%B6%E6%96%87%E6%A1%A3#1_2 */ [[UMSocialManager defaultManager] setPlaform:UMSocialPlatformType_Sina appKey:@"3921700954" appSecret:@"04b48b094faeb16683c32669824ebdad" redirectURL:@"https://sns.whalecloud.com/sina2/callback"]; /* 設置Facebook的appKey和UrlString */ [[UMSocialManager defaultManager] setPlaform:UMSocialPlatformType_Facebook appKey:@"506027402887373" appSecret:nil redirectURL:nil]; }
(4)設定回調入口:
[objc] view plain copy - (BOOL)application:(UIApplication *)application openURL:(NSURL *)url sourceApplication:(NSString *)sourceApplication annotation:(id)annotation { //6.3的新的API調用,是為了兼容國外平台(例如:新版facebookSDK,VK等)的調用[如果用6.2的api調用會沒有回調],對國內平台沒有影響 BOOL result = [[UMSocialManager defaultManager] handleOpenURL:url sourceApplication:sourceApplication annotation:annotation]; if (!result) { // 其他如支付等SDK的回調 } return result; }
7. 最後把 ios 目錄下的 sharemodule.h 與 sharemodule.m 拖進專案。
呼叫分享
import UShare from './share/share'; import SharePlatform from './share/SharePlatform';
/** * 參數說明: * 1. 標題 * 2. 內容 * 3. 跳轉鏈接 * 4. 圖片鏈接 * 5. 分享平台 * 6. 分享結果回調 */ UShare.share('標題','內容','https://baidu.com','https://dev.umeng.com/images/tab2_1.png', SharePlatform.QQ, (code, message) => { // 分享成功:code=200 // ToastAndroid.show(message,ToastAndroid.SHORT); });
實作提醒
過程中最容易出錯的三個環節分別是:Android 的簽名檔案未正確產出或路徑填錯、iOS 的 Other Linker Flags 大小寫寫錯、以及 URL Scheme 的 appID 轉十六進位時忘記補零。這三項只要有一處出問題,分享就會靜默失敗而沒有明顯報錯,建議逐項核對。另外,範例中的 appKey 與 appSecret 皆為測試用,正式上線前務必替換成自己申請的憑證。
以上就是雙平台分享整合的完整流程,希望對大家的開發有所幫助。
- 上一篇文章: 用 CSS media query 打造響應式版面配置
- 下一篇文章: 原生 JS + Ajax 打造百度風格智慧搜尋下拉建議