開場總結:JS 建立物件的方式
JavaScript 建立物件有好幾種途徑,大體可歸為四類。
① 字面量方式
var obj = { name: "大橙子", age: 26 };
直接在大括號中寫出需要的欄位,最簡潔常用。
② 透過 Object 構造函數
var obj = new Object();
Object 是 JS 的內建物件。
③ 透過自定義構造函數
function father() {
  this.name = "I'm your father!";
}
var f = new father();
這裡透過構造函數建立了一個物件實例 f。
④ 透過 Object.create
Object.create(proto [, propertiesObject]);
這是 ES5 提出的新建立方式,第一個參數是要繼承的原型,若不需要可傳 null;第二個參數是屬性描述符,屬可選參數。
一、原型是什麼
我們建立的每個函數都有一個 prototype 屬性,它是一個指向原型物件的指標。這個原型物件的用途,是容納由特定型別所有實例共享的屬性與方法。也就是說,每建立一個函數,就會同時產生一個對應的原型物件。
而一個物件真正的原型,是由物件內部的 [[Prototype]] 所持有。ECMA 提供了標準的存取器 Object.getPrototypeOf(object);此外多數瀏覽器也支援非標準的 __proto__。若兩者都不可用,則要從物件的構造函數上找它的 prototype。
用例子來看最清楚:
function Person() {
  this.name = "大橙子";
  this.age = 26;
  this.sex = "純爺們";
}

var p = new Person();

console.log(p.name);    // "大橙子"
console.log(p.age);     // 26
console.log(p.sex);     // "純爺們"
console.log(p.career);  // undefined

Person.prototype.career = "程序員";
console.log(p.career);  // "程序員"
Person.prototype.career = "程序員" 就是透過原型加入的屬性,所有繼承自 Person 的物件都會擁有它。
這個過程是這樣的:讀取 p.career 時,引擎先在物件 p 自身尋找,因為 p 沒有這個屬性,所以回傳 undefined;執行賦值之後再讀取,p 本身依然沒有,於是沿著原型鏈往上,在 Person.prototype 中找到 career,因此印出「程序員」。
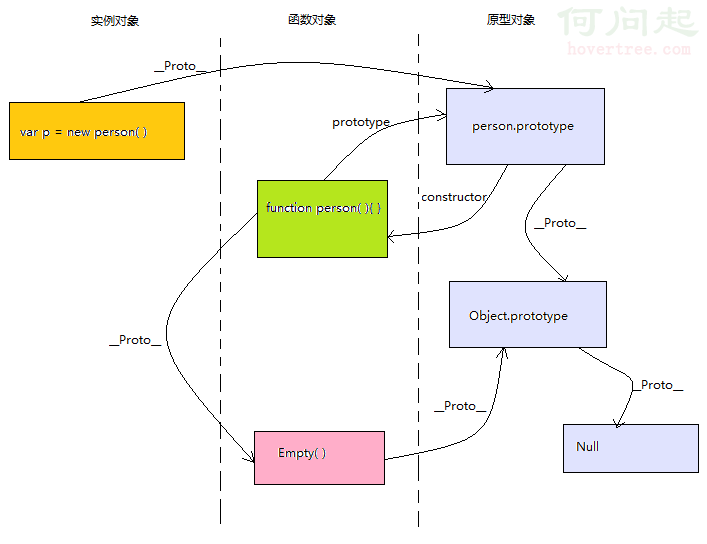
要把原型弄清楚,得先釐清 __proto__、prototype 與 constructor 三者的關係。我們就從 var p = new Person() 這行拆解。
先記住幾個前提:
第一,圖中的 Empty() 是所有函數的原型,它很特殊,自己沒有 prototype。
第二,__proto__ 是物件的內部原型,prototype 是構造器原型。構造器其實就是函數,所以 prototype 只有函數物件才有,而 __proto__ 每個物件都有——它才是構成原型鏈的關鍵。
接著依序看:
① 建立函數 Person() 時,JS 同時幫我們建立了一個原型物件 Person.prototype,並把 Person 的 prototype 指標指向它。這個原型物件中有一個 constructor 屬性,回指 Person 函數。
② 用 new 建立實例時,新物件 p 的 __proto__ 指向 Person.prototype。這也就是為什麼改動 Person.prototype 上的屬性,p 也能反映得出來。
③ Person.prototype 本身也是物件,那它的 __proto__ 是誰?答案是 Object.prototype——Object 是 JS 中所有物件的父級,包含內建物件在內。而 Object.prototype 的 __proto__ 則是 null,鏈條到此終止。
可以用程式實際印出來驗證:
console.log(Person.prototype);                                  // 原型物件
console.log(Person.prototype.constructor);                      // 回指 Person
console.log(p.__proto__ === Person.prototype);                   // true
console.log(Person.__proto__);                                  // 函數物件 Empty()
console.log(Person.__proto__.prototype);                        // undefined
console.log(Person.__proto__.__proto__ === Object.prototype);    // true
console.log(Person.prototype.__proto__ === Object.prototype);    // true
console.log(Object.prototype.__proto__);                        // null
二、原型鏈
上面這個例子還不太能看出「鏈」的感覺,再多看一個繼承的例子。
Object.prototype.dead = true;

function animal() {}
animal.prototype.eat = true;
animal.prototype.sleep = true;

function bird() {
  this.fly = true;
}
bird.prototype = new animal();

var a = new animal();
var b = new bird();

console.log(a.fly);    // undefined
console.log(a.eat);    // true
console.log(a.sleep);  // true
console.log(a.dead);   // true

console.log(b.fly);    // true
console.log(b.eat);    // true
console.log(b.sleep);  // true
console.log(b.dead);   // true
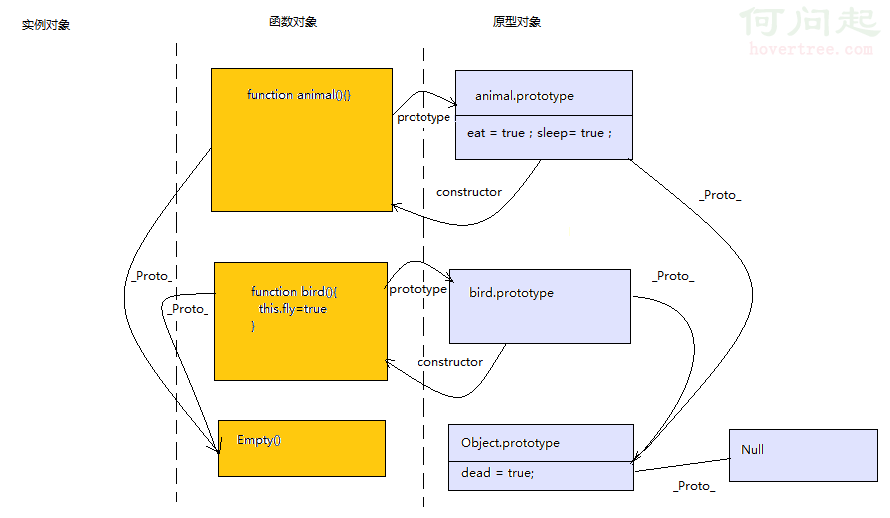
先看執行 bird.prototype = new animal(); 之前的狀態:
繼續執行之後:
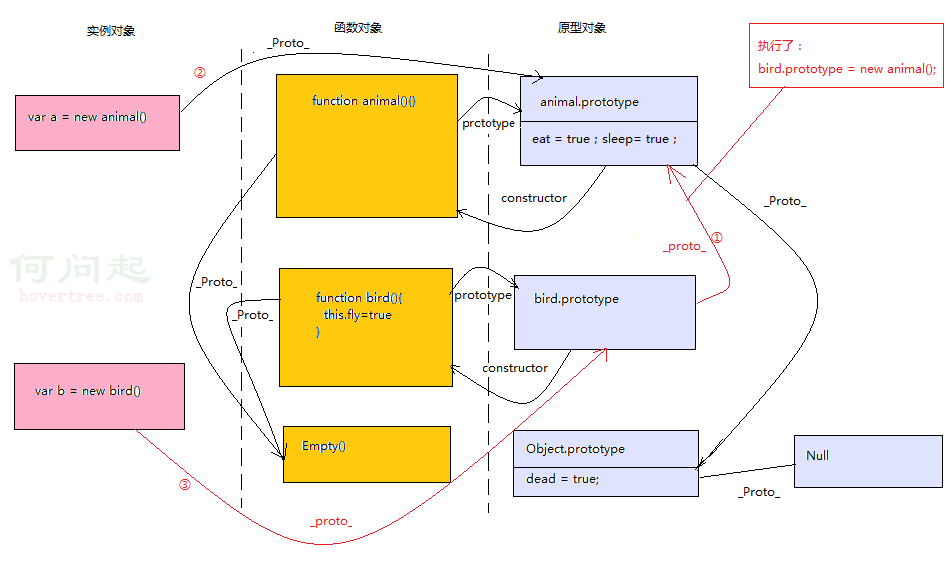
從圖上可以清楚看到,實例 b 的查找路徑是:
b → bird.prototype → animal.prototype → Object.prototype → null
這條鏈式結構解釋了為什麼 b.eat、b.sleep、b.dead 都印得出 true——b 自身與 bird.prototype 上都沒有這些屬性,於是沿著鏈一路往上,先在 animal.prototype 找到 eat 與 sleep,再在 Object.prototype 找到 dead。而 a.fly 之所以是 undefined,是因為 fly 只掛在 b 自身上,a 的查找路徑根本碰不到它。
這就是原型鏈最直觀的樣貌:屬性查找沿著 __proto__ 一路向上,直到 null 為止;找不到就回傳 undefined,不會報錯。
- 上一篇文章: onkeydown、onkeypress、onkeyup 的觸發順序與差異
- 下一篇文章: JSON 資料格式定義與陣列用法完整說明