10 個能省下大量工時的 CSS 實用技巧
編輯:CSS進階教程
CSS 已是前端開發的核心環節,但每次寫都要重新想一遍的細節實在太多。老手通常沿用自己累積的框架,新手卻沒有可依附的東西。以下十個片段都很短,卻能直接嵌進任何專案,是很好的起點。
1. 純 CSS 提示框(Tooltip)
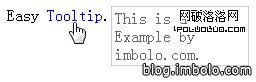
a:hover { background:#ffffff; /* 要相容 IE6 必須給背景色 */ text-decoration:none; }
a.tooltip span { display:none; padding:2px 3px; margin-left:8px; width:130px; }
a.tooltip:hover span { display:inline; position:absolute; background:#ffffff; border:1px solid #cccccc; color:#6c6c6c; }
對應的 HTML 只需把提示文字塞進 span:
Easy <a class="tooltip" href="#">Tooltip<span>This is a Example.</span></a>.
2. 重設基本樣式
各瀏覽器對 HTML 標籤的預設樣式不同,開篇先歸零能省掉後面一堆除錯。把這段放在樣式表最前面:
html, body, div, span, applet, object, iframe,
h1, h2, h3, h4, h5, h6, p, blockquote, pre,
a, abbr, acronym, address, big, cite, code,
del, dfn, em, font, img, ins, kbd, q, s, samp,
small, strike, strong, sub, sup, tt, var,
b, u, i, center,
dl, dt, dd, ol, ul, li,
fieldset, form, label, legend,
table, caption, tbody, tfoot, thead, tr, th, td {
  margin: 0; padding: 0; border: 0; outline: 0;
  font-size: 100%; vertical-align: baseline; background: transparent;
}
body { line-height: 1; }
ol, ul { list-style: none; }
blockquote, q { quotes: none; }
blockquote:before, blockquote:after, q:before, q:after { content: none; }
:focus { outline: 0; }
ins { text-decoration: none; }
del { text-decoration: line-through; }
table { border-collapse: collapse; border-spacing: 0; }
3. 用 outline 當除錯器
替不同嵌套層級的元素套上不同顏色的外框,標籤結構一眼就看出來,找 bug 很快。
* { outline: 2px dotted red }
* * { outline: 2px dotted green }
* * * { outline: 2px dotted orange }
* * * * { outline: 2px dotted blue }
* * * * * { outline: 1px solid red }
* * * * * * { outline: 1px solid green }
* * * * * * * { outline: 1px solid orange }
* * * * * * * * { outline: 1px solid blue }
4. 讓沒有寬度的 DIV 水平居中
固定寬度的容器用 margin:auto 就好;寬度不定的話可以借 table 排版模式:
.content { margin: 0 auto 8px; display: table; }
.content div { display: table-cell; }

<!--[if IE]>
.content { display: block; text-align: center; }
.content div { display: inline; zoom: 1; }
<![endif]-->
5. 為大圖加上偽載入動畫
等圖片下載完成是件苦事,用 JavaScript 動態載入門檻又高。折衷做法是先把載入圖當背景,視覺上至少有所回饋:
img { background: url(loading.gif) no-repeat center center; }
6. 預載圖片
把要預載的圖設成一個隱形容器的多重背景,推到畫面之外。HTML 載入完成後再把容器拉回來,圖片已經在快取裡。
div.loader {
  background:url(images/hover.gif) no-repeat;
  background:url(images/hover2.gif) no-repeat;
  background:url(images/hover3.gif) no-repeat;
  margin-left:-10000px;
}
7. 跨瀏覽器的透明度
selector {
  filter: alpha(opacity=60); /* MSIE/PC */
  -moz-opacity: 0.6; /* 舊版 Mozilla */
  opacity: 0.6;
}
8. 最小高度
IE 不支援 min-height,只能另外餵它一個 height。因為 IE 不認 min 屬性,height 設成 8em 反而能讓容器正常撐開。
/* 正常瀏覽器 */
.container { min-height:8em; height:auto !important; }

/* Internet Explorer */
* html .container { height: 8em; }
9. 依連結類型給不同樣式
CSS3 的屬性選擇器可以讓外部連結、mailto、附件各自有不同的視覺提示:
a[href^="https://"] { padding-right: 13px; background: url(external.gif) no-repeat center right; }
a[href^="mailto:"] { padding-right: 20px; background: url(email.png) no-repeat center right; }
a[href$=".pdf"] { padding-right: 18px; background: url(acrobat.png) no-repeat center right; }
缺點是不支援 CSS3 的舊瀏覽器會完全忽略,這也正是該淘汰老版本 IE 的理由之一。
10. 移除文字輸入框多餘的捲軸
IE 常在任何 textarea 上畫蛇添足地加一條捲軸,即使內容根本沒溢出:
textarea { overflow:auto; }
這十段的共同點是:都不長,但每段都對應一個你一定會遇到的問題。把它們收進自己的起始樣式表,下次開新專案就能少寫很多重複工。
- 上一篇文章: 三支值得看過的 CSS 與 HTML 標籤教學影片
- 下一篇文章: 6 個值得收藏的 CSS3 學習資源網站