HTML5 Canvas 旋轉動畫的兩種寫法(旋轉太極圖)
編輯:HTML5教程
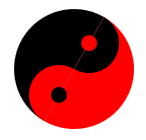
Canvas 做旋轉動畫有兩條路:一是每次重繪時把角度參數帶進三角函式,逐一計算每個弧的起訖角;二是用畫布變換矩陣 translate + rotate,讓 Canvas 自己處理旋轉。以下用一個旋轉的太極圖示範兩種做法。
效果圖:
方法一:直接計算角度
這個版本不使用 Canvas 的旋轉 API,而是把遞增的角度 deg 直接加到每個 arc() 的起始角與結束角上,讓圖形「看起來」在轉。
<!DOCTYPE HTML>
<html>
<body>
<canvas id="myCanvas" width="500" height="500">你的瀏覽器不支援 canvas 標籤</canvas>
<script type="text/javascript">
var deg = 0;
var r = 30;
var rl = 100;

function drawTaiji() {
    var canvas = document.getElementById('myCanvas');
    var context = canvas.getContext('2d');
    var colorA = "rgb(0, 0, 0)";
    var colorB = "red";

    var px = Math.sin(deg) * r;
    var py = Math.cos(deg) * r;

    context.clearRect(0, 0, 300, 300);

    // 左半邊(黑)
    context.beginPath();
    context.fillStyle = colorA;
    context.arc(rl, rl, 60, 0.5 * Math.PI + deg, 1.5 * Math.PI + deg, true);
    context.closePath();
    context.fill();

    // 右半邊(紅)
    context.fillStyle = colorB;
    context.beginPath();
    context.arc(rl, rl, 60, 1.5 * Math.PI + deg, 0.5 * Math.PI + deg, true);
    context.closePath();
    context.fill();

    // 兩個小圓
    context.fillStyle = colorB;
    context.beginPath();
    context.arc(rl + px, rl - py, 30, 0.5 * Math.PI + deg, 1.5 * Math.PI + deg, true);
    context.closePath();
    context.fill();

    context.fillStyle = colorA;
    context.beginPath();
    context.arc(rl - px, rl + py, 30, 1.5 * Math.PI + deg, 0.5 * Math.PI + deg, true);
    context.closePath();
    context.fill();

    // 兩個小點
    context.fillStyle = colorA;
    context.beginPath();
    context.arc(rl + px, rl - py, 8, 0, 2 * Math.PI, true);
    context.closePath();
    context.fill();

    context.fillStyle = colorB;
    context.beginPath();
    context.arc(rl - px, rl + py, 8, 0, 2 * Math.PI, true);
    context.closePath();
    context.fill();

    deg += 0.1;
}
setInterval(drawTaiji, 100);
</script>
</body>
</html>
方法二:使用 translate 與 rotate
這個版本把太極圖封裝成一個函式,畫在「原點為圓心」的座標系上,再由外部透過 translate 決定位置、rotate 決定角度。因為用 save()/restore() 包住,變換不會污染其他繪圖。
<!DOCTYPE HTML>
<html>
<body>
<canvas id="myCanvas" width="500" height="500">你的瀏覽器不支援 canvas 標籤</canvas>
<script type="text/javascript">
var canvas = document.getElementById('myCanvas');
var ctx = canvas.getContext("2d");
var angle = 0;
var count = 360;
var clrA = '#000';
var clrB = 'red';

function taiji(x, y, radius, angle, wise) {
    angle = angle || 0;
    wise = wise ? 1 : -1;

    ctx.save();
    ctx.translate(x, y);
    ctx.rotate(angle);

    // 左半圓
    ctx.fillStyle = clrA;
    ctx.beginPath();
    ctx.arc(0, 0, radius, 0, Math.PI, true);
    ctx.fill();

    // 右半圓
    ctx.fillStyle = clrB;
    ctx.beginPath();
    ctx.arc(0, 0, radius, 0, Math.PI, false);
    ctx.fill();

    // 兩側小圓
    ctx.fillStyle = clrB;
    ctx.beginPath();
    ctx.arc(wise * -0.5 * radius, 0, radius / 2, 0, Math.PI * 2, true);
    ctx.fill();

    ctx.fillStyle = clrA;
    ctx.beginPath();
    ctx.arc(wise * +0.5 * radius, 0, radius / 2, 0, Math.PI * 2, false);
    ctx.arc(wise * -0.5 * radius, 0, radius / 10, 0, Math.PI * 2, true);
    ctx.fill();

    // 小圓上的點
    ctx.fillStyle = clrB;
    ctx.beginPath();
    ctx.arc(wise * +0.5 * radius, 0, radius / 10, 0, Math.PI * 2, true);
    ctx.fill();

    ctx.restore();
}

setInterval(function () {
    ctx.clearRect(0, 0, canvas.width, canvas.height);
    taiji(200, 200, 50, Math.PI * (angle / count) * 2, true);
    angle = (angle + 5) % count;
}, 50);
</script>
</body>
</html>
該選哪一個
方法一讓你完全掌握每個頂點的座標,適合需要依角度做額外判斷或互動的場景,但公式一多就難讀。方法二把「畫一個圖形」與「這個圖形在哪、轉多少度」拆開,函式可以重複呼叫、畫在畫布任何位置、轉到任何角度,可讀性與可重用性都更好,是比較推薦的寫法。
另外,兩個範例都用了 setInterval。實務上建議改用 requestAnimationFrame,讓瀏覽器依螢幕刷新率與頁面可見狀態排程,動畫會更順、也更省電。
- 上一篇文章: HTML5 自訂屬性 data-* 詳解與 JavaScript 操作範例
- 下一篇文章: HTML5 Canvas 鋸齒邊框圖形實作範例