照片牆只能看不能動?那我們就讓它可以動。本文帶你動手做一個基於 HTML5 Canvas 的「自由拼圖」:每張照片都能用滑鼠拖曳、任意角度旋轉、拖動角落縮放,還能刪除、替換,最後一鍵合成圖片並上傳伺服器。
先看成品
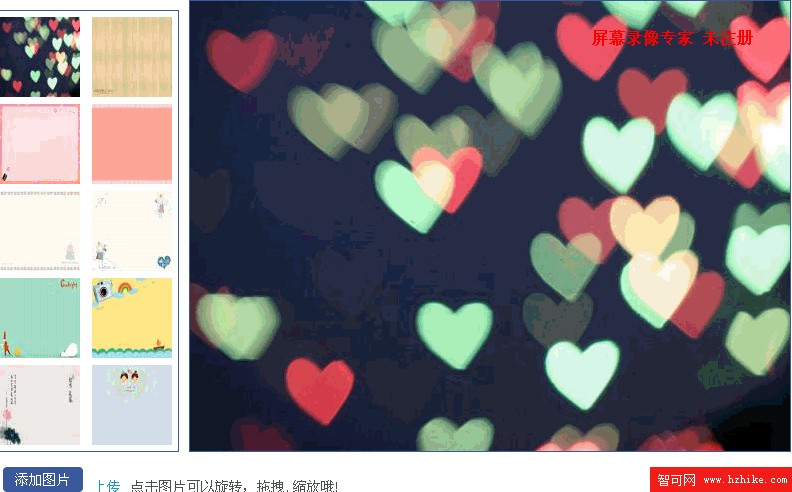
左側是素材清單,右側是拼圖畫布。點一下縮圖更換背景,把照片拖進畫布後即可自由擺放,選中照片旁還會浮出一個小工具列。
整體結構拆成三層
這個範例刻意把職責切開,三個檔案各司其職:
- canvasElement.js:畫布控制器。負責多層 canvas 的建立、滑鼠事件的派發、命中判定與重繪。
- canvasImg.js:單張圖片的資料模型。記錄位置、角度、縮放比,並計算旋轉後的四個角座標。
- Html5_puzzle.js:業務層。把素材清單、上傳、刪除、合成等互動串起來。
多層 Canvas 是關鍵設計
為什麼要用好幾層 canvas?因為拖曳時只需要重畫「正在動的那一張」,若每次都把全部內容重繪,效能會很難看。這裡的做法是插入三層重疊的 canvas:
背景層(canvas-background)→ 內容層(canvas-container)→ 交互層(canvas-top)
背景圖畫在背景層,已確定的照片畫在內容層,滑鼠操作中或選中的那一張畫在最上面的交互層,移動時只清掉交互層即可。
Canvas.Element.prototype.init = function(el, oConfig) {
    if (el == '') { return; }
    this._initElement(el);
    this._initConfig(oConfig);
    this._createCanvasBackground();
    this._createContainer();
    this._initEvents();
    this._initCustomEvents();
};

Canvas.Element.prototype._initEvents = function() {
    var _this = this;
    S(this._oElement).on('mousedown', function(e){ _this.onMouseDown(e); });
    S(this._oElement).on('mouseup',   function(e){ _this.onMouseUp(e); });
    S(this._oElement).on('mousemove', function(e){ _this.onMouseMove(e); });
};
命中判定:光靠 getBoundingClientRect 不夠
圖片一旦旋轉,它的邊界就不再是矩形。這裡用了經典的「射線交叉法」:從滑鼠位置向右射出一條射線,統計它與圖形四條邊的交點數量,奇數代表在圖形內,偶數代表在外。
Canvas.Element.prototype._findCrossPoints = function(mp, oCoords) {
    var b1, b2, a1, a2, xi, yi;
    var xcount = 0;
    var iLine = null;
    for (lineKey in oCoords) {
        iLine = oCoords[lineKey];
        if ((iLine.o.y < mp.ey) && (iLine.d.y < mp.ey))  { continue; }
        if ((iLine.o.y >= mp.ey) && (iLine.d.y >= mp.ey)) { continue; }
        if ((iLine.o.x == iLine.d.x) && (iLine.o.x >= mp.ex)) {
            xi = iLine.o.x; yi = mp.ey;
        } else {
            b1 = 0;
            b2 = (iLine.d.y - iLine.o.y) / (iLine.d.x - iLine.o.x);
            a1 = mp.ey - b1 * mp.ex;
            a2 = iLine.o.y - b2 * iLine.o.x;
            xi = - (a1 - a2) / (b1 - b2);
            yi = a1 + b1 * xi;
        }
        if (xi >= mp.ex) { xcount += 1; }
        if (xcount == 2)  { break; }
    }
    return xcount;
};
同一套邏輯也拿來判斷滑鼠是否落在四個「旋轉把手」上——把每個角另外算出一個小方形範圍(setCornerCoords),再跑一次射線檢測,就能決定游標該顯示 ne-resize 還是 se-resize。
拖曳與旋轉
mousedown 時先判斷是「拖曳」還是「旋轉」,並把當下的狀態快照存進 _currentTransform;mousemove 依快照算出新的位置或角度。
Canvas.Element.prototype.rotateImage = function(mp) {
    var lastAngle = Math.atan2(
        this._currentTransform.ey - this._currentTransform.top,
        this._currentTransform.ex - this._currentTransform.left
    );
    var curAngle = Math.atan2(
        mp.ey - this._currentTransform.top,
        mp.ex - this._currentTransform.left
    );
    this._currentTransform.target.theta =
        (curAngle - lastAngle) + this._currentTransform.theta;
    this.curAngle = this._currentTransform.target.theta * 180 / 3.14;
    $('canvas_menu').style.transform = 'rotate(' + this.curAngle + 'deg)';
};
縮放則是比較「中心到滑鼠的距離」變化比例,並加了一道下限保護,避免把圖片縮小到看不見:
Canvas.Element.prototype.scaleImage = function(mp) {
    var lastLen = Math.sqrt(
        Math.pow(this._currentTransform.ey - this._currentTransform.top, 2) +
        Math.pow(this._currentTransform.ex - this._currentTransform.left, 2));
    var curLen = Math.sqrt(
        Math.pow(mp.ey - this._currentTransform.top, 2) +
        Math.pow(mp.ex - this._currentTransform.left, 2));
    var curScalex = this._currentTransform.scalex * (curLen / lastLen);
    var curScaley = this._currentTransform.target.scalex;
    if (curScalex > 0.7 && curScaley > 0.7) {
        this._currentTransform.target.scalex = curScalex;
        this._currentTransform.target.scaley = curScaley;
    }
};
旋轉後的座標怎麼算
這是整個範例數學味最重的一段。已知中心點、寬高、旋轉角 θ,先求對角線半長與半對角夾角,再用三角函數推回左上角,之後依序加上旋轉後的寬向量與高向量,四個角就出來了。
Canvas.Img.prototype.setImageCoords = function() {
    this.left = parseInt(this.left);
    this.top  = parseInt(this.top);
    this.currentWidth  = parseInt(this.width)  * this.scalex;
    this.currentHeight = parseInt(this.height) * this.scalex;
    this._hypotenuse = Math.sqrt(Math.pow(this.currentWidth / 2, 2) +
                                 Math.pow(this.currentHeight / 2, 2));
    this._angle = Math.atan(this.currentHeight / this.currentWidth);

    var offsetX = Math.cos(this._angle + this.theta) * this._hypotenuse;
    var offsetY = Math.sin(this._angle + this.theta) * this._hypotenuse;
    var sinTh = Math.sin(this.theta), cosTh = Math.cos(this.theta);

    var tl = { x: this.left - offsetX, y: this.top - offsetY };
    var tr = { x: tl.x + this.currentWidth  * cosTh,
               y: tl.y + this.currentWidth  * sinTh };
    var br = { x: tr.x - this.currentHeight * sinTh,
               y: tr.y + this.currentHeight * cosTh };
    var bl = { x: tl.x - this.currentHeight * sinTh,
               y: tl.y + this.currentHeight * cosTh };

    this.oCoords = { tl: tl, tr: tr, br: br, bl: bl };
    this.setCornerCoords();
};
頁面骨架與樣式
HTML 部分把素材區、畫布區、操作區切乾淨,素材用 data-index 標記對應的大圖:
<div id='Html5_puzzle'>
  <div id='puzzle_left'>
    <div class='puzzle_column'>
      <ul>
        <li><img src='small_img/1.jpg' data-index='1' /></li>
        <li><img src='small_img/2.jpg' data-index='2' /></li>
        <!-- ... 其餘素材 -->
      </ul>
    </div>
  </div>
  <div id='puzzle_right'>
    <div id='puzzle_canvas'>
      <canvas id="canvid1"></canvas>
      <div id='canvas_menu'>
        <a href='Javascript:void(0)' id='photo_delete'>刪除</a>
        <a href='Javascript:void(0)' id='photo_update'>更改圖片</a>
      </div>
    </div>
    <img id="bg" src="big_img/1.jpg" width='600' height='450' />
  </div>
  <div id='puzzle_bottom'>
    <a href='Javascript:void(0)' id='add_img'><span>添加圖片</span>
      <input type="file" multiple="" id='fileImage'></a>
    <a href='Javascript:void(0)' id='upload_btn'>上傳</a>
    <a>點擊圖片可以旋轉、拖拽、縮放</a>
  </div>
</div>
CSS 有兩個小細節值得學:三層 canvas 用 position:absolute 完全重疊;「添加圖片」按鈕把真正的 file input 設成 opacity:0 鋪滿整個按鈕,這樣點擊樣式化按鈕就能開啟檔案選擇器,跨瀏覽器都很穩。
canvas { background-color: transparent; left: 0; position: absolute; top: 0; }

#puzzle_canvas { overflow: hidden; width: 600px; height: 450px; position: relative; }

#add_img {
  position: relative; display: inline-block; background: #3B5998;
  border-radius: 4px; padding: 4px 12px; overflow: hidden; color: #ffffff;
}
#add_img input { position: absolute; font-size: 100px; right: 0; top: 0; opacity: 0; }

#canvas_menu { border: 1px solid red; position: absolute; z-index: 5;
               top: 0; left: 0; display: none; }
把互動串起來
主流程用 AMD 的 require 載入模組,初始化畫布後綁定素材點擊、刪除、換圖、上傳。更換圖片時先改 bg 的 src,等 onload 觸發後重畫背景層。
require([ 'img_upload', '../puzzle/canvasImg', '../puzzle/canvasElement' ],
function(S, canvasImg, canvasElement) {
    var img = [];
    var canvas = new canvasElement.Element();
    canvas.init('canvid1', { width: 600, height: 450 });

    S('.puzzle_column img').on('click', function(e) {
        var index = this.getAttribute('data-index');
        $('bg').onload = function() {
            var ctx = $('canvid1-canvas-background').getContext('2d');
            ctx.clearRect(0, 0, 600, 450);
            img[0] = new canvasImg.Img($('bg'), {});
            canvas.setCanvasBackground(img[0]);
        };
        $('bg').setAttribute('src', 'medium_img/' + index + '.jpg');
        e.stopPropagation();
    });
    // ...其餘事件綁定
});
刪除的作法是先用 src 比對找出目前選取的圖在陣列中的索引,再 splice 掉並重繪:
function getCurImg() {
    var oImg = canvas._prevTransform.target;
    for (var i = 0; i < canvas._aImages.length; i++) {
        if (canvas._aImages[i]._oElement.src == oImg._oElement.src) { return i; }
    }
}

S('#photo_delete').on('click', function(e) {
    canvas._aImages.splice(getCurImg(), 1);
    canvas.renderAll(true, true);
    $('canvas_menu').style.display = "none";
});
本機換圖與最終合成
「更改圖片」用 FileReader 讀成本機檔案,先縮到 200px 以內避免記憶體爆掉,畫到臨時 canvas 轉成 DataURL,再包成新的 Canvas.Img 塞回原位置——注意這裡把原本的 top / left / scalex / angle 都複製過來,才能無縫替換。
輸出成品則靠 canvasTo:先把全部內容畫到最上層,清掉四角的綠色把手,最後呼叫 toDataURL。
Canvas.Element.prototype.canvasTo = function(format) {
    this.renderAll(true, false);
    var containerCanvas = this._oContextTop;
    for (var i = 0, l = this._aImages.length; i < l; i += 1) {
        this.clearCorners(containerCanvas, this._aImages[i],
                          this._aImages[i].width / 2,
                          this._aImages[i].height / 2);
    }
    if (format == 'jpeg' || format == 'png') {
        return this._oElement.toDataURL('image/' + format);
    }
};
上傳時把 DataURL 去掉前綴(substr(22))當成 base64 字串 POST 到後端,由 PHP 端解碼存檔即可。
可以延伸的方向
這份實作奠定了完整骨架,若要繼續打磨,可以考慮:加入吸附對齊輔助線、用 requestAnimationFrame 取代直接重繪、把 hit test 換成 Path2D + isPointInPath 以簡化數學,或是加上手勢支援讓它在行動裝置上也能用兩指旋轉縮放。