WebGL 3D 水波特效實作:逼真的多視角水面動畫
編輯:HTML5詳解
這是一個以 HTML5 打造的三維水波動畫,視覺效果相当逼真:按「G」鍵可以讓水池中的石頭上下浮動,按「L」鍵則能切換燈光效果。整個場景基於 WebGL 渲染,如果你想深入研究 GPU 繪圖,這是個很值得拆解的範例。
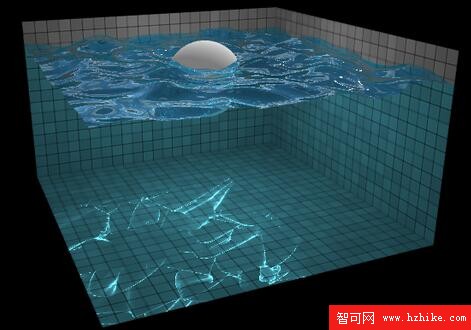
線上預覽 原始碼下載
先理解它是怎麼模擬水的
水面並不是真的用物理引擎算流體,而是一套在 GPU 上跑的「高度場」模擬。核心概念有三個:
- 高度與速度分開存放:每個像素用一個浮點向量記錄狀態,R 通道存高度,G 通道存變化速度。
- 鄰居平均決定加速度:取上下左右四個鄰格的平均高度,讓速度朝平均值靠攏,波紋便會自然向外擴散。
- 法線由高度差導出:算出各點的法向量後,就能讓燈光在水面上產生正確的高光與反射。
由於要把浮點數存進紋理,這個範例依賴 OES_texture_float 擴充;程式一開始就檢查它,不支援便直接丟出錯誤訊息。
HTML 部分
場景需要的貼圖只用幾個 <img> 預先載入,之後交由 WebGL 當成材質使用:
<img id="tiles" src="tiles.jpg">
<img id="xneg" src="xneg.jpg">
<img id="xpos" src="xpos.jpg">
<img id="ypos" src="ypos.jpg">
<img id="zneg" src="zneg.jpg">
<img id="zpos" src="zpos.jpg">
JavaScript 部分
整個模擬被封裝在 Water 建構子裡,四支 shader 各司一職:dropShader 產生漣漪、updateShader 推進波動、normalShader 計算法線、sphereShader 處理石頭進出水面的排水量變化。
function Water() {
  var vertexShader = `
    varying vec2 coord;
    void main() {
      coord = gl_Vertex.xy * 0.5 + 0.5;
      gl_Position = vec4(gl_Vertex.xyz, 1.0);
    }
  `;

  this.plane = GL.Mesh.plane();

  if (!GL.Texture.canUseFloatingPointTextures()) {
    throw new Error('This demo requires the OES_texture_float extension');
  }

  var filter = GL.Texture.canUseFloatingPointLinearFiltering() ? gl.LINEAR : gl.NEAREST;
  this.textureA = new GL.Texture(256, 256, { type: gl.FLOAT, filter: filter });
  this.textureB = new GL.Texture(256, 256, { type: gl.FLOAT, filter: filter });

  // 產生漣漪:以 center 為圓心,在半徑內疊加一個餘弦波形
  this.dropShader = new GL.Shader(vertexShader, `
    const float PI = 3.141592653589793;
    uniform sampler2D texture;
    uniform vec2 center;
    uniform float radius;
    uniform float strength;
    varying vec2 coord;
    void main() {
      /* get vertex info */
      vec4 info = texture2D(texture, coord);
      /* add the drop to the height */
      float drop = max(0.0, 1.0 - length(center * 0.5 + 0.5 - coord) / radius);
      drop = 0.5 - cos(drop * PI) * 0.5;
      info.r += drop * strength;
      gl_FragColor = info;
    }
  `);

  // 推進模擬:讓高度朝鄰居平均值收斂
  this.updateShader = new GL.Shader(vertexShader, `
    uniform sampler2D texture;
    uniform vec2 delta;
    varying vec2 coord;
    void main() {
      vec4 info = texture2D(texture, coord);
      /* calculate average neighbour height */
      vec2 dx = vec2(delta.x, 0.0);
      vec2 dy = vec2(0.0, delta.y);
      float average = (
        texture2D(texture, coord - dx).r +
        texture2D(texture, coord - dy).r +
        texture2D(texture, coord + dx).r +
        texture2D(texture, coord + dy).r
      ) * 0.25;
      /* change the velocity to move toward the average */
      info.g += (average - info.r) * 2.0;
      /* attenuate the velocity a little so waves do not last forever */
      info.g *= 0.995;
      /* move the vertex along the velocity */
      info.r += info.g;
      gl_FragColor = info;
    }
  `);

  // 由高度差導出法線
  this.normalShader = new GL.Shader(vertexShader, `
    uniform sampler2D texture;
    uniform vec2 delta;
    varying vec2 coord;
    void main() {
      vec4 info = texture2D(texture, coord);
      /* update the normal */
      vec3 dx = vec3(delta.x, texture2D(texture, vec2(coord.x + delta.x, coord.y)).r - info.r, 0.0);
      vec3 dy = vec3(0.0, texture2D(texture, vec2(coord.x, coord.y + delta.y)).r - info.r, delta.y);
      info.ba = normalize(cross(dy, dx)).xz;
      gl_FragColor = info;
    }
  `);

  // 石頭移動時,舊位置補水、新位置排水
  this.sphereShader = new GL.Shader(vertexShader, `
    uniform sampler2D texture;
    uniform vec3 oldCenter;
    uniform vec3 newCenter;
    uniform float radius;
    varying vec2 coord;

    float volumeInSphere(vec3 center) {
      vec3 toCenter = vec3(coord.x * 2.0 - 1.0, 0.0, coord.y * 2.0 - 1.0) - center;
      float t = length(toCenter) / radius;
      float dy = exp(-pow(t * 1.5, 6.0));
      float ymin = min(0.0, center.y - dy);
      float ymax = min(max(0.0, center.y + dy), ymin + 2.0 * dy);
      return (ymax - ymin) * 0.1;
    }

    void main() {
      vec4 info = texture2D(texture, coord);
      /* add the old volume */
      info.r += volumeInSphere(oldCenter);
      /* subtract the new volume */
      info.r -= volumeInSphere(newCenter);
      gl_FragColor = info;
    }
  `);
}
接著是四個方法。這裡有個關鍵技巧:模擬結果不能直接寫回同一張紋理,因此每次都畫進 textureB,再把兩張紋理交換,讓下一步的輸入永遠是上一步的輸出。
Water.prototype.addDrop = function(x, y, radius, strength) {
  var this_ = this;
  this.textureB.drawTo(function() {
    this_.textureA.bind();
    this_.dropShader.uniforms({
      center: [x, y],
      radius: radius,
      strength: strength
    }).draw(this_.plane);
  });
  this.textureB.swapWith(this.textureA);
};

Water.prototype.moveSphere = function(oldCenter, newCenter, radius) {
  var this_ = this;
  this.textureB.drawTo(function() {
    this_.textureA.bind();
    this_.sphereShader.uniforms({
      oldCenter: oldCenter,
      newCenter: newCenter,
      radius: radius
    }).draw(this_.plane);
  });
  this.textureB.swapWith(this.textureA);
};

Water.prototype.stepSimulation = function() {
  var this_ = this;
  this.textureB.drawTo(function() {
    this_.textureA.bind();
    this_.updateShader.uniforms({
      delta: [1 / this_.textureA.width, 1 / this_.textureA.height]
    }).draw(this_.plane);
  });
  this.textureB.swapWith(this.textureA);
};

Water.prototype.updateNormals = function() {
  var this_ = this;
  this.textureB.drawTo(function() {
    this_.textureA.bind();
    this_.normalShader.uniforms({
      delta: [1 / this_.textureA.width, 1 / this_.textureA.height]
    }).draw(this_.plane);
  });
  this.textureB.swapWith(this.textureA);
};
把這些積木接起來
有了 Water 之後,主程式要做的事就清楚了:建立 Water 物件、準備天空盒材質、掛上鍵盤事件觸發 addDrop 與燈光切換,然後在每一幀依序呼叫 stepSimulation() 與 updateNormals(),最後才畫出水面與場景幾何。因為模擬與渲染完全分離,畫面解析度調整時不必更動水波計算,這也是這類架構最值得學的地方。
以上就是本文的全部內容,希望對大家的學習有所幫助。