網頁要上傳檔案,幾乎都會用到 <input type="file">。但它的預設外觀實在樸素:
Chrome 下:

IE 下:

兩者風格都極簡,跟多數網站的設計語言很難協調。依需求改寫它的外觀,就成了常見課題。目標:做一個 Bootstrap 風格的上傳按鈕。

先搭出基本骨架
<span>
  <span>上傳</span>
  <input type="file">
</span>
此時在 Chrome 下會分成兩行顯示:
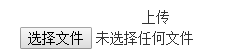
外層之所以用 span 而非 div,是因為在 IE7 以下的瀏覽器中,只要不是 inline,寬度就會被撐到最大;但若設成 inline,寬度又完全無法調整。改用 span 並指定 inline-block,剛好能繞過這個兩難。
用定位把兩行併成一行
<span class="fileinput-button">
  <span>上傳</span>
  <input type="file">
</span>
.fileinput-button { position: relative; display: inline-block; }
.fileinput-button input { position: absolute; right: 0px; top: 0px; }結果:

預設看不到淺藍框線,那是點擊後才出現的焦點框,這裡顯示出來只是為了看清楚範圍。
原理是把外層 span 設為 relative 定位錨點,再讓 input 以 absolute 脫離文檔流,收進 span 的範圍內,兩行自然疊成一層。
不過此時其實已經溢出了,實際寬度只有「上傳」兩字的寬,所以必須補上 overflow: hidden:
.fileinput-button { position: relative; display: inline-block; overflow: hidden; }效果:

很有意思,上緣與右緣的藍色框線露出來了,其實就是把左邊與下邊多出的部分裁掉。這時候用滑鼠點「上傳」兩字,實際上是点在 input 上,所以「開啟」對話框照樣彈出——在堆疊層級上,input 比文字更貼近使用者。
right 與 left 定位的差別
為什麼用 right 而不用 left?改用 left 之後:
Chrome 下:

IE 下:

Chrome 裡只是露出選擇按鈕,後續用透明度處理即可;但 IE 會把輸入框本身整個露出來,而且滑鼠移到輸入框上时光标會變成文字輸入態,這個細節幾乎無解。改用 right 定位把輸入框推到左側,就能在 IE 下避開這個問題。
讓 input 完全透明
.fileinput-button { position: relative; display: inline-block; overflow: hidden; }
.fileinput-button input {
  position: absolute;
  left: 0px;
  top: 0px;
  opacity: 0;
  -ms-filter: 'alpha(opacity=0)';
}
效果:

input 徹底消失,但點擊「上傳」依然有效,可支援 IE8 以上。
引入 Bootstrap 套用現成按鈕樣式
在 head 中載入外部 CSS 與 JS:
<link rel="stylesheet" href="bootstrap/bootstrap.css">
<link rel="stylesheet" href="bootstrap/bootstrap-theme.css">
<script src="bootstrap/jquery-1.10.2.js"></script>
<script src="bootstrap/bootstrap.js"></script>
再替外層 span 掛上 Bootstrap 的按鈕 class:
<span class="btn btn-success fileinput-button">
  <span>上傳</span>
  <input type="file">
</span>
效果:

解決覆蓋範圍不足的問題
若替 .fileinput-button 加上 width: 100px、外層 span 也設成 100px 寬,會發現點擊按鈕下半部沒有反應——因為 input 仍是預設尺寸,蓋不住整個區域。
解法是把 input 的字級撐大,讓它自己長到足以覆蓋整個按鈕,這裡設成 200px:
.fileinput-button input {
  position: absolute;
  right: 0px;
  top: 0px;
  opacity: 0;
  -ms-filter: 'alpha(opacity=0)';
  font-size: 200px;
}
覆蓋問題就此解決。
需要相容 IE7 以下的話
可以參考 jQuery-File-Upload 的做法:
<!DOCTYPE html>
<html>
<head>
  <title></title>
  <meta http-equiv="Content-Type" content="text/html;charset=utf-8">
  <link rel="stylesheet" href="bootstrap/bootstrap.css">
  <link rel="stylesheet" href="bootstrap/bootstrap-theme.css">
  <script src="bootstrap/jquery-1.10.2.js"></script>
  <script src="bootstrap/bootstrap.js"></script>
  <style>
    .fileinput-button {
      position: relative;
      display: inline-block;
      overflow: hidden;
    }
    .fileinput-button input {
      position: absolute;
      right: 0px;
      top: 0px;
      opacity: 0;
      -ms-filter: 'alpha(opacity=0)';
      font-size: 200px;
    }
  </style>
</head>
<body style="padding: 10px">
  <div align="center">
    <span class="btn btn-success fileinput-button">
      <span>上傳</span>
      <input type="file">
    </span>
  </div>
</body>
</html>
整套思路可以濃縮成一句:外層 relative + overflow hidden,內層 absolute + opacity 0,就能把不可控的原生控件馴化成任何你想要的樣子。
- 上一篇文章: input 的 file 上傳控件用法與美化思路
- 下一篇文章: HTML 入門筆記:標記語言的定義與基礎語法