JavaScript 插件化開發(六):把重複程式碼抽成介面的重構實踐
編輯:關於JavaScript
上一篇我們把下拉選單插件 ItemSelector 跑了起來,功能正常,但程式碼醜得很有潛力。這一篇就來動刀重構。
一、回顧現況
先看目前的 Js 主體:
復制代碼 代碼如下:
function ItemSelector(elem,opts){
    this.elem = elem ;
    this.opts = opts ;
} ;
var ISProto = ItemSelector.prototype ;
ISProto.getElem = function(){ return this.elem ; } ;
ISProto.getOpts = function(){ return this.opts ; } ;
ISProto.init = function(){
    var that = this ;
    this.getOpts()["current"] = null ; // 數據游標
    this._setItemValue(this.getOpts()["currentText"]) ;
    var itemsElem = that.getElem().find(".content .items") ;
    this.getElem().find(".title div").on("click",function(){ itemsElem.toggle() ; }) ;
    this.getElem().find(".title span").on("click",function(){ itemsElem.toggle() ; }) ;
    $.each(this.getOpts()["items"],function(i,item){
        item["id"] = (new Date().getTime()).toString() ;
        that._render(item) ;
    }) ;
} ;
ISProto._render = function(item){
    var that = this ;
    var itemElem = $("<div></div>").text(item["text"]).attr("id",item["id"]) ;
    if("0" == item["disabled"]){
        itemElem.on("click",function(){
            var onChange = that.getOpts()["change"] ;
            that.getElem().find(".content .items").hide() ;
            that._setItemValue(item["text"]) ;
            that._setCurrent(item) ;
            onChange && onChange(item) ;
        })
        .mouseover(function(){ $(this).addClass("item-hover") ; })
        .mouseout(function(){ $(this).removeClass("item-hover") ; }) ;
    } else {
        itemElem.css("color","#ccc").on("click",function(){
            that.getElem().find(".content .items").hide() ;
            that._setItemValue(item["text"]) ;
        }) ;
    }
    itemElem.appendTo(this.getElem().find(".content .items")) ;
} ;
對應的畫面有三種狀態:預設收起、展開可操作、以及項目被停用。
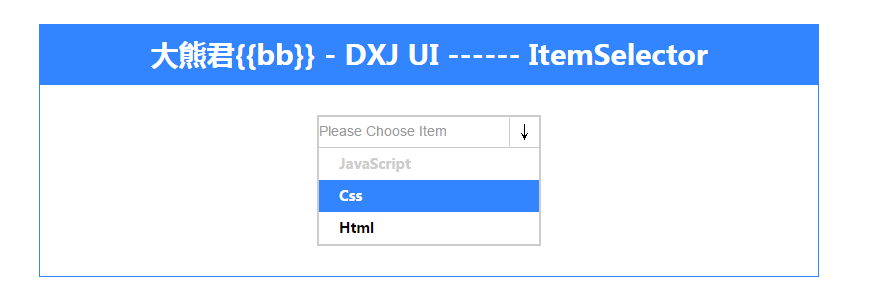
a) 非可操作狀態
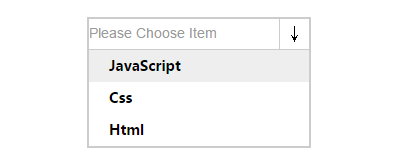
b) 可操作狀態
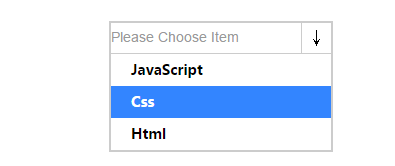
二、問題盤點
雖然已經用物件導向的寫法組織過,比一團過程式程式碼好得多,但毛病還是很明顯:
1. 重複程式碼太多——兩個一模一樣的 toggle 綁定、兩段幾乎相同的 click 邏輯。
2. 職責劃分不清——init 裡混進了細節實作,初始化與渲染糾纏在一起。
3. 流程不夠清晰——資料游標被塞進 opts 裡, DOM 操作與資料操作沒有分家。
三、重構步驟
先把呼叫端確認一遍,這部分寫得很乾淨,不需要動:
復制代碼 代碼如下:
$(function(){
    var itemSelector = new ItemSelector($("#item-selector"),{
        currentText : "Please Choose Item" ,
        items : [
            { text : "JavaScript" , value : "js" ,   disabled : "1" } ,
            { text : "Css" ,        value : "css" ,  disabled : "0" } ,
            { text : "Html" ,       value : "html" , disabled : "0" }
        ] ,
    }) ;
    itemSelector.init() ;
}) ;
未來要擴充時,可以在這裡加一個 mode 設定,例如 "checkbox 勾選模式"。
第一步:定出流程骨架
先只放空方法,把主線任務定義出來:
ISProto.init = function(){
  // put you code here !
} ;
ISProto._render = function(){
  // put you code here !
} ;
第二步:抽出被重複呼叫的細節
ISProto._fnItemSelectorDelegateHandler = function(){
  // 用事件委派統一處理展開/收合
} ;
ISProto._fnTriggerHandler = function(){
  // 統一切換文字、游標與收合
} ;
ISProto._addOrRemoveClass = function(){
  // 統一 class 的增刪
} ;
第三步:把資料操作獨立出來
ISProto._setCurrent = function(){
  // 設定游標
} ;
ISProto._getCurrent = function(){
  // 讀取游標
} ;
四、重構後的完整程式碼
復制代碼 代碼如下:
function ItemSelector(elem,opts){
    this.elem = elem ;
    this.opts = opts ;
    this.current = -1 ; // 數據游標改放自己這裡
} ;
var ISProto = ItemSelector.prototype ;
/* getter api*/
ISProto.getElem = function(){ return this.elem ; } ;
ISProto.getOpts = function(){ return this.opts ; } ;
ISProto._getCurrent = function(){ return this.current ; } ;
/* data manip*/
ISProto._setCurrent = function(current){ this.current = current ; } ;
ISProto._setItemText = function(text){
    this.getElem().find(".title div").text(text) ;
} ;

ISProto._fnTriggerHandler = function(index,text,value){
    if(this._isDisabled(value)){
        index = -1 ;
        text = this.getOpts()["currentText"] ;
    }
    this._setItemText(text) ;
    this._setCurrent(index) ;
    this.getElem().find(".content .items").hide() ;
} ;
ISProto._addOrRemoveClass = function(elem,className,addIs){
    if(addIs){ elem.addClass(className) ; }
    else{ elem.removeClass(className) ; }
} ;
ISProto._fnItemSelectorDelegateHandler = function(){
    var that = this ;
    this.getElem().on("click","[data-toggle]",function(){
        that.getElem().find(".content .items").toggle() ;
    }) ;
} ;
ISProto._isDisabled = function(value){
    return ("1" == value) ? true : false ;
} ;

ISProto.init = function(){
    var that = this ;
    this._fnItemSelectorDelegateHandler() ;
    $.each(this.getOpts()["items"],function(i,item){
        item["index"] = i ;
        that._render(item) ;
    }) ;
    this._fnTriggerHandler(this._getCurrent(),this.getOpts()["currentText"],"1") ;
} ;
ISProto._render = function(item){
    var that = this ;
    var itemElem = $("<div></div>").text(item["text"]).attr("id",item["index"]) ;
    var activeClass = ("0" == item["disabled"]) ? "item-hover" : "item-disabled-hover" ;
    itemElem.on("click",function(){
        that._fnTriggerHandler(item["index"],item["text"],item["disabled"]) ;
    })
    .mouseover(function(){
        that._addOrRemoveClass($(this),activeClass,true) ;
    })
    .mouseout(function(){
        that._addOrRemoveClass($(this),activeClass,false) ;
    }) ;
    itemElem.appendTo(this.getElem().find(".content .items")) ;
} ;
五、這次重構學到什麼
1. 先用物件導向的視角把功能需求拆乾淨,再動手。
2. 用「類」的方式組織插件邏輯,資料與 DOM 各自歸位。
3. 重構要拿捏分寸,別設計過度。實務上最順手的往往是「過程式骨架 + 物件導向組織」的混搭。
4. 下一篇會加上 mode 屬性,讓 "1" 時支援 checkbox 多選,目前只有預設的下拉模式。
對照一下前後兩版,差距應該很明顯。自己做專案時也建議多想想、多改幾輪,讓程式碼逐步變得合理。
- 上一篇文章: 附農曆、節氣與節日的 JavaScript 日曆完整實作
- 下一篇文章: JavaScript 插件化開發(五):從零做一個下拉選單插件