JavaScript 插件化開發(五):從零做一個下拉選單插件
編輯:關於JavaScript
前兩篇我們談過「用 jQuery 的方式開發插件」以及「過程式設計結合物件導向思想」兩條路線,各有取捨。這一篇正式進到實作,做一個自製的下拉選單。
一、為什麼要自己做
先看成品:
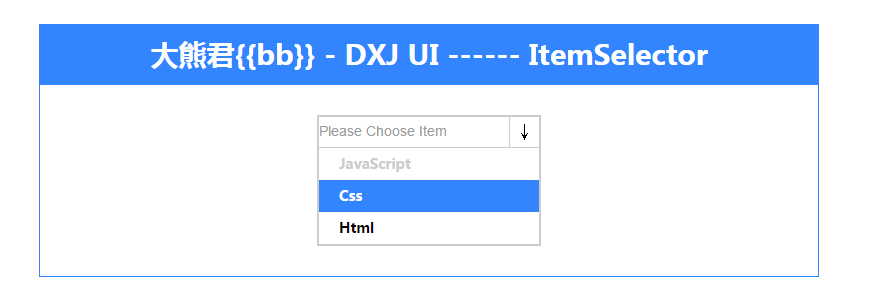
瀏覽器原生的 select 在不同作業系統下長相不一,很難融入自訂的視覺設計,功能也受限。與其跟它搏鬥,不如自己寫一個可控的版本。
二、先定介面
呼叫方式與參數說明如下:
復制代碼 代碼如下:
$(function(){
    var itemSelector = new ItemSelector($("#item-selector"),{
        currentText : "Please Choose Item" ,
        items : [
            { text : "JavaScript" , value : "js" ,   disabled : "1" } ,
            { text : "Css" ,        value : "css" ,  disabled : "0" } ,
            { text : "Html" ,       value : "html" , disabled : "0" }
        ] ,
        mode : "0" , // 為"1"時支持checkbox多選模式
        change : function(value){
            // put your code here
        }
    }) ;
    itemSelector.init() ;
    setTimeout(function(){
        console.log(itemSelector.getCurrentValue()) ; // 測試 獲取當前選中項
    },2000) ;
}) ;
new ItemSelector() 收兩個參數:第一個是 DOM 節點物件,第二個是設定物件。其中 currentText 是標題區的提示文字;items 是項目陣列,每項包含顯示文字 text、代表值 value,以及 disabled("0" 表示可用、"1" 表示停用);change 是選中後的回呼,選到的資料會當參數傳回去。
兩種狀態的差別如下:
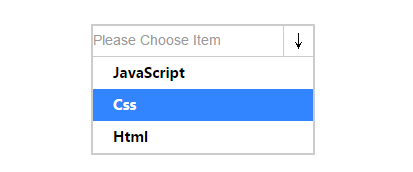
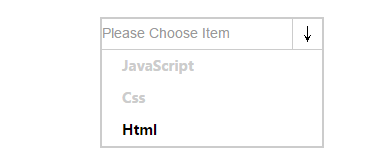
停用狀態的項目不會回傳資料,滑鼠移上去也不會有任何反應。
三、完整程式碼
HTML 結構
復制代碼 代碼如下:
<body>
    <div class="dxj-ui-hd">
        大熊君{{bb}} - DXJ UI ------ ItemSelector
    </div>
    <div class="dxj-ui-bd">
        <div id="item-selector">
            <div class="title">
                <div></div><span>↓</span>
            </div>
            <div class="content">
                <div class="items">
                </div>
            </div>
        </div>
    </div>
</body>
CSS 樣式
復制代碼 代碼如下:
/* item-selector */
#item-selector {
    margin : 0 auto;
    width : 220px ;
    overflow:hidden;
    border:2px solid #ccc;
}
#item-selector .title {
    border-bottom:1px solid #ccc;
    overflow:hidden;
}
#item-selector .title div {
    width:190px;
    border:0px ;
    color:#999;
    font-family: arial ;
    font-size: 14px;
    height:28px;
    line-height:28px;
    float:left;
    cursor:pointer;
}
#item-selector .title span {
    display:block;
    height:30px;
    line-height:30px;
    width:29px;
    float:left;
    text-align:center;
    border-left:1px solid #ccc;
    cursor:pointer;
}
#item-selector .content { width : 220px ; overflow:hidden; }
#item-selector .content .items { overflow:hidden; }
#item-selector .content .items div {
    padding-left:20px;
    width : 200px ;
    height:32px;
    line-height:32px;
    font-family: "微軟雅黑" ;
    font-size: 14px;
    font-weight:bold;
    cursor:pointer;
}
.item-hover { background:#3385ff; color:#fff; }
ItemSelector.js
復制代碼 代碼如下:
function ItemSelector(elem,opts){
    this.elem = elem ;
    this.opts = opts ;
} ;
var ISProto = ItemSelector.prototype ;
ISProto.getElem = function(){ return this.elem ; } ;
ISProto.getOpts = function(){ return this.opts ; } ;
/* data manip*/
ISProto._setCurrent = function(current){
    this.getOpts()["current"] = current ;
} ;
ISProto.getCurrentValue = function(current){
    return this.getOpts()["current"] ;
} ;
ISProto.init = function(){
    var that = this ;
    this.getOpts()["current"] = null ; // 數據游標
    this._setItemValue(this.getOpts()["currentText"]) ;
    var itemsElem = that.getElem().find(".content .items") ;
    this.getElem().find(".title div").on("click",function(){ itemsElem.toggle() ; }) ;
    this.getElem().find(".title span").on("click",function(){ itemsElem.toggle() ; }) ;
    $.each(this.getOpts()["items"],function(i,item){
        item["id"] = (new Date().getTime()).toString() ;
        that._render(item) ;
    }) ;
} ;
ISProto._setItemValue = function(value){
    this.getElem().find(".title div").text(value)
} ;
ISProto._render = function(item){
    var that = this ;
    var itemElem = $("<div></div>").text(item["text"]).attr("id",item["id"]) ;
    if("0" == item["disabled"]){
        itemElem.on("click",function(){
            var onChange = that.getOpts()["change"] ;
            that.getElem().find(".content .items").hide() ;
            that._setItemValue(item["text"]) ;
            that._setCurrent(item) ;
            onChange && onChange(item) ;
        })
        .mouseover(function(){ $(this).addClass("item-hover") ; })
        .mouseout(function(){ $(this).removeClass("item-hover") ; }) ;
    } else {
        itemElem.css("color","#ccc").on("click",function(){
            that.getElem().find(".content .items").hide() ;
            that._setItemValue(item["text"]) ;
        }) ;
    }
    itemElem.appendTo(this.getElem().find(".content .items")) ;
} ;
四、小結
1. 先用物件導向的思路把功能需求想清楚。
2. 用「類」的方式組織插件邏輯,而不是散落的全域函式。
3. 這一版還有重複程式碼與職責不清的問題,下一篇會示範怎麼一步步重構;同時加上 mode 屬性,讓 "1" 時切換成 checkbox 多選模式。
系列文章會持續往下寫,希望對動手做插件的朋友有幫助。
相關文章
-
徹底搞懂 jQuery 的 $.extend()、$.fn 與 $.fn.extend() 封裝 jQuery placeholder 插件,讓舊版瀏覽器也有提示文字 Highcharts 氣泡圖實作:三維數據一圖呈現 從零學會寫 jQuery 插件:三種類型、七條規範與完整示例 用JS與CSS實作下拉刷新/上拉加載 jQuery 插件 用 jQuery 插件補足 CSS3 效果:11 個實用方案整理 jQuery.fn.extend 與 jQuery.extend 的用法區別詳解 《鋒利的 jQuery》讀書筆記:第 7、8 章插件與實戰 YesTop 插件:一行 jQuery 搞定返回頂部按鈕 拖曳滑塊驗證 jQuery 插件:告別扭曲的圖形驗證碼