三層分類連動+多選標籤:EasyUI 下拉選單的實作與動畫預覽
編輯:關於JavaScript
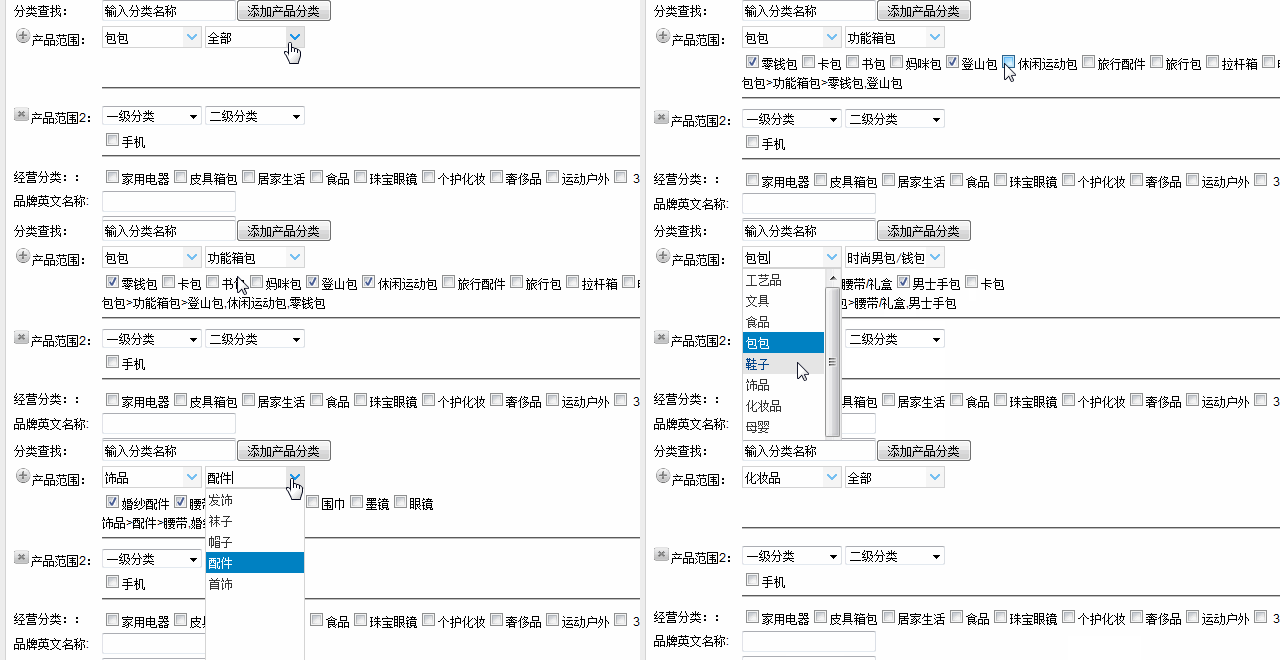
這個案例做的是商品分類的層層連動:選一層就載入下一層,最底層以多個核取方塊呈現,選到的項目即時以逗號串接顯示在下方,取消勾選就同步移除。
先看效果:
一、HTML 結構
用兩個 EasyUI 的 combobox 分別承載第一、二層,第三層留一個空 td 由 JS 動態填入,最下方兩行 span 分別顯示「目前路徑」與「已選項目」。
<tr>
  <td><img onclick="addType()" src="${msUrl}/images/logo/add.png">產品范圍:</td>
  <td>
    <select id="selectTypeOne" class="easyui-combobox" data-options="required:true">
      <option>一級分類</option>
    </select>
    <select id="selectTypeTwo" class="easyui-combobox" data-options="required:true">
      <option selected="selected">全部</option>
    </select>
  </td>
</tr>
<tr height="20px"><td></td><td id="typeThree"</td></tr>
<tr height="30px">
  <td></td>
  <td><span id="typeOneResult"</span><span id="typeOneSubResult"</span><hr /></td>
</tr>
二、連動邏輯
第一層 onSelect 觸發時,先清空第三層與已選結果,再以所選項目的 id 作為 parent 參數去抓第二層;第二層選定後同理抓第三層,並把路徑字串更新成「一層 > 二層 >」。
$('#selectTypeOne').combobox({
  url: config.urlMap.typeList,
  valueField: 'name', textField: 'name', required: true, width: '100',
  onSelect: function(row) {
    typeName1 = row.name;
    $('#typeThree').html("");
    $('#typeOneResult').html("");
    $('#typeOneSubResult').html("");
    subTypeName = [];
    $('#selectTypeTwo').combobox({
      url: config.urlMap.typeList + "?parent=" + row.id,
      valueField: 'name', textField: 'name', width: '100', required: true,
      onSelect: function(row) {
        typeName2 = typeName1 + ">" + row.name;
        $.getJSON(config.urlMap.typeList + "?parent=" + row.id, function(data) {
          var typeThreeName = "";
          for (var i = 0; i < data.length; i++) {
            typeThreeName += "<input onclick=clinkType(\"" + data[i].name +
              "\") name='typeThree' value=" + data[i].name + " type='checkbox'>" +
              data[i].name;
          }
          $('#typeThree').html(typeThreeName);
          $('#typeOneResult').html(typeName2 + ">");
          $('#typeOneSubResult').html("");
          subTypeName = [];
        });
      }
    });
  }
});
三、核取方塊的選取與取消
每次點擊先在陣列裡找該名稱:找不到就推進去,找到就移除,最後用 join(",") 更新顯示。陣列移除提供兩種寫法:
// 方式一:重建陣列
Array.prototype.remove = function(dx) {
  if (isNaN(dx) || dx > this.length) return false;
  for (var i = 0, n = 0; i < this.length; i++) {
    if (this[i] != this[dx]) this[n++] = this[i];
  }
  this.length -= 1;
};

// 方式二:直接用 splice
Array.prototype.baoremove = function(dx) {
  if (isNaN(dx) || dx > this.length) return false;
  this.splice(dx, 1);
};

var subTypeName = [];
function clinkType(name) {
  var index = subTypeName.indexOf(name);
  if (index == -1) subTypeName.push(name);
  else subTypeName.baoremove(index);
  $('#typeOneSubResult').html(subTypeName.join(","));
}
兩個可以更好的地方
一是拼音式命名(baoremove)不利維護,建議統一成 removeAt;二是直接擴充 Array.prototype 會污染全域,容易與第三方函式庫衝突,實務上改成獨立工具函式(例如 utils.removeAt(arr, i))更安全。另外,用字串拼接產生 HTML 時,若 data[i].name 來自使用者輸入,需先做轉義以防 XSS,改用 $('<input>').attr() 逐項建立元素會更穩妥。
相關文章
-
JavaScript 函式中的 arguments:它不是真正的陣列 擴充 Array 原型:實作 OrderByAsc 與 OrderByDesc 排序法 為什麼別用 for in 遍歷陣列:從 jqModal 的兼容性 bug 說起 讓正則表達式像函式一樣被呼叫:call 與 apply 的擴充技巧 JavaScript 陣列的本質:它其實就是一個特殊物件 擴充 Array.prototype.indexOf 引發的 for-in 問題與解法 JavaScript 陣列的真相:它其實是一個特殊的物件 為 Array 擴展二分法查找 Array.prototype 的泛型應用:類數組也能用的原生方法 JavaScript 擴充 Array 物件:從 YUI 到 ES5 新方法