在 WinForm 上做樹狀選單輕鬆又直覺,所以我自然希望在網頁上也有同樣的東西。挑了一圈之後我選了 dtree——它是純 JavaScript 實作,不需要引入任何 jar 包,設定都寫在 JS 裡,上手很快;網路上也有不少人改出了帶 checkbox 的改良版,更好用。
真正的難點:資料怎麼從後台走到 JS
dtree 是純前端的,本身沒有與後端溝通的能力。我的做法是先用後端把資料拼成字串塞到頁面,再由 JS 切割還原成陣列,最後餵給 dtree 建樹。
後端把目錄與聯絡人各自拼成以 + 分隔、欄位以 - 分隔的字串,存進 session:
public String GetLinkManByDID(){
try {
directories = this.directoryService.GetAllDirecoty();
selectlinkMans = this.linkManService.GetAllLinkMans();
String direStringstring = "";
String linkString = "";
for (int i = 0; i < directories.size(); i++) {
if (i < directories.size()-1) {
direStringstring += directories.get(i).getID()+"-"+directories.get(i).getDirectoryName()+"+";
} else {
direStringstring += directories.get(i).getID()+"-"+directories.get(i).getDirectoryName();
}
}
for (int i = 0; i < selectlinkMans.size(); i++) {
if (i < selectlinkMans.size()-1) {
linkString += selectlinkMans.get(i).getDirectory().getID()+"-"+selectlinkMans.get(i).getName()+"-"+selectlinkMans.get(i).getPhoneNum()+"+";
} else {
linkString += selectlinkMans.get(i).getDirectory().getID()+"-"+selectlinkMans.get(i).getName()+"-"+selectlinkMans.get(i).getPhoneNum();
}
}
ActionContext.getContext().getSession().put("directories", direStringstring);
ActionContext.getContext().getSession().put("allLinkMans", linkString);
} catch (Exception e) {
e.printStackTrace();
}
return SUCCESS;
}
專案用的是 ssh 框架,因此存 session 的語法如上。頁面上再把字串取出、切開:
<script type="text/javascript">
var linkmans = [];
var dires = [];
linkmans = "${allLinkMans}".split(',');
dires = "${directories}".split(',');
treeload(linkmans[0], dires[0]);
</script>
treeload:把字串還原成樹
function treeload(linkmans, dires){
var linklist = String2linklist(linkmans);
var direslist = String2direlist(dires);
d = new dTree('d','./');
d.config.checkbox = true;      // 顯示 checkbox
d.config.objValueId = 'phoneNums';
d.icon.root = 'images/hr/home.png';
d.icon.folder = 'images/hr/group.gif';
d.icon.folderOpen = 'images/hr/group.gif';
d.icon.node = 'images/hr/nan.gif';
d.add(0, -1, '聯系人', null);

var int = 0;
var direids = new Array();
var direpid = new Array();
for (int; int < direslist.length; int++) {
d.add(int+1, 0, direslist[int].name, false);
direids.push(direslist[int].id);
direpid.push(int+1);
}
d.add(int+1, 0, '全部聯系人', false);
direpid.push(int+1);

for (var int2 = 0; int2 < linklist.length; int2++) {
for (var int3 = 0; int3 < direpid.length-1; int3++) {
if (linklist[int2].did == direids[int3]) {
int++;
d.add(int+1, direpid[int3], linklist[int2].name, false, linklist[int2].phone);
}
}
}
for (var int4 = 0; int4 < linklist.length; int4++) {
int++;
d.add(int+1, direpid[direpid.length-1], linklist[int4].name, false, linklist[int4].phone);
}
document.write(d);
}

function String2linklist(linkmans){
var linkarray = new Array();
var a = linkmans.split('+');
for (var int = 0; int < a.length; int++) {
var b = a[int].split('-');
linkarray.push(new linkman(b[0], b[1], b[2]));
}
return linkarray;
}

function String2direlist(dires){
var direlist = new Array();
var a = dires.split('+');
for (var int = 0; int < a.length; int++) {
var b = a[int].split('-');
direlist.push(new dire(b[0], b[1]));
}
return direlist;
}

function linkman(Did, name, phone){
this.did = Did;
this.name = name;
this.phone = phone;
}

function dire(id, name){
this.id = id;
this.name = name;
}
最終效果如下:
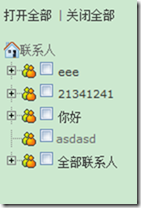
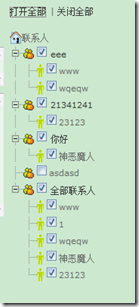
我改寫過的 dtree 關鍵片段
原始 dtree 的節點沒有 value 屬性,也沒有 checkbox,於是我做了幾處改造。節點加上 checked 與 value:
function Node(id, pid, name, checked, value, icon, url, title, target, iconOpen, open) {
this.id = id;
this.pid = pid;
this.name = name;
// 是否在該節點加復選框並設定選取狀態:true 選取、false 不選取、null 不加入
this.checked = checked == null ? null : (checked || false);
this.value = value; // 新增 value 屬性,選取後輸入框取得的就是這個值
this.url = url;
this.title = title;
this.target = target;
this.icon = icon;
this.iconOpen = iconOpen;
this._io = open || false;
this._is = false;
this._ls = false;
this._hc = false;
this._ai = 0;
this._p;
};
設定檔增加 checkbox 與 objValueId 兩項:
this.config = {
target : null,
folderLinks : true,
useSelection : true,
useCookies : true,
useLines : true,
useIcons : true,
useStatusText : false,
closeSameLevel : false,
inOrder : false,
checkbox : false,   // 是否顯示復選框
objValueId : ''     // 用來回寫選取值的輸入框 id
}
把選取值寫回輸入框,以及反向回填勾選狀態:
// 依輸入框內既有的值設定勾選狀態
dTree.prototype.checkedNodes = function(){
if (this.config.objValueId == '') { return; }
var val = document.getElementById(this.config.objValueId).value;
if (val == '') { return; }
val = val.split(',');
var o = null;
for (var i = 0; i < val.length; i++) {
o = document.getElementById('cbx_' + this.obj + val[i]);
if (o) { o.checked = true; }
}
};

// 把勾選項的 value 彙整回輸入框
dTree.prototype.update = function(){
if (this.config.objValueId == '') { return; }
var cbx = null, v = [];
var ns = this.aNodes;
for (var i = 0; i < ns.length; i++) {
cbx = document.getElementById('cbx_' + this.obj + ns[i].id);
if (cbx) {
if (cbx.checked) {
if (ns[i].pid != '0') { v.push(cbx.value); } // 取 value 而非節點 id,就能拿到電話號碼
}
}
}
document.getElementById(this.config.objValueId).value = v.join();
};
輸出節點時插入 checkbox:
/*** 加上 checkbox ***/
if (this.config.checkbox && node.checked != null) {
str += '<input ' + (node.checked ? 'checked="checked"' : '') +
' onclick="javascript: ' + this.obj +
(node._hc && node.pid != this.root.id ? '.o(' + nodeId + ')' : '.update()') + ';" ' +
'type="checkbox" value="' + node.value + '" name="cbx_' + this.obj + '" id="cbx_' + this.obj + nodeId +
'" title="' + node.name + '"\/>';
}
展開/收合節點時連帶勾選底下所有子節點:
dTree.prototype.nodeStatus = function(status, id, bottom) {
try {
eDiv = document.getElementById('d' + this.obj + id);
eJoin = document.getElementById('j' + this.obj + id);
// 選擇:父節點勾選時,底下子節點一起勾選
if (this.config.checkbox) {
cbx = document.getElementById('cbx_' + this.obj + id);
cbx.checked = status;
cbxChild = eDiv.getElementsByTagName('input');
for (var i = 0; i < cbxChild.length; i++) {
cbxChild[i].checked = status;
}
}
if (this.config.useIcons) {
eIcon = document.getElementById('i' + this.obj + id);
eIcon.src = (status) ? this.aNodes[id].iconOpen : this.aNodes[id].icon;
}
eJoin.src = (this.config.useLines) ?
((status) ? ((bottom) ? this.icon.minusBottom : this.icon.minus) : ((bottom) ? this.icon.plusBottom : this.icon.plus)) :
((status) ? this.icon.nlMinus : this.icon.nlPlus);
eDiv.style.display = (status) ? 'block' : 'none';
} catch (ex) {}
};
另外我還在 node 方法中調整了圖示的判定邏輯:當群組底下沒有任何節點時,仍然沿用群組的圖示,而不是掉回聯絡人的圖示。
if (!node.icon) node.icon = (this.root.id == node.pid) ? this.icon.root : ((node.pid == 0) ? this.icon.folder : this.icon.node);幾點經驗
dtree 剩下的部分(toString、addNode、indent、setCS、cookie 相關方法等)與原版差異不大,這裡不再重貼。值得一提的是,這種「後端拼字串、前端 split」的做法雖然簡單,卻很脆弱:一旦資料中出現分隔字元就會壞掉,字串過長也會拖慢頁面。若重做一次,我會直接讓後端輸出 JSON,前端用 JSON.parse 還原成物件後再建樹,省掉整套切割邏輯,也少掉一類難查的 bug。
整體來說 dtree 是個不錯的選擇,建議自己開個小專案試試。