每種語言都有自己的擅長領域,把它們結合起來各取所長,往往能讓程序執行效率更高,或是以更簡單的方式實現需求。Node.js 可以通過子進程來調用系統命令或外部文件,官方文檔見 https://nodejs.org/api/child_process.html。
NodeJS 的子進程提供了與系統交互的重要接口,主要 API 包括:
child.stdin 獲取標準輸入
child.stdout 獲取標準輸出
child.stderr 獲取標準錯誤輸出
child.pid 獲取子進程的 PID
child_process.spawn(cmd, args=[], [options]) 生成子進程
child_process.exec(cmd, [options], callback) 直接執行系統命令
child_process.execFile(file, [args], [options], [callback]) 調用腳本文件
child.kill(signal='SIGTERM') 殺死進程
1、利用子進程調用系統命令
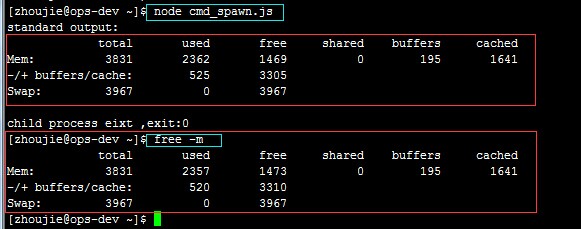
下面以獲取系統內存使用情況為例,新建 cmd_spawn.js:
var spawn = require('child_process').spawn;
free = spawn('free', ['-m']);

// 捕獲標準輸出並打印到控制台
free.stdout.on('data', function (data) {
  console.log('standard output:\n' + data);
});

// 捕獲標準錯誤輸出並打印到控制台
free.stderr.on('data', function (data) {
  console.log('standard error output:\n' + data);
});

// 註冊子進程關閉事件
free.on('exit', function (code, signal) {
  console.log('child process exit, exit:' + code);
});
運行該腳本的結果與直接執行 free -m 完全一致:
2、執行系統命令(child_process.exec())
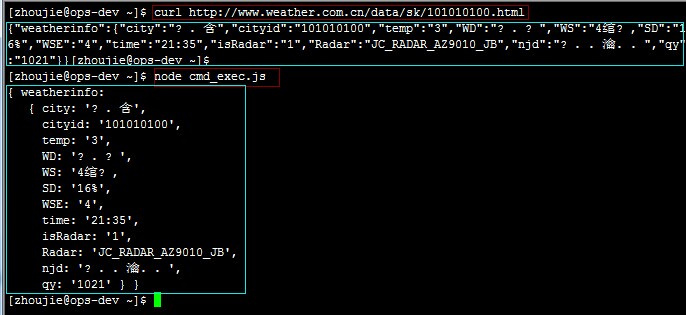
這個方法非常常用,功能比上面強大一些。比如以獲取天氣接口的 JSON 數據為例,新建 cmd_exec.js:
var exec = require('child_process').exec;
var cmdStr = 'curl https://www.weather.com.cn/data/sk/101010100.html';
exec(cmdStr, function (err, stdout, stderr) {
  if (err) {
    console.log('get weather api error:' + stderr);
  } else {
    // stdout 內容即 curl 返回的 JSON 字符串
    var data = JSON.parse(stdout);
    console.log(data);
  }
});
通過腳本運行或直接 curl,得到的結果是一樣的:
3、調用帶參數的 Shell 腳本(child_process.execFile())
先準備一個 shell 腳本,比如要連接到某台服務器修改密碼,需要提供 IP、user、new pwd、old pwd,新建 change_password.sh:
#!/bin/sh

IP=""
NAME=""
PASSWORD=""
NEWPASSWORD=""

while getopts "H:U:P:N:" arg  # 選項後面的冒號表示該選項需要參數
do
  case $arg in
    H) IP=$OPTARG ;;
    U) NAME=$OPTARG ;;
    P) PASSWORD=$OPTARG ;;
    N) NEWPASSWORD=$OPTARG ;;
    ?)  # 當有不認識的選項時 arg 為 ?
      echo "含有未知參數"
      exit 1
    ;;
  esac
done

# 先獲取 userid
USERID=`/usr/bin/ipmitool -I lanplus -H $IP -U $NAME -P $PASSWORD user list | grep root | awk '{print $1}'`
# 根據 userid 修改密碼
/usr/bin/ipmitool -I lanplus -H $IP -U $NAME -P $PASSWORD user set password $USERID $NEWPASSWORD
再準備一個 Node 文件來調用這個腳本,名為 file_changepwd.js:
var callfile = require('child_process');
var ip = '1.1.1.1';
var username = 'test';
var password = 'pwd';
var newpassword = 'newpwd';

callfile.execFile('change_password.sh', ['-H', ip, '-U', username, '-P', password, '-N', newpassword], null, function (err, stdout, stderr) {
  callback(err, stdout, stderr);
});
這裡就不便貼運行結果了,不過可以保證它是經過測試的。理解了上面幾種方式,調用 Python 腳本其實別無二致,本質上也是執行命令。
4、調用 Python 腳本
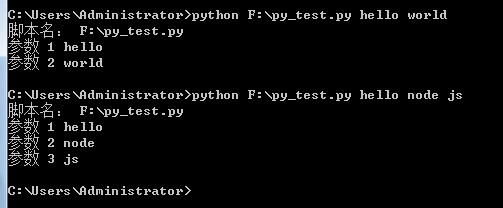
先插一段關於 Python 傳參的簡要說明:
# -*-coding:utf-8 -*-
'''
需要模塊:sys
參數個數:len(sys.argv)
腳本名:   sys.argv[0]
參數1:    sys.argv[1]
參數2:    sys.argv[2]
'''
import sys
print u"腳本名:", sys.argv[0]
for i in range(1, len(sys.argv)):  # 這裡參數從 1 開始
  print u"參數", i, sys.argv[i]
運行結果如下:
接着準備一個 Node 文件 file_python.js 來調用這個 Python 腳本:
var exec = require('child_process').exec;
var arg1 = 'hello'
var arg2 = 'jzhou'
exec('python py_test.py ' + arg1 + ' ' + arg2 + ' ', function (error, stdout, stderr) {
  if (stdout.length > 1) {
    console.log('you offer args:', stdout);
  } else {
    console.log('you don\'t offer args');
  }
  if (error) {
    console.info('stderr : ' + stderr);
  }
});
py_test.py 的內容如下:
# -*-coding:utf-8 -*-
import sys
print sys.argv
運行結果如下:

整體用起來還是相當順手的,也為這一年的學習又添了一篇滿意的筆記。
- 上一篇文章: AngularJS 中取消 HTML 片段轉義的方法與示例
- 下一篇文章: Node.js 讀取中文文件編碼、發送郵件與定時任務實例教程