本節的目標很明確:讓使用者能夠上傳一張圖片,並且直接在瀏覽器裡把它顯示出來。整個流程會串起表單提交、檔案解析、存檔與讀取幾個環節。
要處理上傳的檔案資料,我們會借助 Felix Geisendörfer 開發的 node-formidable 模組。它把 HTTP POST 表單中附帶的檔案內容做了相當完善的抽象,省去我們手動拆解 multipart 資料的麻煩。
安裝方式很簡單,在命令列視窗中執行:
代碼如下:
npm install formidable
當畫面出現類似下面的訊息,就代表安裝成功:
代碼如下:
npm info build Success: formidable@1.0.14
接著只要用 require 將它引入即可:
代碼如下:
var formidable = require("formidable");
這個模組的核心作用,是把透過 HTTP POST 送出的表單在 Node.js 端解析成可用的資料。使用時我們先建立一個 IncomingForm 物件,它代表「一份被提交的表單」,再拿它去解析 request,就能取得表單中的各個欄位。
本範例會把上傳的圖片存放到 /tmp 資料夾中。
在動手之前,先解決一個前置問題:該怎麼把存在本機硬碟的檔案顯示在瀏覽器上?答案是用 fs 模組把檔案讀進伺服器再回傳。
我們先新增一個 /show 的請求處理函式,它會直接把 /tmp/test.png 的內容輸出到瀏覽器(前提是該圖片已存在於這個路徑)。requestHandlers.js 修改如下:
代碼如下:
var querystring = require("querystring"),
fs = require("fs");
function start(response, postData) {
console.log("Request handler 'start' was called.");
var body = '<html>'+
'<head>'+
'<meta http-equiv="Content-Type" '+
'content="text/html; charset=UTF-8" />'+
'</head>'+
'<body>'+
'<form action="/upload" method="post">'+
'<textarea name="text" rows="20" cols="60"></textarea>'+
'<input type="submit" value="Submit text" />'+
'</form>'+
'</body>'+
'</html>';
response.writeHead(200, {"Content-Type": "text/html"});
response.write(body);
response.end();
}
function upload(response, postData) {
console.log("Request handler 'upload' was called.");
response.writeHead(200, {"Content-Type": "text/plain"});
response.write("You've sent the text: "+ querystring.parse(postData).text);
response.end();
}
function show(response, postData) {
console.log("Request handler 'show' was called.");
fs.readFile("/tmp/test.png", "binary", function(error, file) {
if(error) {
response.writeHead(500, {"Content-Type": "text/plain"});
response.write(error + "\n");
response.end();
} else {
response.writeHead(200, {"Content-Type": "image/png"});
response.write(file, "binary");
response.end();
}
});
}
exports.start = start;
exports.upload = upload;
exports.show = show;
別忘了把新的處理函式掛進 index.js 的路由對應表:
代碼如下:
var server = require("./server");
var router = require("./router");
var requestHandlers = require("./requestHandlers");
var handle = {}
handle["/"] = requestHandlers.start;
handle["/start"] = requestHandlers.start;
handle["/upload"] = requestHandlers.upload;
handle["/show"] = requestHandlers.show;
server.start(router.route, handle);
重啟伺服器後,瀏覽 https://localhost:8888/show,就能看到 /tmp/test.png 這張圖片了。
接下來把三件事拼湊起來,完成真正的上傳功能:
在 /start 表單中補上一個檔案上傳元件
把 node-formidable 整合進 upload 處理函式,將上傳的圖片存成 /tmp/test.png
在 /upload 輸出的 HTML 中把圖片內嵌顯示
第一件事很簡單:把表單的編碼類型改成 multipart/form-data,移除原本的文字輸入區,換成檔案上傳元件,並把按鈕文字改成「Upload file」。requestHandler.js 如下:
代碼如下:
var querystring = require("querystring"),
fs = require("fs");
function start(response, postData) {
console.log("Request handler 'start' was called.");
var body = '<html>'+
'<head>'+
'<meta http-equiv="Content-Type" '+
'content="text/html; charset=UTF-8" />'+
'</head>'+
'<body>'+
'<form action="/upload" enctype="multipart/form-data" '+
'method="post">'+
'<input type="file" name="upload">'+
'<input type="submit" value="Upload file" />'+
'</form>'+
'</body>'+
'</html>';
response.writeHead(200, {"Content-Type": "text/html"});
response.write(body);
response.end();
}
function upload(response, postData) {
console.log("Request handler 'upload' was called.");
response.writeHead(200, {"Content-Type": "text/plain"});
response.write("You've sent the text: "+ querystring.parse(postData).text);
response.end();
}
function show(response, postData) {
console.log("Request handler 'show' was called.");
fs.readFile("/tmp/test.png", "binary", function(error, file) {
if(error) {
response.writeHead(500, {"Content-Type": "text/plain"});
response.write(error + "\n");
response.end();
} else {
response.writeHead(200, {"Content-Type": "image/png"});
response.write(file, "binary");
response.end();
}
});
}
exports.start = start;
exports.upload = upload;
exports.show = show;
接著處理第二件事。我們從 server.js 開始改:把原本對 postData 的收集以及 request.setEncoding 都移除(這些工作交給 node-formidable 自己處理),改成直接把 request 物件往下傳給路由:
代碼如下:
var http = require("http");
var url = require("url");
function start(route, handle) {
function onRequest(request, response) {
var pathname = url.parse(request.url).pathname;
console.log("Request for " + pathname + " received.");
route(handle, pathname, response, request);
}
http.createServer(onRequest).listen(8888);
console.log("Server has started.");
}
exports.start = start;
再來修改 router.js,讓它把 request 物件一併傳下去:
代碼如下:
function route(handle, pathname, response, request) {
console.log("About to route a request for " + pathname);
if (typeof handle[pathname] === 'function') {
handle[pathname](response, request);
} else {
console.log("No request handler found for " + pathname);
response.writeHead(404, {"Content-Type": "text/html"});
response.write("404 Not found");
response.end();
}
}
exports.route = route;
現在 request 物件就能在 upload 處理函式中使用了。node-formidable 會先把上傳的檔案暫存到本機的 /tmp 目錄,而我們要做的,是確保它最終被命名成 /tmp/test.png。
把「接收上傳」與「重新命名」兩件事寫進同一段,requestHandlers.js 如下:
代碼如下:
var querystring = require("querystring"),
fs = require("fs"),
formidable = require("formidable");
function start(response) {
console.log("Request handler 'start' was called.");
var body = '<html>'+
'<head>'+
'<meta http-equiv="Content-Type" content="text/html; '+
'charset=UTF-8" />'+
'</head>'+
'<body>'+
'<form action="/upload" enctype="multipart/form-data" '+
'method="post">'+
'<input type="file" name="upload" multiple="multiple">'+
'<input type="submit" value="Upload file" />'+
'</form>'+
'</body>'+
'</html>';
response.writeHead(200, {"Content-Type": "text/html"});
response.write(body);
response.end();
}
function upload(response, request) {
console.log("Request handler 'upload' was called.");
var form = new formidable.IncomingForm();
console.log("about to parse");
form.parse(request, function(error, fields, files) {
console.log("parsing done");
fs.renameSync(files.upload.path, "/tmp/test.png");
response.writeHead(200, {"Content-Type": "text/html"});
response.write("received image:<br/>");
response.write("<img src='/show' />");
response.end();
});
}
function show(response) {
console.log("Request handler 'show' was called.");
fs.readFile("/tmp/test.png", "binary", function(error, file) {
if(error) {
response.writeHead(500, {"Content-Type": "text/plain"});
response.write(error + "\n");
response.end();
} else {
response.writeHead(200, {"Content-Type": "image/png"});
response.write(file, "binary");
response.end();
}
});
}
exports.start = start;
exports.upload = upload;
exports.show = show;
寫到這裡,我們的伺服器功能就完整了。
不過在實測上傳時,有些人可能會碰到下面這個錯誤:
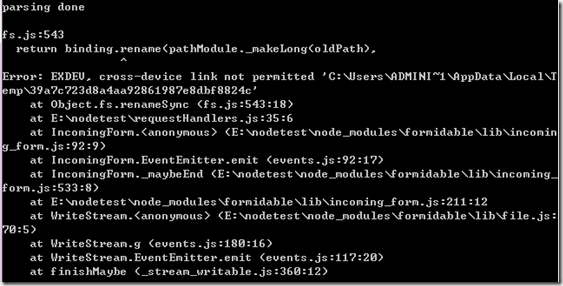
這個問題推測與磁碟分割區有關。要解決它,就得把 formidable 的預設暫存資料夾,改到跟目標目錄同一個磁碟分割區上。
找到 requestHandlers.js 的 upload 函式,做個小調整:
代碼如下:
function upload(response, request) {
console.log("Request handler 'upload' was called.");
var form = new formidable.IncomingForm();
console.log("about to parse");
form.uploadDir = "tmp";
form.parse(request, function(error, fields, files) {
console.log("parsing done");
fs.renameSync(files.upload.path, "/tmp/test.png");
response.writeHead(200, {"Content-Type": "text/html"});
response.write("received image:<br/>");
response.write("<img src='/show' />");
response.end();
});
}
我們只多加了一行 form.uploadDir = "tmp"。重啟伺服器再試一次上傳,問題就迎刃而解了。