拖曳功能聽起來門檻很高,其實拆開來就是三個事件加上一點位置計算。本文動手做一個帶「自動吸附」效果的範例:拖曳過程中會偵測元素與目標容器的距離,進入一定範圍就自動靠攏。
先看一下成果(Chrome、Firefox、Opera、Safari、IE9 皆測試通過):
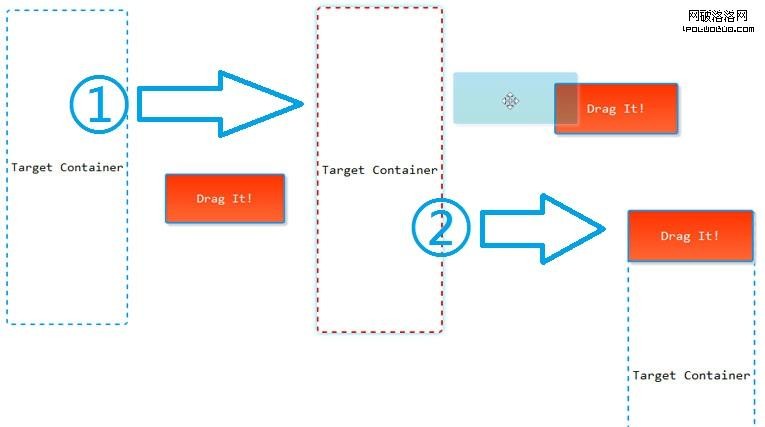
虛線框為目標容器,藍色半透明框是拖曳過程中的臨時元素,紅色框為被拖曳的物件。
整體思路
為要拖曳的 div 綁定 mousedown,並在 document 上監聽 mousemove 與 mouseup。按下時記錄初始位置,移動時建立一個臨時元素 temp 跟著滑鼠跑,放開時把被拖曳元素的位置設為 temp 的位置再移除 temp。移動過程中同時持續做碰撞偵測,命中範圍就套用吸附效果。
這裡為了聚焦在事件與座標計算,並沒有真的把 DOM 節點搬進目標容器,只是把位置對齊而已。
滑鼠按下:記錄起點
elem.onmousedown = function (event) {
  isDrag = true;
  startX = parseInt(this.style.left || getCSSValue(this, 'left'));
  startY = parseInt(this.style.top || getCSSValue(this, 'top'));
  mX = event.pageX;
  mY = event.pageY;
};
滑鼠移動:建立 temp 並更新座標
document.onmousemove = function (event) {
  if (isDrag) {
    if (temp == undefined) {
      temp = document.createElement('div');
      temp.id = 'drag';
      temp.className = 'temp';
      document.body.appendChild(temp);
    }
    temp.style.left = (startX + event.pageX - mX) + 'px';
    temp.style.top  = (startY + event.pageY - mY) + 'px';

    if (checkIntersect(temp, $('target'), 20)) {
      $('target').style.border = '2px #F00 dashed';
      $('target').style.webkitAnimationName = 'light'; // 閃爍提示
      $('target').style.webkitAnimationDuration = '1s';
      $('target').style.webkitAnimationDelay = '0.5s';
      $('target').style.webkitAnimationIterationCount = '100';
    } else {
      $('target').style.border = '2px #09F dashed';
      $('target').style.webkitAnimationName = '';
    }
  }
};
為什麼監聽 document 而不是 elem? 如果把 mousemove 掛在被拖曳元素上,滑鼠一旦移動過快、瞬間離開元素範圍,事件就斷了,拖曳會出現卡頓甚至中斷。掛在 document 上才不會有這個問題。
滑鼠放開:決定最終落點
document.onmouseup = function () {
  isDrag = false;
  if (checkIntersect(temp, $('target'), 20)) {
    elem.style.left = $('target').offsetLeft + 'px';
    elem.style.top  = $('target').offsetTop  + 'px';
  } else {
    elem.style.left = temp.offsetLeft + 'px';
    elem.style.top  = temp.offsetTop  + 'px';
  }
  document.body.removeChild(temp);
  temp = null;
  $('target').style.border = '2px #09F dashed';
  $('target').style.webkitAnimationName = '';
};
輔助函式一:跨瀏覽器讀取樣式值
行內樣式可以用 obj.style.left 直接讀,但樣式寫在 <style> 標籤或外部 CSS 檔裡時就讀不到了。IE 有 currentStyle,其他瀏覽器則用 getComputedStyle():
function getCSSValue(obj, key) {
  if (obj.currentStyle) {
    return obj.currentStyle[key];          // IE
  } else {
    return document.defaultView.getComputedStyle(obj, null)[key];
  }
}
輔助函式二:碰撞(重疊)偵測
function checkIntersect(obj1, obj2, distance) {
  var left1 = obj1.offsetLeft,  top1 = obj1.offsetTop;
  var left2 = obj2.offsetLeft,  top2 = obj2.offsetTop;
  var width1 = obj1.offsetWidth,  height1 = obj1.offsetHeight;
  var width2 = obj2.offsetWidth,  height2 = obj2.offsetHeight;

  return (
    ((left1 - left2 >= 0 && left1 - left2 < width2 + distance) ||
     (left2 - left1 >= 0 && left2 - left1 < width1 + distance)) &&
    ((top1 - top2 >= 0 && top1 - top2 < height2 + distance) ||
     (top2 - top1 >= 0 && top2 - top1 < height1 + distance))
  );
}
distance 就是吸附的容許間距:數值越大,越容易觸發吸附。判定邏輯是「橫軸有交集且縱軸有交集」,只是把邊界往外放寬了 distance。
小結
這個範例用到的知識點其實很集中:滑鼠事件的三段式生命週期、基本的 DOM 節點操作,再加上一點 CSS3 的新玩具(animation、border-radius、box-shadow)。把 checkIntersect 的容差調大一點、加上 transition,手感就會瞬間提升一個檔次。