現在早已不是原生 Android 獨霸的時代,把 H5 嵌進 App 的 Hybrid 混合開發是主流做法之一。今天要做的就是行動端最常見的「下拉刷新、上拉加載」,而且完全用 H5 實現,靠的是 iscroll.js。
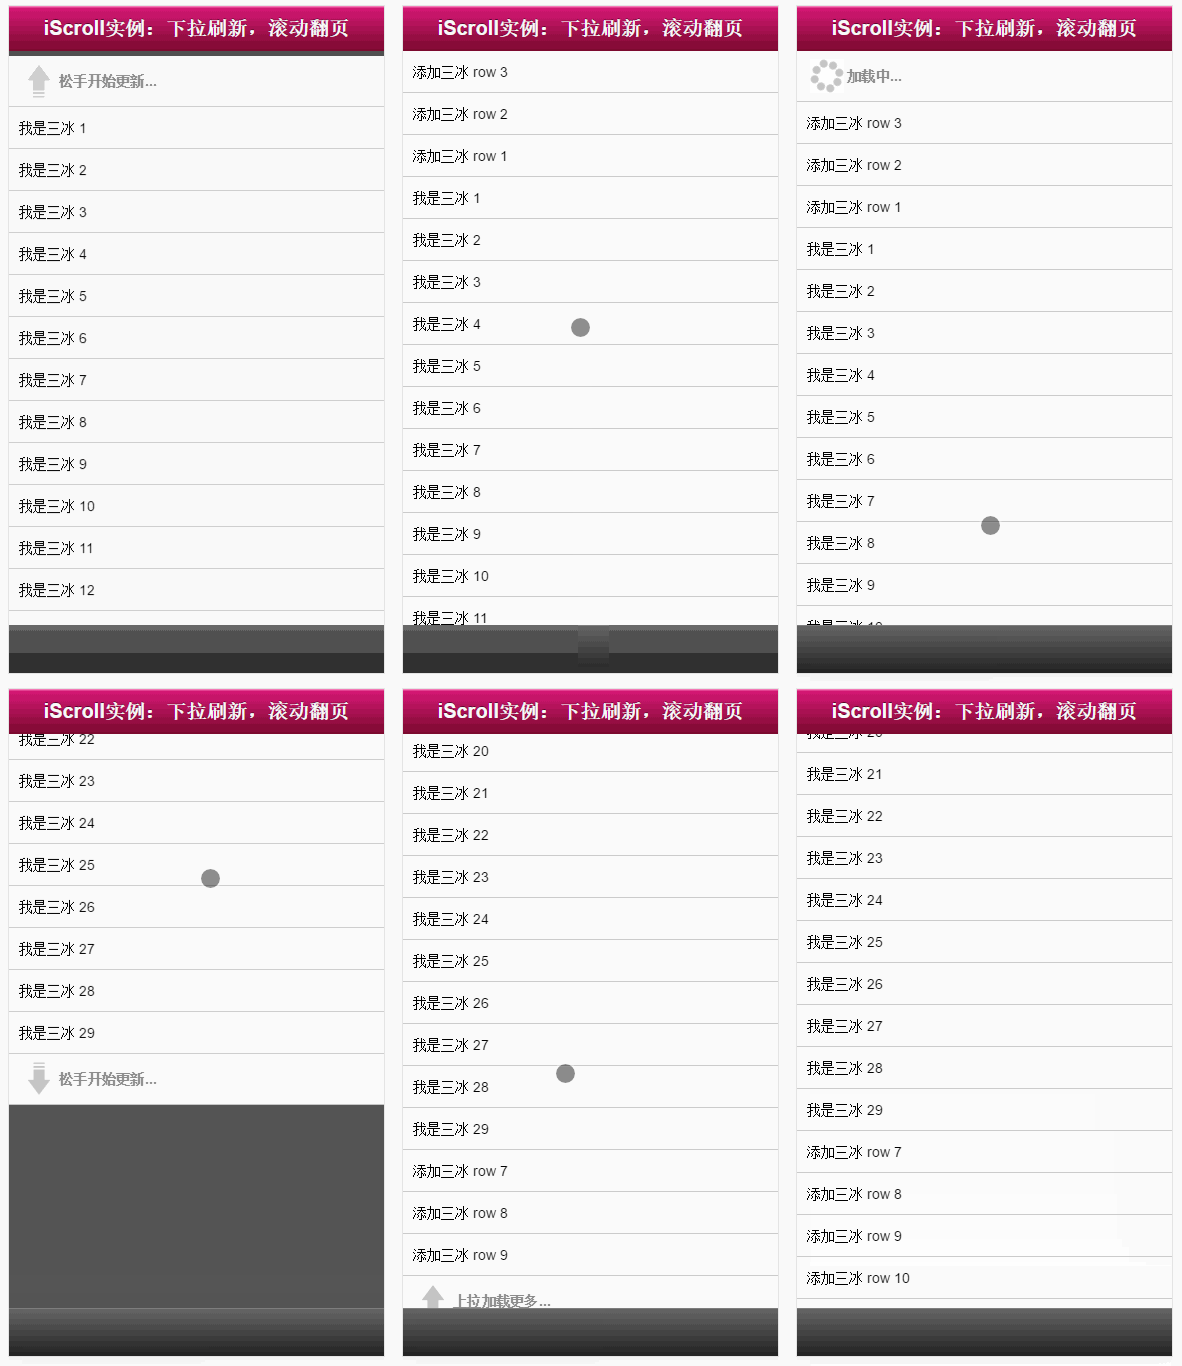
一、準備 iscroll.js
到官方專案下載即可:https://github.com/cubiq/iscroll
二、搭建頁面結構
結構本身很直觀:一個外層 #wrapper 作為捲動容器,裡面 #scroller 放內容,內容的頭尾各擺一塊 #pullDown 與 #pullUp 作為提示區。
 <!DOCTYPE html>
<html>
<head>
<meta http-equiv="Content-Type" content="text/html; charset=utf-8">
<meta name="viewport" content="width=device-width, initial-scale=1.0, user-scalable=0, minimum-scale=1.0, maximum-scale=1.0">
<meta name="apple-mobile-web-app-capable" content="yes">
<meta name="apple-mobile-web-app-status-bar-style" content="black">
<title>iScroll 實例:下拉刷新,滾動翻頁</title>
<style type="text/css" media="all">
  body, ul, li { padding:0; margin:0; border:0; }
  body { font-size:12px; -webkit-user-select:none; -webkit-text-size-adjust:none; font-family:helvetica; }
  #header { position:absolute; top:0; left:0; width:100%; height:45px; line-height:45px;
            background-image:-webkit-gradient(linear, 0 0, 0 100%, color-stop(0,#fe96c9), color-stop(0.05,#d51875), color-stop(1,#7b0a2e));
            padding:0; color:#eee; font-size:20px; text-align:center; }
  #header a { color:#f3f3f3; text-decoration:none; font-weight:bold; text-shadow:0 -1px 0 rgba(0,0,0,0.5); }
  #footer { position:absolute; bottom:0; left:0; width:100%; height:48px; border-top:1px solid #444; }
  #wrapper { position:absolute; z-index:1; top:45px; bottom:48px; left:0; width:100%;
             background:#555; overflow:auto; }
  #scroller { position:relative; -webkit-tap-highlight-color:rgba(0,0,0,0); float:left; width:100%; padding:0; }
  #scroller ul { position:relative; list-style:none; padding:0; margin:0; width:100%; text-align:left; }
  #scroller li { padding:0 10px; height:40px; line-height:40px; border-bottom:1px solid #ccc;
                 border-top:1px solid #fff; background-color:#fafafa; font-size:14px; }
  #scroller li > a { display:block; }

  /* 下拉/上拉提示區 */
  #pullDown, #pullUp { background:#fff; height:40px; line-height:40px; padding:5px 10px;
                       border-bottom:1px solid #ccc; font-weight:bold; font-size:14px; color:#888; }
  #pullDown .pullDownIcon, #pullUp .pullUpIcon { display:block; float:left; width:40px; height:40px;
      background:url(pull-icon@2x.png) 0 0 no-repeat; -webkit-background-size:40px 80px; background-size:40px 80px;
      -webkit-transition-property:-webkit-transform; -webkit-transition-duration:250ms; }
  #pullDown .pullDownIcon { -webkit-transform:rotate(0deg) translateZ(0); }
  #pullUp .pullUpIcon     { -webkit-transform:rotate(-180deg) translateZ(0); }
</style>
</head>
<body>
<div id="header">
  <a href="../db.html#page2">iScroll 實例:下拉刷新,滾動翻頁</a>
</div>
<div id="wrapper">
  <div id="scroller">
    <div id="pullDown">
      <span class="pullDownIcon"></span><span class="pullDownLabel">下拉刷新...</span>
    </div>
    <ul id="thelist">
      <li>我是三冰 1</li>
      <li>我是三冰 2</li>
      <li>我是三冰 3</li>
      <li>我是三冰 4</li>
      <li>我是三冰 5</li>
      <li>我是三冰 6</li>
      <li>我是三冰 7</li>
      <li>我是三冰 8</li>
      <li>我是三冰 9</li>
      <li>我是三冰 10</li>
      <li>我是三冰 11</li>
      <li>我是三冰 12</li>
      <li>我是三冰 13</li>
    </ul>
    <div id="pullUp">
      <span class="pullUpIcon"></span><span class="pullUpLabel">上拉加載更多...</span>
    </div>
  </div>
</div>
<div id="footer"></div>
</body>
</html>
到這一步還跟 iscroll 一點關係都沒有,就是個純靜態頁面。
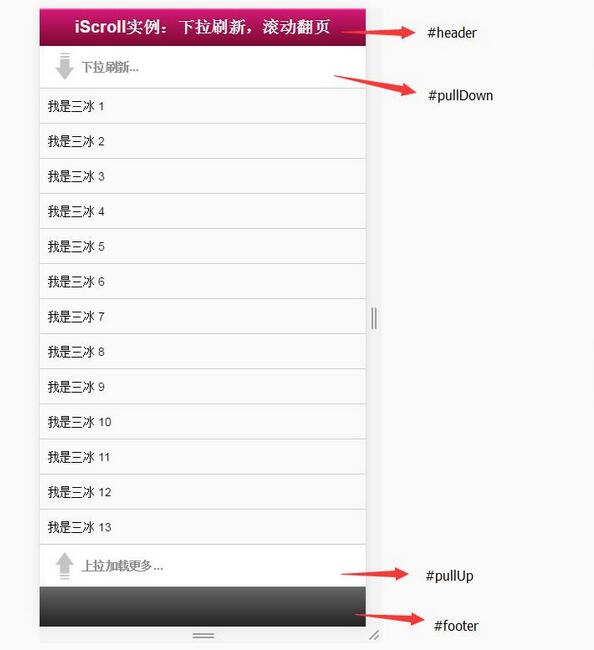
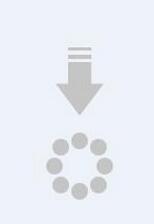
此時唯一缺的只是那張小箭頭圖 pull-icon@2x.png。
三、JavaScript
 <script type="application/javascript" src="iscroll.js"></script>
<script type="text/javascript">
var myScroll, pullDownEl, pullDownOffset, pullUpEl, pullUpOffset, generatedCount = 0;

/**
 * 下拉刷新(自訂方法)
 * 資料載入完成後,記得呼叫 myScroll.refresh() 更新介面
 */
function pullDownAction() {
  setTimeout(function () {
    // 這裡用 setTimeout 模擬網路延遲,正式環境請移除並替換成 Ajax
    var el, li, i;
    el = document.getElementById('thelist');
    for (i = 0; i < 3; i++) {
      li = document.createElement('li');
      li.innerText = '添加三冰 ' + (++generatedCount);
      el.insertBefore(li, el.childNodes[0]);
    }
    myScroll.refresh();
  }, 1000);
}

/**
 * 滾動翻頁(自訂方法)
 */
function pullUpAction() {
  setTimeout(function () {
    var el, li, i;
    el = document.getElementById('thelist');
    for (i = 0; i < 3; i++) {
      li = document.createElement('li');
      li.innerText = '添加三冰 ' + (++generatedCount);
      el.appendChild(li);
    }
    myScroll.refresh();
  }, 1000);
}

/** 初始化 iScroll 控制項 */
function loaded() {
  pullDownEl = document.getElementById('pullDown');
  pullDownOffset = pullDownEl.offsetHeight;
  pullUpEl = document.getElementById('pullUp');
  pullUpOffset = pullUpEl.offsetHeight;

  myScroll = new iScroll('wrapper', {
    scrollbarClass: 'myScrollbar',
    useTransition: false,
    topOffset: pullDownOffset,
    onRefresh: function () {
      if (pullDownEl.className.match('loading')) {
        pullDownEl.className = '';
        pullDownEl.querySelector('.pullDownLabel').innerHTML = '下拉刷新...';
      } else if (pullUpEl.className.match('loading')) {
        pullUpEl.className = '';
        pullUpEl.querySelector('.pullUpLabel').innerHTML = '上拉加載更多...';
      }
    },
    onScrollMove: function () {
      if (this.y > 5 && !pullDownEl.className.match('flip')) {
        pullDownEl.className = 'flip';
        pullDownEl.querySelector('.pullDownLabel').innerHTML = '松手開始更新...';
        this.minScrollY = 0;
      } else if (this.y < 5 && pullDownEl.className.match('flip')) {
        pullDownEl.className = '';
        pullDownEl.querySelector('.pullDownLabel').innerHTML = '下拉刷新...';
        this.minScrollY = -pullDownOffset;
      } else if (this.y < (this.maxScrollY - 5) && !pullUpEl.className.match('flip')) {
        pullUpEl.className = 'flip';
        pullUpEl.querySelector('.pullUpLabel').innerHTML = '松手開始更新...';
        this.maxScrollY = this.maxScrollY;
      } else if (this.y > (this.maxScrollY + 5) && pullUpEl.className.match('flip')) {
        pullUpEl.className = '';
        pullUpEl.querySelector('.pullUpLabel').innerHTML = '上拉加載更多...';
        this.maxScrollY = pullUpOffset;
      }
    },
    onScrollEnd: function () {
      if (pullDownEl.className.match('flip')) {
        pullDownEl.className = 'loading';
        pullDownEl.querySelector('.pullDownLabel').innerHTML = '加載中...';
        pullDownAction();   // 執行自訂函數(此處可換成 Ajax)
      } else if (pullUpEl.className.match('flip')) {
        pullUpEl.className = 'loading';
        pullUpEl.querySelector('.pullUpLabel').innerHTML = '加載中...';
        pullUpAction();
      }
    }
  });

  setTimeout(function () {
    document.getElementById('wrapper').style.left = '0';
  }, 800);
}

// 綁定初始化
document.addEventListener('touchmove', function (e) { e.preventDefault(); }, false);
document.addEventListener('DOMContentLoaded', loaded, false);
</script>
程式碼看起來長,實際要理解的只有五個重點:
onRefresh:頁面刷新或呼叫 refresh() 時觸發,這裡用來把樣式和文字重設回初始狀態。
onScrollMove:拖曳中但還沒松手時觸發,負責處理箭頭旋轉與「松手開始更新」的提示。
onScrollEnd:松手停止拖曳時觸發,負責進入 loading 狀態並呼叫取資料的函數。
topOffset:把下拉提示區的高度藏起來,讓它預設不佔畫面。
pullDownAction/pullUpAction:範例用 createElement 造假資料,實際開發時把迴圈那段換成 Ajax 請求後端即可,但 myScroll.refresh() 一定要留在資料回來之後呼叫——ISCroll 會快取內容高度,不通知它就會出現捲到底卻還能再拉的錯覺。
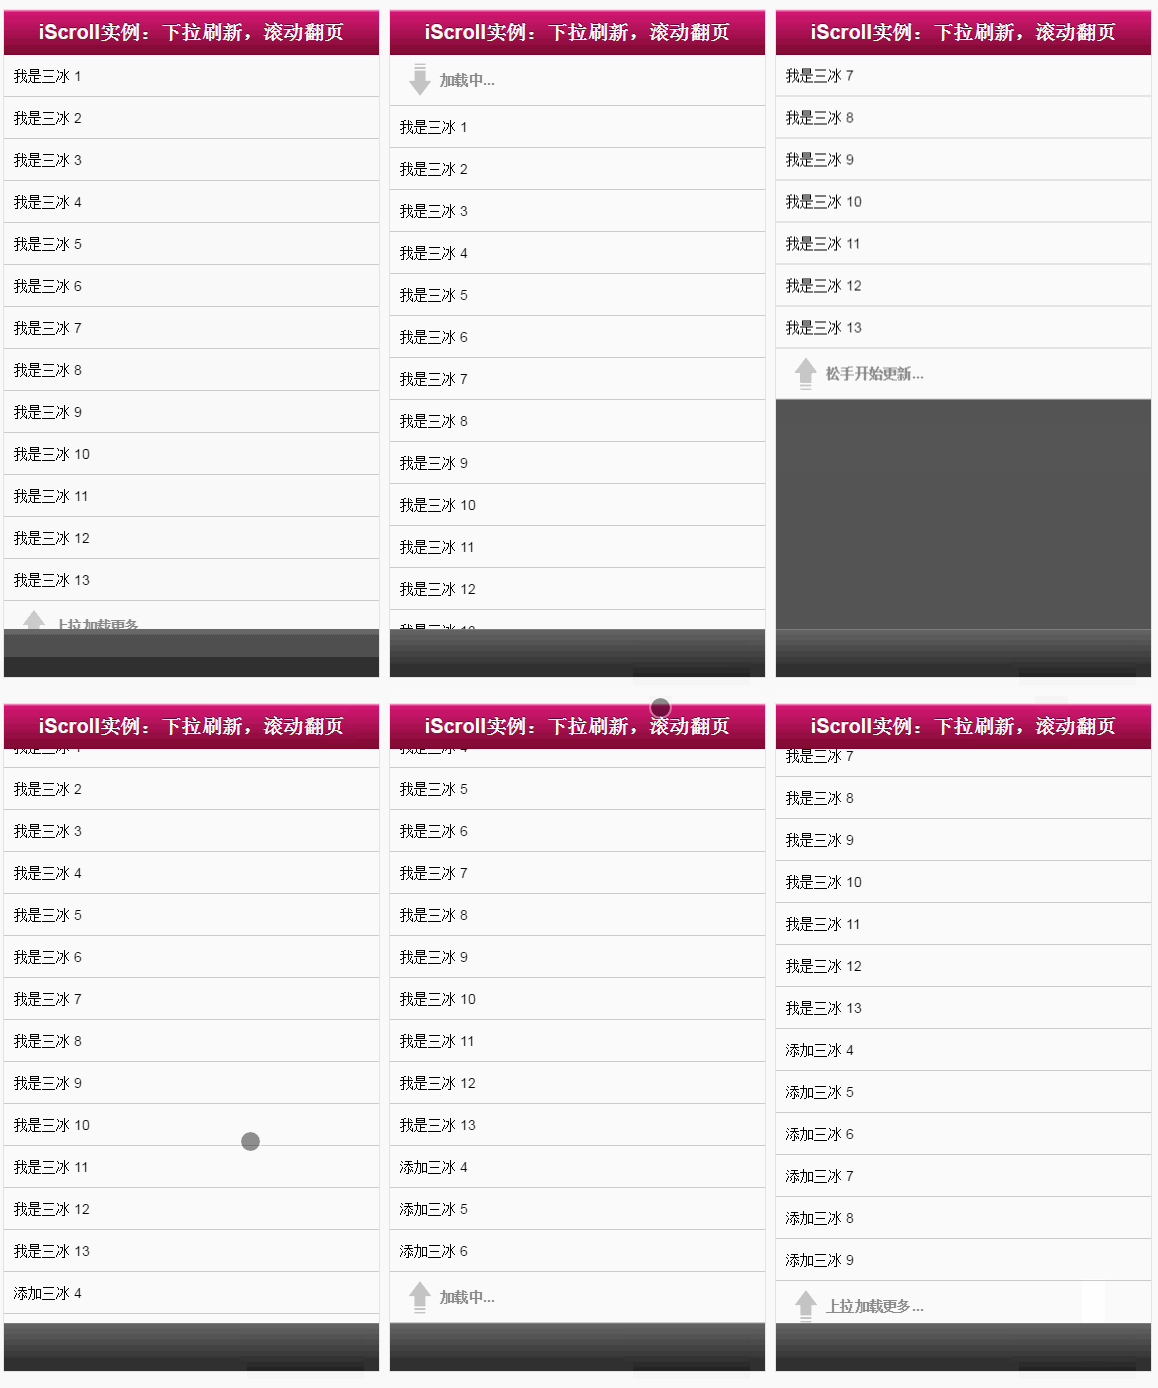
四、加上 CSS3 轉圈動畫
資料會刷新了,只差箭頭不會轉。既然要動畫,就用 CSS3 的 transform 與 keyframes。相對於前面的版本,只要在 style 裡補上這幾段:
 /* 拉到放手的位置時,箭頭翻轉 */
#pullDown.flip .pullDownIcon { -webkit-transform:rotate(-180deg) translateZ(0); }
#pullUp.flip .pullUpIcon     { -webkit-transform:rotate(0deg) translateZ(0); }

/* 加載中:換成 sprite 的另一半,並持續旋轉 */
#pullDown.loading .pullDownIcon, #pullUp.loading .pullUpIcon {
  background-position: 0 100%;
  -webkit-transform: rotate(0deg) translateZ(0);
  -webkit-transition-duration: 0ms;
  -webkit-animation-name: loading;
  -webkit-animation-duration: 2s;
  -webkit-animation-iteration-count: infinite;
  -webkit-animation-timing-function: linear;
}

@-webkit-keyframes loading {
  from { -webkit-transform: rotate(0deg) translateZ(0); }
  to   { -webkit-transform: rotate(360deg) translateZ(0); }
}
整份 HTML 其餘部分與前面完全相同,只是多引一次 iscroll.js 並把這段樣式併進 style 區塊即可。
這裡的動畫是靠 flip 與 loading 這兩個 class 驅動的,而 class 的切換完全由 ISCroll 的三個回呼函數決定。理解這條鏈——使用者手勢 → 位移 → class 變化 → CSS 動畫——之後要換成自己的視覺設計就只是改 CSS 的事。
最後提醒一個實務細節:document.addEventListener('touchmove', preventDefault, false) 這行全域阻止了所有捲動,是為了讓 ISCroll 全权接管手勢。副作用是頁面裡任何需要原生捲動的元素(例如提示框內的長文)都會失效,記得在那類元素上單獨排除。
以上就是本文的全部內容,希望對你的學習有所幫助。
- 上一篇文章: JavaScript 實作郵箱地址自動補全
- 下一篇文章: 用正則表達式清掉 HTML 標籤的實作討論