JavaScript 嚴格說來不是物件導向語言,實務上也少有機會認真用上物件導向。很多人一開始都以為「等到要複用時再包成物件就好」,但真正把專案做到後期測試階段才會發現:物件導向的價值遠不只複用,它真正解決的是「可讀性」與「可維護性」。
你可能會說物件導向還有繼承與多型。但在 JavaScript 裡,多型的概念其實不太成立;繼承則受限於網頁必須先下載 JS 才能執行,靈活度遠不如後端語言,加上沒有重載、重寫的意義也不大。所以前端很少認真談物件導向,多數時候只是在讀外掛原始碼時看到那種寫法。
真實的開發節奏通常是这样:先用面像過程把功能寫出來,再重構成物件。但專案有進度壓力,很少真有那麼寬裕的時間讓你先寫一遍再重構,於是面像過程寫完就直接提交了。
問題在半年後爆發
這種寫法有個致命缺點:頁面做完過一陣子,需求或版面要調整,你回頭看自己的程式碼,很難快速把整個頁面的邏輯步驟梳理清楚。相信寫前端的人都有過類似經驗——幫自己幾個月前寫的頁面加註解時,發現自己已經看不懂了。
舉個實例。幾年前我寫過一個放大鏡外掛,最近拿出來發現它在 Chrome 第一次渲染時沒有效果。原始版本大致如下:
/// <reference path="../jquery11.js" />
(function ($) {
  $.fn.extend({
    jqoom: function (potions) {
      var settings = { width: 350, height: 350, position: "right" }
      if (potions) { $.extend(settings, potions); }

      var ImgUrl = $("img", this).attr("src");
      var ImgMinWidth = $("img", this).width();
      var ImgMinHeigth = $("img", this).height();
      var ImgWidth = 0;
      var ImgHeight = 0;
      var de = true;

      $(this).hover(function (e) { }, function () {
        $("#jqoomz").remove();
        $(document).unbind("mousemove");
        $("#jqoomy").remove();
        de = true;
      });

      $("img", this).hover(function (e) {
        var pagex = e.x || e.pageX;
        var pagey = e.y || e.pageY;
        var pagex1 = 0, pagey1 = 0, leftcha = 0, topcha = 0;
        _this = $(this).parents("div");

        if ($("#jqoomz").length == 0) {
          _this.after("<div id='jqoomz'></div>");
          var obj = new Image();
          obj.src = ImgUrl;
          obj.onload = function () {
            if (de && obj.height > 0) {
              de = false;
              ImgWidth = obj.width;
              ImgHeight = obj.height;
              finder.call(_this.find("img")[0]);
            }
          };
          $("#jqoomz").width(settings.width).height(settings.height)
            .offset({ left: $(_this).outerWidth() + $(_this).offset().left,
                      top: $(_this)[0].offsetTop })
            .append($("<img></img>").attr("src", ImgUrl));
          if (de && obj.height > 0) {
            de = false;
            ImgWidth = obj.width;
            ImgHeight = obj.height;
            finder.call(this);
          }
        }

        function mover(event) {
          var pagex2 = event.x || event.pageX;
          var pagey2 = event.y || event.pageY;
          // 邊界判斷與 offset 計算……(略)
          var bilx = ($(this).offset().left - $(_this).offset().left) / (ImgMinWidth / ImgWidth);
          var bily = ($(this).offset().top - $(_this).offset().top) / (ImgMinHeigth / ImgHeight);
          $("#jqoomz img").css({ "margin-left": -bilx, "margin-top": -bily });
        }

        function finder() {
          // 計算遮罩層位置與 leftcha / topcha……(略)
          if ($("#jqoomy").length == 0) {
            $(this).after("<div id='jqoomy'></div>")
              .siblings("#jqoomy").addClass("jqoomy").show()
              .width((ImgMinWidth / ImgWidth * ImgMinWidth))
              .height((ImgMinHeigth / ImgHeight * ImgMinHeigth))
              .offset({ top: pagey1, left: pagex1 });
          }
          $(document).on("mousemove", $.proxy(mover, $("#jqoomy")));
        }
      }, function () { });
    }
  });
})(jQuery);
HTML 與 CSS 部分:
<script src="jquery11.js"></script>
<script src="OppJqoom.js"></script>
<style type="text/css">
.jqoom { width: 350px; height: 350px; border: solid 1px #DFDFDF; z-index: 10; }
.jqoom img { cursor: pointer; z-index: 10; max-height: 350px; max-width: 350px; }
.jqoomy { background-color: white; position: relative; z-index: 999;
          opacity: 0.5; cursor: pointer; border: solid 1px #DFDFDF; }
#jqoomz { border: solid 1px #DFDFDF; position: absolute; overflow: hidden; }
</style>
<script type="text/javascript">
$(function () { $(".jqoom").jqoom(); });
</script>
<body>
<div class="jqoom"><img src="b3.jpg" /></div>
</body>
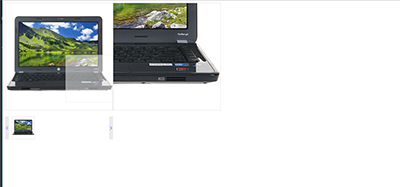
要找出「為什麼 Chrome 第一次載入沒有效果」,我得重新跟著程式碼把放大鏡的每個步驟梳理一遍。這功能其實不算複雜,但實際專案裡各種函式回呼嵌套、取資料、資料處理、畫面動態效果全都糾結在 onload 或 ready 裡,要花幾小時甚至一整天才能理清,而且未必理得完整。
回呼地獄才是真正的成本
JavaScript 的特色之一是事件監聽與函式回呼,這是它的優點——Node.js 之所以選它,很大程度就是看中這點。但回呼也帶來一個嚴重缺點:函式常常「回傳不出資料」。最典型的例子就是 AJAX,jQuery 傳統的 success 回呼,當你要把一個 AJAX 的輸出當成另一個 AJAX 的輸入,就不得不嵌套;嵌套一多,可讀性與複雜度直線上升,後期維護成本自然跟著爆掉。Promise 出現之後 jQuery、Angular 都紛紛補上,原因就在這裡。
後端怎麼做的?
看看 Java 或 C# 的做法。Java Web 幾乎都是 Spring MVC,C# 做 Web 則是 .NET MVC,它們有個共同點:Controller 提供給前端的 AJAX 方法都是依照「需要的資料」一個一個拆細的,對應的 Model 也分得很清楚。我個人是把 MVC 看成兩個維度的分層:一個維度是把單一細小功能拆成 view / control / model,另一個維度是把整個頁面拆成多個小功能。所以後端要改邏輯時很容易梳理,前端 JavaScript 能不能也照這個思路分層?
用分層重寫同一個外掛
這個外掛沒有涉及動態取資料,所以分層標準不一樣。我分成兩層:第一層是滑鼠移動後的圖片座標演算法,第二層是事件綁定與 DOM 操作。
(function ($) {

  // 建構函式:主流程
  var OppJqoom = function (_this, potions) {
    this._this = _this;
    this.ImgUrl      = $("img", this._this).attr("src");
    this.ImgMinWidth = $("img", this._this).width();
    this.ImgMinHeigth= $("img", this._this).height();
    this.ImgWidth; this.ImgHeight; this.leftcha; this.topcha;

    var settings = { width: 350, height: 350, position: "right" }
    $.extend(this, settings);
    if (potions) { $.extend(this, potions); }

    this.domOperation.Jqoomhover.call(this);
    this.domOperation.imghover.call(this);
  };

  OppJqoom.prototype = {

    // 第一層:演算法層(只算數字,不碰 DOM 結構)
    basicOperation: {
      // 取得遮罩層的 top / left
      finder: function (that) {
        var pagey1, pagex1;
        if (parseFloat($(this).offset().top + $(this).height()
              - (that.ImgMinHeigth / that.ImgHeight * that.ImgMinHeigth))
              >= parseFloat(this.pagey - that.ImgMinHeigth / that.ImgHeight * that.ImgMinHeigth / 2)
              && parseFloat(this.pagey - that.ImgMinHeigth / that.ImgHeight * that.ImgMinHeigth / 2)
              >= parseFloat($(this).offset().top)) {
          pagey1 = (this.pagey - that.ImgMinHeigth / that.ImgHeight * that.ImgMinHeigth / 2);
        } else {
          if ((this.pagey - that.ImgMinHeigth / that.ImgHeight * that.ImgMinHeigth / 2)
              < $(this).offset().top) {
            pagey1 = $(this).offset().top;
          } else {
            pagey1 = ($(this).offset().top + $(this).height()
                     - (that.ImgMinHeigth / that.ImgHeight * that.ImgMinHeigth));
          }
        }
        if (($(this).offset().left + $(this).width()
              - that.ImgMinWidth / that.ImgWidth * that.ImgMinWidth)
              >= (this.pagex - that.ImgMinWidth / that.ImgWidth * that.ImgMinWidth / 2)
              && (this.pagex - that.ImgMinWidth / that.ImgWidth * that.ImgMinWidth / 2)
              >= $(this).offset().left) {
          pagex1 = (this.pagex - that.ImgMinWidth / that.ImgWidth * that.ImgMinWidth / 2);
        } else {
          if ((this.pagex - that.ImgMinWidth / that.ImgWidth * that.ImgMinWidth / 2)
              < $(this).offset().left) {
            pagex1 = $(this).offset().left;
          } else {
            pagex1 = ($(this).offset().left + $(this).width()
                     - that.ImgMinWidth / that.ImgWidth * that.ImgMinWidth);
          }
        }
        that.leftcha = that.ImgMinWidth / that.ImgWidth * that.ImgMinWidth / 2;
        that.topcha  = that.ImgMinHeigth / that.ImgHeight * that.ImgMinHeigth / 2;
        that.domOperation.docMousemove.call(that);
        return { top: pagey1, left: pagex1 };
      },

      // 計算放大鏡內圖片的 top / left
      mover: function (that) {
        if (parseInt(that.pagex2 + that.leftcha) <= parseInt(that._this.width() + that._this.offset().left)
            && that.pagex2 >= that.leftcha + that._this.offset().left) {
          $(this).offset({ left: that.pagex2 - that.leftcha });
        } else {
          if (parseInt(that.pagex2 + that.leftcha) > parseInt(that._this.width() + that._this.offset().left)
              && that.pagex2) {
            $(this).offset({ left: that._this.width() + that._this.offset().left - that.leftcha * 2 });
          } else {
            $(this).offset({ left: that._this.offset().left });
          }
        }
        if (parseInt(that.pagey2 + that.topcha) <= parseInt(that._this.height() + that._this.offset().top)
            && that.pagey2 >= that.topcha + that._this.offset().top) {
          $(this).offset({ top: (that.pagey2 - that.topcha) });
        } else {
          if (parseInt(that.pagey2 + that.topcha) > parseInt(that._this.height() + that._this.offset().top)) {
            $(this).offset({ top: (that._this.height() + that._this.offset().top - that.topcha * 2) });
          } else {
            $(this).offset({ top: that._this.offset().top });
          }
        }
        var bilx = ($(this).offset().left - that._this.offset().left) / (that.ImgMinWidth / that.ImgWidth);
        var bily = ($(this).offset().top  - that._this.offset().top)  / (that.ImgMinHeigth / that.ImgHeight);
        return { left: bilx, top: bily };
      }
    },

    // 第二層:事件綁定層(只負責 DOM 與事件)
    domOperation: {
      // 滑鼠移入圖片
      imghover: function () {
        var that = this;
        $("img", this._this).hover(function (e) {
          this.pagex = e.x || e.pageX;
          this.pagey = e.y || e.pageY;
          var offset;
          var obj = new Image();
          obj.src = that.ImgUrl;
          obj.onload = function () {
            if (obj.height > 0) {
              that.ImgWidth = obj.width;
              that.ImgHeight = obj.height;
              if ($("#jqoomz").length == 0) {
                that._this.after("<div id='jqoomz'></div>");
              }
              offset = that.basicOperation.finder.call(that._this.find("img")[0], that);
            }
          };
          if ($("#jqoomz").length == 0) {
            that.ImgWidth = obj.width;
            that.ImgHeight = obj.height;
            that._this.after("<div id='jqoomz'></div>");
          }
          offset = that.basicOperation.finder.call(this, that);
          if ($("#jqoomy").length == 0) {
            $(this).after("<div id='jqoomy'></div>")
              .siblings("#jqoomy").addClass("jqoomy").show()
              .width((that.ImgMinWidth / that.ImgWidth * that.ImgMinWidth))
              .height((that.ImgMinHeigth / that.ImgHeight * that.ImgMinHeigth))
              .offset({ top: offset.top, left: offset.left });
          }
          $("#jqoomz").width(that.width).height(that.height)
            .offset({ left: that._this.outerWidth() + that._this.offset().left,
                      top: that._this[0].offsetTop })
            .append($("<img></img>").attr("src", that.ImgUrl));
        }, function () { });
      },

      // 滑鼠在圖片上滑動
      docMousemove: function () {
        var that = this;
        $(document).on("mousemove", function (event) {
          that.pagex2 = event.x || event.pageX;
          that.pagey2 = event.y || event.pageY;
          var offset = that.basicOperation.mover.call($("#jqoomy"), that);
          $("#jqoomz img").css({ "margin-left": -offset.left, "margin-top": -offset.top });
        });
      },

      // 滑鼠移出圖片
      Jqoomhover: function () {
        this._this.hover(function (e) { }, function () {
          $("#jqoomz").remove();
          $(document).unbind("mousemove");
          $("#jqoomy").remove();
        });
      }
    }
  };

  $.fn.extend({
    jqoom: function (potions) { return new OppJqoom(this, potions); }
  })

})(jQuery);
加上簡單註解之後,整個頁面的邏輯步驟立刻清晰很多:想知道「遮罩位置怎麼算」,只看 basicOperation.finder;想知道「什麼時候建立元素」,只看 domOperation。當初那個「Chrome 第一次渲染沒效果」的問題,也是靠 obj.onload 與同步分支的順序比對才看出來的。
this 的坑要先知道
這種寫法最麻煩的地方是 this。物件裡嵌套物件呼叫其方法時,this 指向的是自己那個物件,而不是外層。所以程式裡到處可以看到 call(that) 這種把「真正的外掛實例」當參數傳進去的寫法——這不是優雅,而是 JavaScript this 綁定規則下的必要妥協。如果不改用 call,也可以常見到另一種解法:在進入回呼之前先把 this 存成 var self = this,之後一律用 self。
可以怎麼分層
實際專案裡,我通常會這樣切:資料讀取層負責 AJAX 與資料來源、資料處理層負責格式轉換與計算、DOM 動態效果層負責畫面,業務特別複雜時再獨立一個資料展現層。分層的依據不是「程式碼好不好看」,而是「半年後我要改一個小需求時,需要讀幾個檔案」。
以上就是關於 JavaScript 物件導向分層思維的整理。結論不是「一定要寫物件導向」,而是:當你的回呼開始嵌套、當你已經看不懂自己寫的程式碼時,就是該分層的訊號。
相關文章
-
JavaScript 建立類的五種寫法:工廠、建構器、原型與混合模式比較 解開AJAX的達文西密碼:JavaScript中的物件導向與父類呼叫 用 AJAX 打造智能 Web 應用(進階篇):JavaScript 的物件導向力量 JavaScript 類的三種成員:公有、私有與靜態 AJAX 入門指南(二):JavaScript 物件導向怎麼寫,以及繼承怎麼做 JavaScript 物件導向之我見:原型機制與類式模擬 JavaScript 物件導向學習筆記(一):基礎類型、原型與繼承入門 JavaScript 定義類的六種寫法:從工廠模式到動態原型 JavaScript 物件導向全解:從建立物件到寄生組合式繼承 深入理解 JavaScript 的同步與非同步:事件循環、Promise 與訊息傳遞