檔案上傳是常見需求,依業務不同有單檔、多檔、拖放等各種形式。瀏覽器原生的 <input type="file"> 樣式樸素、功能有限,因此實務上常需要美化樣式並補強互動。
本文示範一個完整案例:美化多檔上傳介面,並支援「選檔後先檢視清單、刪掉不要的檔案、最後再一次上傳」。這個「先挑再送」的互動在真實專案中非常實用——使用者不必因為多選了一個檔案就全部重來。

一、檔案上傳的基礎
1. 單檔上傳
最簡單的形式:form 加上 enctype="multipart/form-data",內部有一個 file 類型的 input。
<form name="form1" method="post" action="/abc.php" enctype="multipart/form-data"> <input type="text" name="user" id="user" placeholder="請輸入昵稱"> <input type="file" name="userImage" id="userImage"> <input type="submit" name="sub" value="提交"> </form>
enctype 這一步不能省。少了它,瀏覽器會以預設的 application/x-www-form-urlencoded 編碼表單,檔案內容根本無法正確傳到後端。
2. 多檔上傳
最直白的做法是多放幾個 file input:
<form name="form1" method="post" action="/abc.php" enctype="multipart/form-data"> <input type="text" name="user" id="user" placeholder="請輸入昵稱"> <input type="file" name="userImage1" id="userImage1"> <input type="file" name="userImage2" id="userImage2"> <input type="file" name="userImage3" id="userImage3"> <input type="submit" name="sub" value="提交"> </form>
HTML5 提供了更好的方式——加上 multiple 屬性,一次就能選多個檔案:
<form name="form1" method="post" action="/abc.php" enctype="multipart/form-data">
<input type="text" name="user" id="user" placeholder="請輸入昵稱">
<input type="file" name="userImage" id="userImage" multiple>
<input type="submit" name="sub" value="提交">
</form>

二、樣式美化的三個痛點
原生的檔案選擇項主要有三個問題:
一是沒有邊框,與頁面上其他有邊框的表單元素格格不入;二是「選擇檔案」按鈕樣式過於基礎,無法與設計稿一致;三是選多檔後只顯示「共選了 N 個檔案」,看不到具體檔名。
第一點直接加 border 樣式即可解決。
第二、三點則需要額外元素配合:把原生 file input 隱藏,另做一個按鈕,點擊時用 JS 觸發原 input 的 click:
<input type="file" name="userImage" id="userImage" style="display: none;"> <input type="button" id="" value="選擇文件" onclick="document.getElementById('userImage').click()">
選檔後再用 JS 取得檔案清單,渲染到自己的元素上。但檔案一多,佔用空間就成了問題——解法是預設只顯示前幾個,其餘收進「查看更多」的下拉清單。
衍生出的第二個需求正是本文重點:既然已經列出檔名,就應該讓使用者能直接刪除單項,而不必重新選一次。
三、選檔後的刪除操作
1. 介面處理
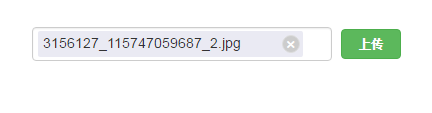
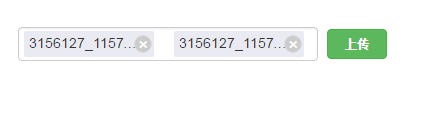
每個檔案項都是一個帶有 × 刪除鈕的小標籤,用 template 統一產生:
<!-- 當前選擇的文件列表 文件信息模版 --> <script type="text/template" id="file-temp-item-tpl"> <span class="file-temp-item" style="{{style}}"> <span class="file-temp-name">{{name}}</span> <span class="file-temp-btn">×</span> </span> </script>
檔案超過 5 個時,多出的部分收進下拉清單,避免一列擠爆:
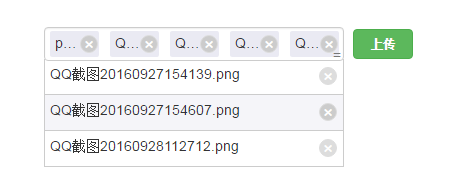
這裡各項的 left 與 width 計算如下,可依需要調整:
// 計算每一項坐標left、占寬width left = i === 0 ? 2 : 2 + i * (100 / fileTempLen); width = 100 / fileTempLen - 2;
下拉清單的每一項同樣有獨立 template:
<!-- 查看更多文件 文件信息模版 --> <script type="text/template" id="file-more-item-tpl"> <li> <span class="file-item-more-name">{{name}}</span> <span class="file-item-more-btn">×</span> </li> </script>
初始的 HTML 結構:
<form name="form" id="form" method="post" action="fileTest.php" enctype="multipart/form-data"> <!-- <input type="number" name="numberTest" value="100"> --> <input type="file" name="fileTest[]" id="fileTest" multiple> <!-- 當前選擇的文件列表(最多顯示5條) --> <span class="file-temp"> </span> <!-- 查看更多文件 --> <ul class="item-more"> </ul> <input type="button" class="btn btn-success" id="uploadBtn" value="上傳"> <p class="upload-tip">文件上傳成功</p> </form>
完整 CSS 樣式:
<link rel="stylesheet" type="text/css" href="bootstrap.min.css"> <style type="text/css"> html { font-family: Arial; } form { margin: 50px auto; width: 400px; } input { width: 300px; padding: 4px; } #uploadBtn { margin-top: -3px; margin-left: 5px; width: 60px; height: 30px; font-weight: bold; font-size: 12px; } #fileTest { display: inline-block; border: 1px solid #ccc; border-radius: 3px; } .file-temp { position: relative; display: none; width: 300px; height: 31px; } .file-temp-item { position: absolute; top: 4px; height: 24px; } .item-more-btn { display: inline-block; position: absolute; top: 18px; right: 0.5%; width: 10px; height: 10px; color: #777; cursor: pointer; } .item-more-btn:hover { border-top-color: #aaa; } .file-temp-name { display: inline-block; overflow: hidden; width: 90%; height: 26px; padding: 2px 15px 2px 5px; border-radius: 2px; background-color: #eaeaf3; text-overflow: ellipsis; white-space: nowrap; } .file-temp-btn { position: absolute; display: inline-block; top: 4px; right: 11%; width: 18px; height: 18px; line-height: 18px; text-align: center; border: 1px solid #ddd; background-color: #ccc; border-radius: 50%; color: #fff; font-size: 18px; cursor: pointer; } .item-more { position: absolute; overflow-y: auto; display: none; padding-left: 0; width: 300px; max-height: 150px; list-style: none; } .item-more li { position: relative; padding: 5px; border: 1px solid #ccc; border-top: none; } .item-more li:hover { background-color: #f5f5f9; } .file-item-more-name { display: inline-block; width: 90%; overflow: hidden; text-overflow: ellipsis; white-space: nowrap; } .file-item-more-btn { position: absolute; display: inline-block; top: 8px; right: 2%; width: 18px; height: 18px; line-height: 18px; text-align: center; border: 1px solid #ddd; background-color: #ddd; border-radius: 50%; color: #fff; font-size: 18px; cursor: pointer; } .file-item-more-btn:hover { background-color: #ccc; } .upload-tip { display: none; margin: 50px auto; text-align: center; font-size: 12px; } </style>
2. 腳本處理
先說一個關鍵發現:value 拿不到全部檔名。
直覺上會想用 this.value 取檔名,但無論有沒有 multiple,它都只回傳第一個檔案的虛擬路徑:
<input type="file" onchange="console.log(this.value);">

<input type="file" multiple onchange="console.log(this.files);">
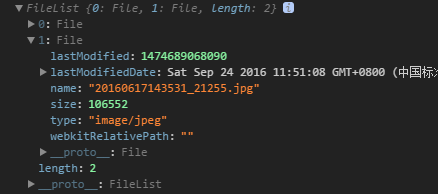
正確的途徑是 HTML5 新增的 FileList 物件。每個 file input 都有 files 屬性,存放選中檔案的相關資訊:
<input type="file" multiple onchange="console.log(this.files);">
選兩個檔案後檢視,可以看到 FileList 是類陣列結構,有 length 屬性:
那麼能不能直接改它?實測不行。用 splice 刪除第二項:
<input type="file" multiple onchange="console.log(Array.prototype.splice.call(this.files, 1, 1));">

直接報錯。嘗試把 length 改成可寫:
Object.defineProperty(FileList.prototype, 'length', { writable: true, configurable: true });
設定後 length 確實能改了,看似成功,但實際輸出會發現 FileList 內容完全沒變,仍是兩項。
查過資料後可以確認:基於安全性考量,瀏覽器刻意讓 FileList 的內容不可變更。你能把它整體清空,卻無法增刪其中單項。
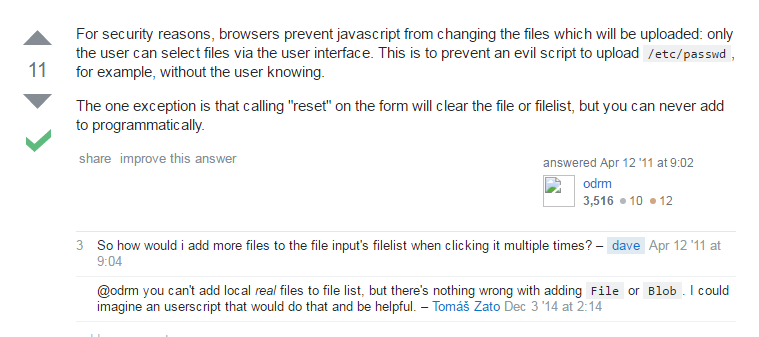
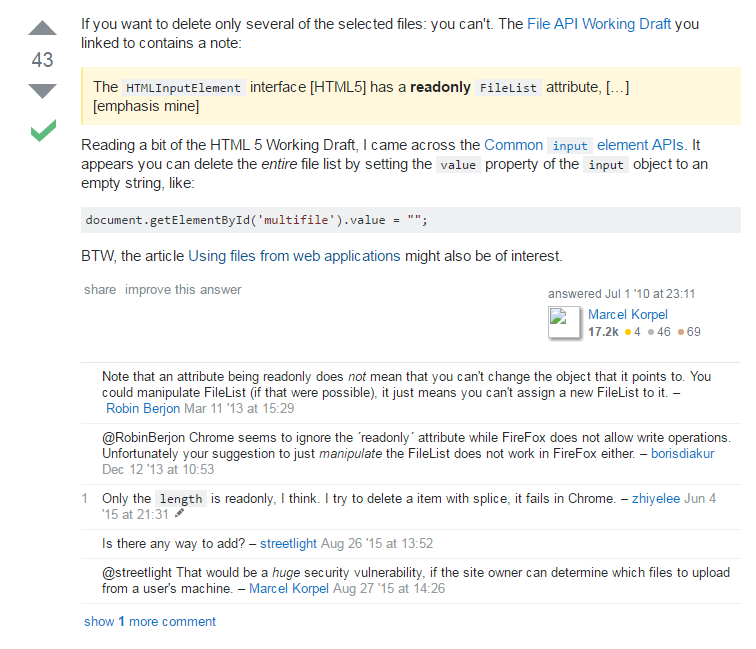
解法:另存一個可變的陣列。選檔時把 FileList 內容複製到自己的陣列,之後所有增刪都在這個陣列上進行:
// 存儲更新所選文件 var curFiles = []; ... // 選中文件後 var files = this.files; if (files && files.length) { // 原始FileList對象不可更改,所以將其賦予curFiles提供接下來的修改 Array.prototype.push.apply(curFiles, files); }
點擊刪除鈕時,用 filter 依檔名過濾掉該項即可:
var name = $(this).prev().text(); // 去除該文件 curFiles = curFiles.filter(function(file) { return file.name !== name; });
要注意這種「以檔名辨識」的做法有個弱點:若使用者一次選了兩個同名檔案,刪一項會連帶刪掉兩項。更穩妥的方式是用索引:
var index = $(this).closest('.file-temp-item').data('index'); curFiles.splice(index, 1);
四、上傳:改用 FormData + Ajax
清單處理完,按下上傳。若直接呼叫 $form.submit(),送到後端的仍是原始的 FileList,自訂的刪除結果會被忽略。因此必須改用 Ajax 提交。
HTML5 的 FormData 正是為此而生:它能建立表單物件、以鍵值對方式加入資料,再整包送出。
MDN 上的基本用法:
var oMyForm = new FormData(); oMyForm.append("username", "Groucho"); oMyForm.append("accountnum", 123456); // 數字123456被立即轉換成字符串"123456" // fileInputElement中已經包含了用戶所選擇的文件 oMyForm.append("userfile", fileInputElement.files[0]); var oFileBody = '<a id="a"><b id="b">hey!</b></a>'; // Blob對象包含的文件內容 var oBlob = new Blob([oFileBody], { type: "text/xml"}); oMyForm.append("webmasterfile", oBlob); var oReq = new XMLHttpRequest(); oReq.open("POST", "https://foo.com/submitform.php"); oReq.send(oMyForm);
也可以用 jQuery 封裝的 ajax,但務必把 processData 與 contentType 設為 false,否則 jQuery 會試圖解析並錯誤設定請求標頭:
var fd = new FormData(document.getElementById("fileinfo")); // 使用某個表單作為初始項 fd.append("CustomField", "This is some extra data"); $.ajax({ url: "stash.php", type: "POST", data: fd, processData: false, // 告訴jQuery不要去處理發送的數據 contentType: false // 告訴jQuery不要去設置Content-Type請求頭 });
五、四個實測得到的注意點
1)FormData 的值不接受複合物件,必須逐項 append。
直接把整個 curFiles 陣列塞進去:
var fd = new FormData($('#form')[0]); fd.append('myFileTest', curFiles); $files = $_REQUEST['myFileTest']; var_dump($files);
用 PHP 接收時,資料會被直接轉成字串,完全不是檔案物件:
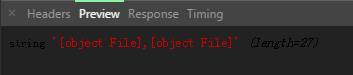
既然 curFiles 裡裝的是 File 物件,改用 $_FILES 接收呢?會直接出錯。正確做法是把陣列拆開,一個檔案呼叫一次 append:
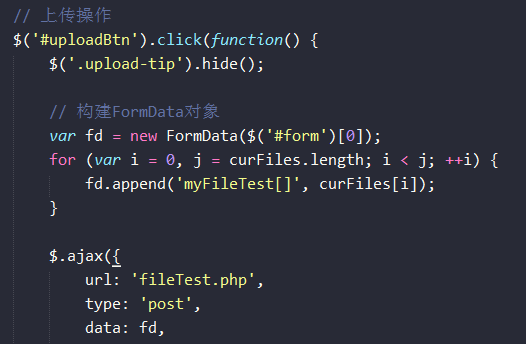
var fd = new FormData($('#form')[0]); for (var i = 0, j = curFiles.length; i < j; ++i) { fd.append('myFileTest[]', curFiles[i]); } $files = $_FILES['myFileTest']; var_dump($files);
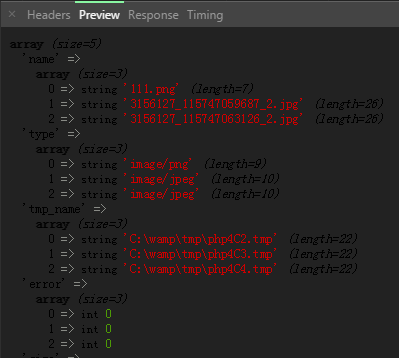
2)後端要用 $_FILES 取檔案、$_REQUEST 取其他欄位。
改成 $files = $_REQUEST['myFileTest']; 會直接找不到 myFileTest。順帶測試同時送出一般欄位:
var fd = new FormData($('#form')[0]); for (var i = 0, j = curFiles.length; i < j; ++i) { fd.append('myFileTest[]', curFiles[i]); } fd.append('myTest', [1, 2, 3]); $files = $_FILES['myFileTest']; $test = $_REQUEST['myTest']; var_dump($test); var_dump($files);
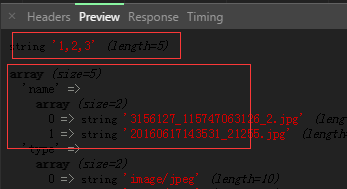
3)多檔上傳的欄位名要加 []。
fd.append('myFileTest[]', curFiles[i]);
若漏掉後面的方括號,連續 append 會互相覆蓋,後端最後只收到最後一次 append 的那個檔案。加上 [] 才能讓 PHP 把它解析成陣列。
4)不要在 $.ajax 的 data 屬性裡直接 new FormData()。
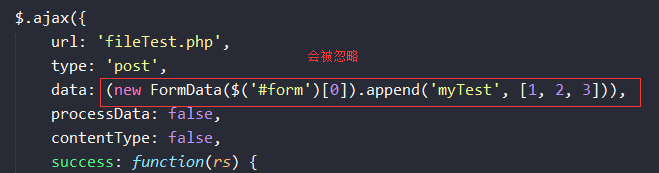
寫在 data 中會被 jQuery 忽略,後端什麼都拿不到。必須先在外層建立好 FormData 實例,再把它當作 data 的值傳入。
混合表單的驗證。實務上表單通常同時有檔案與一般欄位,多加一個 input 測試:
<input type="number" name="numberTest" value="100">
<?php $files = $_FILES['myFileTest']; $test = $_REQUEST['numberTest']; echo json_encode(array( 'len' => count($files['name']), 'num' => $test )); ?>

完整 JS 腳本:
<script type="text/javascript"> /** * 向文件列表元素中添加相應的文件項 * @param {Array} files 當前的文件列表數組對象 */ function addItem(files) { var fileTempItemTpl = $('#file-temp-item-tpl').html(), fileMoreItemTpl = $('#file-more-item-tpl').html() htmlTemp = [], htmlMoreTemp = [], // 文件列表中各文件坐標位置及所占空間 left = 2, width = 100, // 最多取前5個文件 fileTempLen = files.length > 5 ? 5 : files.length; for (var i = 0, j = files.length; i < j; ++i) { // 當i > 4,即第6個文件開始 if (i > 4) { htmlMoreTemp.push(fileMoreItemTpl.replace('{{name}}', files[i].name)); continue; } // 計算每一項坐標left、占寬width left = i === 0 ? 2 : 2 + i * (100 / fileTempLen); width = 100 / fileTempLen - 2; htmlTemp.push(fileTempItemTpl .replace('{{style}}', 'left: ' + left + '%;width: ' + width + '%;') .replace('{{name}}', files[i].name) ); } // 渲染相關元素內容 $('.file-temp').html('' + '<input type="text" style="background-color:#fff;" class="form-control" id="fileTemp" readonly>' + htmlTemp.join('') + (files.length > 5 ? '<span class="item-more-btn" title="查看更多">=</span>' : '' ) ); $('.item-more').html(htmlMoreTemp.join('')); } // 保存當前選擇的(更新後)文件列表 var curFiles = []; // 初始選擇文件時觸發 $('#fileTest').change(function() { var $this = $(this), $temp = $('.file-temp'), files = this.files; if (files && files.length) { // 原始FileList對象不可更改,所以將其賦予curFiles提供接下來的修改 Array.prototype.push.apply(curFiles, files); addItem(curFiles); $this.hide(); $temp.css('display', 'inline-block'); } }); $(document) // 取消選擇某個文件時,在文件列表數組對象中刪除這個值,並更新列表 .on('click', '.file-temp-btn, .file-item-more-btn', function() { $('.upload-tip').hide(); var name = $(this).prev().text(); // 去除該文件 curFiles = curFiles.filter(function(file) { return file.name !== name; }); // 文件列表數組對象長度大於5才顯示“更多文件列表”下拉項 if (curFiles.length <= 5) { $('.item-more').hide(); } // 文件列表數組被清空則重置文件選擇表單項 if (!curFiles.length) { $('#fileTest').val('').show(); $('.file-temp').css('display', 'none'); } else { addItem(curFiles); } console.log(curFiles) }) // 顯示“更多文件列表”下拉項 .on('click', '.item-more-btn', function() { $('.upload-tip').hide(); $('.item-more').show('normal'); }); // 上傳操作 $('#uploadBtn').click(function() { $('.upload-tip').hide(); // 構建FormData對象 var fd = new FormData($('#form')[0]); for (var i = 0, j = curFiles.length; i < j; ++i) { fd.append('myFileTest[]', curFiles[i]); } $.ajax({ url: 'fileTest.php', type: 'post', data: fd, processData: false, contentType: false, success: function(rs) { rs = JSON.parse(rs); $('.upload-tip') .addClass('text-success') .removeClass('text-error') .text(rs.len + '個文件上傳成功, number項值為' + rs.num) .show(); }, error: function(err) { } }); }); </script>
實務補充
這份實作把邏輯都寫在全域,正式專案中建議封裝成一個上傳元件,把 curFiles 收進閉包或 class 中,避免與頁面其他程式碼衝突。
另外幾個 production 環境該補上的防護:前端應限制檔案大小與副檔名(file.type、file.size),但這只是使用者體驗,真正的驗證必須在後端做——副檔名與 MIME 都可以偽造,存檔時應使用重新產生的檔名而非使用者提供的原名,並避免把上傳目錄設定為可執行。
最後,事件綁定用的是 delegate 寫法($(document).on('click', '.file-temp-btn', ...)),這點做得很對——因為檔案項是動態產生的,直接綁定會在重新渲染後失效。