先說整體思路
這篇文章以一個仿直播平台的右側互動欄為範例,把「評論列表 + 發言框 + 彈幕顯示設置面板」三個模組拆開來做。原始素材是設計稿切圖,因此 CSS 裡大量使用同一張雪碧圖(videoicos.png)透過 background-position 定位,這也是切圖還原時最常見的做法。

一、頁面結構(HTML)
外層 .lv-wrapper 負責整體寬度與居中,右側互動欄 .lv-right-interact 固定在 310px;上方是「節目單 / 彈幕」切換選單,下方 .tabcon 承載評論區。評論列表用 ul > li 結構,每條包含發言者與內容兩個 span,系統訊息與 VIP 用戶各自掛不同的 class。
<div class="lv-wrapper cf">
  <div class="lv-right-interact">
    <div class="lv-right-interact-menu cf">
      <a href="javascript:;" title="節目單" class="show now" data-target="liveprogram"></a>
      <a href="javascript:;" title="彈幕" class="barrage" data-target="barrage"><i class="ic2"></i></a>
    </div>
    <div class="tabcon">
      <div class="barrage">
        <div class="chat-wrap">
          <div class="chat">
            <ul>
              <li><span data-name="sysmsg">系統消息:</span><span class="txt">歡迎進入寧夏衛視!</span></li>
              <li><span class="vipcolor" data-name="liiuxiaobao">starof<i class="vip"></i>:</span><span class="txt">評論內容</span></li>
              <!-- 其餘評論重複結構 -->
            </ul>
          </div>
        </div>
        <div class="comments-area">
          <div id="form-wrap">
            <div class="formtext">
              <textarea maxlength="30" placeholder="請在這裡輸入評論"></textarea>
              <p class="num">0/30</p>
              <div class="loginarea">
                <p class="tips login"><a href="javascript:void(0);" data-type="login">登錄</a> 或 <a href="javascript:void(0);" data-type="reg">注冊</a> 後可以發送彈幕</p>
                <p class="tips wait"><em>5</em> 秒後可再次評論</p>
              </div>
            </div>
            <a href="javascript:void(0);" class="btn-submit">發送</a>
            <a href="javascript:void(0);" class="btn-set"></a>
            <!-- 設置面板 -->
          </div>
        </div>
      </div>
    </div>
  </div>
</div>
二、關鍵樣式(CSS)
common.css 只做一件事:把常用標簽的 margin、padding、list-style 歸零,並提供 .cf 清浮動、.fl/.fr 等工具類。真正的版面都在 style.css:
/* 整體寬度與互動欄 */
.lv-wrapper{ width:990px; margin:0 auto; clear:both; }
.lv-right-interact{ width:310px; float:left; position:relative; }
.lv-right-interact-menu a{ float:left; width:155px; height:40px;
  background:#000 url(../images/videoicos.png); border-bottom:2px solid #313132; }
.lv-right-interact-menu .now{ border-color:#c22; background-color:#232324; }
.lv-right-interact .tabcon{ height:800px; background-color:#232323; }

/* 評論列表:固定高度 + 隱藏橫向溢出 */
.barrage .chat-wrap{ position:relative; height:630px; overflow-x:hidden; padding:15px 5px 0 15px; }
.barrage .chat li{ margin:0 0 5px; color:#555; }
.barrage .chat li span.txt{ color:#8b8b8b; }
.barrage .chat li span.vipcolor{ color:#c22; }
.barrage .chat li .vip{ display:inline-block; width:20px; height:8px;
  background:url(../images/videoicos.png) no-repeat -228px -86px; }

/* 發言框固定在底部 */
.barrage .comments-area{ position:absolute; bottom:0; left:0; width:270px;
  padding:20px; border-top:1px solid #222; background-color:#191919; }
.comments-area .focus .formtext{ border-color:#c22; background-color:#fff; }
.comments-area .focus .btn-submit{ background-color:#c22; }

/* 設置面板 */
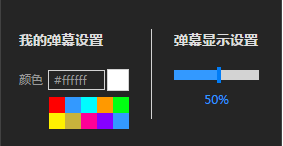
.comments-area .setform{ position:absolute; z-index:99; width:240px; padding:12px 22px 18px 18px;
  top:-70px; left:10px; background:#252525; border:1px solid #424242; display:none; }
.comments-area .dragbar{ width:85px; height:10px; background:#d3d3d3; position:relative; }
.comments-area .dragbar .progress{ width:50%; position:absolute; height:10px; top:0; left:0; background:#39f; }
.comments-area .dragbar .icon{ width:4px; height:16px; position:absolute; top:-3px; left:50%; background:#007cf7; }
三、設置面板的開關:別忘了阻止事件冒泡
重複點擊「設置」圖示要能顯示/隱藏交替,點擊頁面其他區域則要收起面板。看起來很直觀,實作時卻很容易踩坑。
// 第一步:切換顯示
$(".btn-set").click(function(evt){
  $(".setform").toggle();
  evt.stopPropagation ? evt.stopPropagation() : evt.cancelBubble = true;
});

// 第二步:點擊其他區域時收起
$(".tabcon").click(function(){
  if ($(".setform").is(":visible")) { $(".setform").hide(); }
});

// 第三步:點面板內部不觸發收起
$(".setform").click(function(evt){
  evt.stopPropagation ? evt.stopPropagation() : evt.cancelBubble = true;
});
如果第一步不寫 stopPropagation,點擊 .btn-set 時面板會先被 toggle() 打開,接著事件冒泡到父層 .tabcon,又被父層的隱藏邏輯關掉,於是看起來「完全沒反應」。這正是事件冒泡最典型的陷阱。
四、進度條拖曳與百分比計算
透明度滑桿的做法是:在圖示上按下(mousedown)記錄狀態,在背景上監聽 mousemove 持續計算位置,最後用 left / barwidth * 100 換算百分比。同時也支援直接點擊軌道跳位,並用 animate 做一點緩衝動畫。
dragbar(85);

function dragbar(barwidth){
  var $bg = $('.dragbar'),
      $bgcolor = $('.progress'),
      $btn = $('.icon'),
      $text = $('.percent');
  var statu = false, ox = 0, left = 0, bgleft = 0;

  $btn.mousedown(function(e){
    ox = e.pageX - left;   // 記錄滑鼠與圖示的偏移量
    statu = true;
  });
  $(document).mouseup(function(){ statu = false; });

  $bg.mousemove(function(e){
    if (!statu) return;
    left = e.pageX - ox;
    if (left < 0) left = 0;
    if (left > barwidth) left = barwidth;
    $btn.css('left', left);
    $bgcolor.width(left);
    $text.html(parseInt(left / barwidth * 100) + '%');
  });

  $bg.click(function(e){
    if (statu) return;
    bgleft = $bg.offset().left;
    left = e.pageX - bgleft;
    if (left < 0) left = 0;
    if (left > barwidth) left = barwidth;
    $btn.css('left', left);
    $bgcolor.stop().animate({ width: left }, barwidth);
    $text.html(parseInt(left / barwidth * 100) + '%');
  });
}
五、字數統計與調色盤
字數統計利用 input / propertychange 雙事件綁定,兼顧現代瀏覽器與舊版 IE;調色盤則是把 data-color 讀出來,同步更新文字與色塊背景。
$('.comments-area textarea').bind('input propertychange', function(){
  $('.comments-area .num').html($(this).val().length + "/30");
});

$(".takecolor a").click(function(){
  $(".rgb-set .rgb").html("#" + $(this).attr("data-color"));
  $(".rgb-set .color").css("backgroundColor", $(this).css("backgroundColor"));
});
小結
整個模組的難點其實不多,真正容易出錯的是三個細節:事件冒泡導致面板無法打開、滑桿拖曳時座標要記住初始偏移、以及切圖而來的雪碧圖座標必須與設計稿完全對齊。掌握這三點,這類互動欄就能穩定還原。