原生 JavaScript 與 jQuery 雙版本實作:帳號密碼即時驗證
編輯:關於JavaScript
前一篇文章中我們已經用原生 JavaScript 完成了帳號的即時驗證,不過當時只檢查了使用者名稱,並沒有把密碼欄位一起納入驗證範圍。這次把這個缺口補上,並且刻意寫成兩個版本:一份交給 jQuery 處理,另一份完全用原生 JavaScript 手刻,方便對照兩者的差異。
一、jQuery + Ajax 版本的核心寫法
這個版本把請求邏輯交給 $.ajax(),程式碼量明顯精簡。帳號欄位與密碼欄位各自監聽 blur 事件,也就是當焦點離開輸入框的那一刻才送出請求,避免使用者每敲一個字就打一次後端。
/* jquery 版本 */
$(document).ready(function(){
    $("#account").blur(function(event) {
        $.ajax({
            type: "GET",
            url: "checkAccount.php?account=" + $("#account").val(),
            dataType: "text",
            success: function(msg){
                $("#accountStatus").html(msg);
            },
            error: function(jqXHR) {
                alert("帳號發生錯誤!")
            },
        });
    });

    $("#password").blur(function(event) {
        $.ajax({
            type: "GET",
            url: "checkPassword.php?",
            dataType: "text",
            data: "account=" + $("#account").val() + "&password=" + $("#password").val(),
            success: function(msg){
                $("#passwordStatus").html(msg);
            },
            error: function(jqXHR) {
                alert("密碼查詢發生錯誤!")
            },
        });
    });
});
二、原生 JavaScript 版本的核心寫法
如果不想依賴任何函式庫,就得自己處理 XMLHttpRequest 物件的建立,包含對舊版 IE 的 ActiveXObject 相容分支。剩下的流程其實和 jQuery 一樣:開啟連線、送出、在 onreadystatechange 中判斷 readyState 與 status,再把回傳文字塞進頁面上對應的提示區塊。
// 原生 JavaScript 版本
function checkAccount(){
    var xmlhttp;
    var name = document.getElementById("account").value;
    if (window.XMLHttpRequest)
        xmlhttp = new XMLHttpRequest();
    else
        xmlhttp = new ActiveXObject("Microsoft.XMLHTTP");
    xmlhttp.open("GET", "checkAccount.php?account=" + name, true);
    xmlhttp.send();
    xmlhttp.onreadystatechange = function(){
        if (xmlhttp.readyState == 4 && xmlhttp.status == 200)
            document.getElementById("accountStatus").innerHTML = xmlhttp.responseText;
    }
}

function checkPassword(){
    var xmlhttp;
    var name = document.getElementById("account").value;
    var pw = document.getElementById("password").value;
    if (window.XMLHttpRequest)
        xmlhttp = new XMLHttpRequest();
    else
        xmlhttp = new ActiveXObject("Microsoft.XMLHTTP");
    xmlhttp.open("GET", "checkPassword.php?account=" + name + "&password=" + pw, true);
    xmlhttp.send();
    xmlhttp.onreadystatechange = function(){
        if (xmlhttp.readyState == 4 && xmlhttp.status == 200)
            document.getElementById("passwordStatus").innerHTML = xmlhttp.responseText;
    }
}
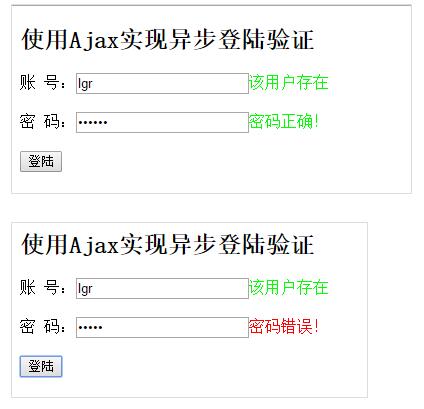
MySQL 資料庫與連線的部分沿用上一篇的設定,完全沒有更動。實際執行的畫面如下圖所示:
以上就是這次補充的全部內容,希望對正在練習表單驗證的朋友有幫助。