zTree 插件下拉樹使用入門教程
編輯:關於JavaScript
最近因為工作需要一個樹形下拉框元件,查資料後發現一般有兩種實現方式:一是使用 zTree,二是使用 easyUI。由於公司的前端並非基於 easyUI,所以這裡選擇用 zTree 來實現下拉樹。
這裡採用簡單的數據格式(簡單 Json),類似如下:
var zNodes = [
  {id:1, pId:0, name:"北京"},
  {id:2, pId:0, name:"天津"},
  {id:4, pId:0, name:"河北省", open:true, nocheck:true},
  {id:41, pId:4, name:"石家莊"},
  {id:42, pId:4, name:"保定"}
];
首先需要一個實體 bean,用來封裝查出的數據:
public class ZtreeNode {
  private String id;   //id
  private String pId;  //父 id
  private String name; //顯示名稱
  /*getter and setter*/
}
這裡要特別注意:pId 的第二個字母必須大寫,若寫成小寫 pId 就無法構建出樹形結構,所有節點都會變成根節點。
接著把從資料庫查出的數據轉換為 ztree 需要的 bean,再轉為對應的 Json:
//獲取商品分類樹,返回 json
public String getGoodsCategoryTreeJson() {
  List<GoodsCategory> allGoodsCategoryList = goodsCategoryService.getGoodsCategoryTreeJson();
  List<ZtreeNode> ztreelist = new ArrayList<ZtreeNode>();
  for (GoodsCategory gcty : allGoodsCategoryList) {
    ZtreeNode treenade = new ZtreeNode();
    treenade.setId(gcty.getId());
    treenade.setpId(gcty.getParent()==null ? "" : gcty.getParent().getId());
    treenade.setName(gcty.getName());
    ztreelist.add(treenade);
  }
  return ajax(ztreelist);
}
這樣前台所需的數據就從資料庫取出並封裝成了對應的 Json。
接下來是前台實現。需要引入的 js 和 css 如下:
<link rel="stylesheet" href="${base}/template/ztree/css/demo.css" type="text/css">
<link rel="stylesheet" href="${base}/template/ztree/css/zTreeStyle/zTreeStyle.css" type="text/css">
<script type="text/javascript" src="${base}/template/ztree/js/jquery.ztree.core.js"></script>
其中 demo.css 是自己添加的,用來調整下拉框的樣式(ul.ztree 設定寬高與滾動等)。
接著是對應的下拉框結構:
<div class="content_wrap">
  <input id="citySel" type="text" onclick="showMenu(); return false;" readonly value="" style="width:150px;"/>
  <input id="treeids" type="hidden" name="goods.goodsCategory.id">
  <input type="button" onclick="showMenu();" value="∨">
</div>
<div id="menuContent" class="menuContent" style="display:none; position: absolute;">
  <ul id="treeDemo" class="ztree" style="margin-top:0;"></ul>
</div>
這裡有一個隱藏輸入框,用來存放下拉框選中內容對應的 id。
對應的腳本如下:
var setting = {
  data: { simpleData: { enable: true } },
  callback: { onClick: onClick },
  view: { showIcon: false }
};
function onClick(e, treeId, treeNode) {
  var zTree = $.fn.zTree.getZTreeObj("treeDemo"),
      nodes = zTree.getSelectedNodes(), v = "", ids = "";
  for (var i=0, l=nodes.length; i<l; i++) { v += nodes[i].name + ","; ids += nodes[i].id + ","; }
  if (v.length > 0) v = v.substring(0, v.length-1);
  $("#citySel").attr("value", v);
  if (ids.length > 0) ids = ids.substring(0, ids.length-1);
  $("#treeids").attr("value", ids);
}
function showMenu() {
  var cityObj = $("#citySel");
  var cityOffset = $("#citySel").offset();
  $("#menuContent").css({left:cityOffset.left + "px", top:cityOffset.top + cityObj.outerHeight() + "px"}).slideDown("fast");
  $("body").bind("mousedown", onBodyDown);
}
$(document).ready(function(){
  $.ajax({ async:false, cache:false, type:'POST', dataType:'json',
    url: '${base}/admin/goods!getGoodsCategoryTreeJson.action',
    success:function(data){ $.fn.zTree.init($("#treeDemo"), setting, data); } });
});
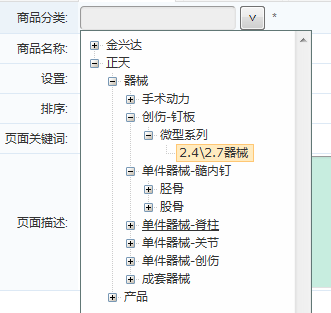
這樣,一個下拉樹就做好了:
如果需要在修改頁面中回寫相應的下拉數據,添加如下腳本:
$(document).ready(function(){
  if ("${goods.goodsCategory.id}" != "") {
    var treeObj = $.fn.zTree.getZTreeObj("treeDemo");
    var node = treeObj.getNodeByParam("id", "${goods.goodsCategory.id}", null);
    treeObj.selectNode(node, false, false);
  }
});
以上就是用 zTree 實現下拉樹的完整入門流程,希望對大家學習 zTree 插件有所幫助。
- 上一篇文章: JS 程式碼防止 SQL 注入的方法(超簡單)
- 下一篇文章: JavaScript 結合 HTML5 Canvas 實現圓盤抽獎功能