本文整理 mustache.js 的常用用法與實作心得。內容談不上高深,屬於入門級別,但如果你還沒用過這類前端模板引擎,讀完之後大概會忍不住馬上把它塞進自己的專案裡。
一、從一個真實需求說起
公司做了一套統一開發平台,後端封裝好 MVC 與資料增刪改查介面,前端則用 bootstrap 搭配手寫元件搭出開發框架;在 CAS 的基礎上先做了統一權限管理系統,後來又陸續有了業務系統 A 與 B。三個子系統是三個 Java 工程,部署在 Tomcat 裡是三個獨立應用。現在的需求是:
- 登入後點擊系統名稱,展開下拉選單列出所有有權限的子系統;
- 點選其他子系統即可切換過去,且每個系統都有這個選單,因此也能切回來;
- 若只有一個系統的權限,就不顯示下拉選單。
需求不難,原型大致如下:
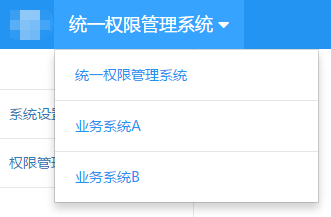
實作方式是每個子系統登入後呼叫「取得系統列表」的介面,再用 JS 渲染出下拉選單。介面回傳格式如下:
data: [ { "sortOrder": 1, "isCurrent": true, "systemHttpUrl": "https://xxxx:8080/permission", "systemName": "統一權限管理系統" }, { "sortOrder": 2, "isCurrent": false, "systemHttpUrl": "https://xxxx:8080/systemA", "systemName": "業務系統A" }, { "sortOrder": 3, "isCurrent": false, "systemHttpUrl": "https://xxxx:8080/systemB", "systemName": "業務系統B" } ]
如果不借助模板引擎,傳統做法是用 JS 硬拼字串:
function data2Html(data) { data = data || []; var html = ['<ul class="nav navbar-nav navbar-left nav-system">', ' <li class="dropdown">', ' <a href="javascript:;" class="dropdown-toggle" data-toggle="dropdown" title="切換系統">'], l = data.length; if(l < 2) { l == 1 && html.push(data[0].systemName || ''); html.push('</a></li></ul>'); return html.join(''); } var curSysAry = data.filter(function(s){ return s.isCurrent; }); html.push(curSysAry[0].systemName + ' <i class="fa fa-caret-down"></i></a><ul class="dropdown-menu">'); data.sort(function(a, b){ return a.sortOrder - b.sortOrder;}); for(var i = 0; i < l; i++) { i && html.push('<li role="separator" class="divider"></li>'); html.push('<li><a href="' + data[i].systemHttpUrl + '" target="_self">' + data[i].systemName + '</a></li>'); } html.push('</ul></li></ul>'); return html.join(''); }
這種寫法問題不少:拼接邏輯一複雜就很痛苦;標籤閉合關係稍有閃失就出錯,維護成本高;整體結構也不清楚。
模板引擎其實後端最早有,寫過 JSP 的人都知道 JSP 本質就是個模板,此外還有 Velocity、FreeMarker 等。前端這幾年也很多,mustache.js 算是相當流行的一個。改用它以後,同樣的需求會變成:
//通過一些根據屬性名稱對應的標記定義模板 var _template = [ '<ul class="nav navbar-nav navbar-left nav-system">', ' <li class="dropdown">', ' <a href="javascript:;" class="dropdown-toggle" data-toggle="dropdown" title="切換系統">', ' {{curSystemName}} {{#multiple}}<i class="fa fa-caret-down"></i>{{/multiple}}', ' </a>', ' {{#multiple}}<ul class="dropdown-menu">', ' {{#systems}}', ' {{^first}}<li role="separator" class="divider"></li>{{/first}}', ' <li>', ' <a href="{{{systemHttpUrl}}}" target="_self">{{systemName}}</a>', ' </li>', ' {{/systems}}', ' </ul>{{/multiple}}', ' </li>', '</ul>' ].join(''); //初始化這個模板 Mustache.parse(_template); function data2Html(data) { data = data || []; var curSysAry = data.filter(function(s){ return s.isCurrent; }); data.sort(function(a, b){ return a.sortOrder - b.sortOrder;}); data = data.map(function(s, i){s.first = i == 0; return s}); //模板渲染成字符串 return Mustache.render(_template, { curSystemName: curSysAry.length ? curSysAry[0].systemName : '', multiple: !!data.length, systems: data }); }
兩段程式碼一比,差別很明顯:
- 結構清晰:所有 HTML 都集中在一處定義,完全沒有拼接。
- 邏輯清晰:模板裡的標記名稱,跟渲染時傳入物件的屬性一一對應。
- 好維護:要增刪標籤,只改模板陣列即可。
在前后端分離的架構裡,這類工具幾乎已是標配。
二、mustache 的使用流程
先用 script 標籤引入它的 JS 檔,然後三個步驟:
1)定義模板字串
有兩種方式。方式一是像上面那樣在 JS 裡用 [...].join('') 定義;方式二是直接把模板寫進 HTML 的 script 標籤:
<script id="tpl" type="text/html"> Hello {{name}}! </script>
編譯前先取出內容:
var tpl = document.getElementById('tpl').innerHTML.trim();
選擇建議:模板會被多個頁面共用,就寫在 JS 裡;只服務當前頁面,直接放 script 標籤裡更好管理。
2)預編譯模板
Mustache.parse(tpl);
注意預編譯會改動 tpl 本身——它不再是字串,型別變成陣列了。
3)渲染模板
var htmlAfterRendered = Mustache.render(tpl1, obj);
obj 是資料來源,mustache 會依規則把標記換成對應內容,回傳的就是最終 HTML 字串,拿去做 DOM 操作即可。
三、mustache 的核心思想
兩個關鍵詞:標籤與 logic-less。模板裡的 {{name}}、{{#systems}}...{{/systems}} 就是標籤,用 {{}} 而非 <> 是為了不跟 HTML 標籤混淆。logic-less 則是「輕邏輯」——模板裡不會出現 if-else、也不寫迴圈,一切靠標籤表達。而它只需要這四種標籤,幾乎就能應付所有場景:
{{prop}}
{{{prop}}}
{{#prop}}{{/prop}}
{{^prop}}{{/prop}}
四、{{prop}} 標籤
最常用的一種,把屬性值轉成字串輸出。以下是同一個屬性在不同型別下的渲染結果(前後的短橫線是為了看清楚邊界):
<script id="tpl1" type="text/html"> -{{prop}}- </script> <script> var tpl1 = document.getElementById('tpl1').innerHTML.trim(); Mustache.parse(tpl1); //測試falsy值 console.log(Mustache.render(tpl1, {prop: ''}));//-- console.log(Mustache.render(tpl1, {prop: 0}));//-0- console.log(Mustache.render(tpl1, {prop: null}));//-- console.log(Mustache.render(tpl1, {prop: undefined}));//-- console.log(Mustache.render(tpl1, {prop: false}));//-false- console.log(Mustache.render(tpl1, {prop: NaN}));//-NaN- //測試簡單對像 console.log(Mustache.render(tpl1, {prop: {name: 'jason'}}));//-[object Object]- //測試數組 console.log(Mustache.render(tpl1, {prop: [{name: 'jason'}, {name: 'frank'}]}));//-[object Object],[object Object]- //測試日期對像 console.log(Mustache.render(tpl1, {prop: new Date()}));//-Mon Jan 18 2016 15:38:46 GMT+0800 (中國標准時間)- //測試自定義toString的簡單對像 var obj1 = {name: 'jason'}; obj1.toString = function () { return this.name; }; console.log(Mustache.render(tpl1, {prop: obj1}));//-jason- //測試boolean number string console.log(Mustache.render(tpl1, {prop: true}));//-true- console.log(Mustache.render(tpl1, {prop: 1.2}));//-1.2- console.log(Mustache.render(tpl1, {prop: 'yes'}));//-yes- //測試function console.log(Mustache.render(tpl1, { prop: function () { } }));//-- console.log(Mustache.render(tpl1, { prop: function () { return 'it\'s a fun' } }));//-it's a fun- console.log(Mustache.render(tpl1, { prop: function () { return false; } }));//-false- console.log(Mustache.render(tpl1, { prop: function(){ return function (text, render) { return "<b>" + render(text) + "</b>" }; } })); //-function (text, render) { // return "<b>" + render(text) + "</b>" //}- </script>
它的渲染規則整理如下:
- 值為 null 或 undefined 時,渲染成空字串。
- 值是一個函式時,會自動執行它並取回傳值作為結果;回傳值若為 null/undefined 仍是空字串,否則轉成字串。
- 其他情況,直接把值轉成字串輸出。
另外要留意編碼行為:mustache 預設會對輸出做 HTML 轉義,所以單引號會被轉成實體:
console.log(Mustache.render(tpl1, { prop: function () { return 'it\'s a fun' } }));//-it's a fun-
若想跳過轉義,把標籤改成三括號即可:
<script id="tpl1" type="text/html"> -{{{prop}}}- </script> console.log(Mustache.render(tpl1, { prop: function () { return 'it\'s a fun' } }));//-it's a fun-
三括號等於關掉轉義,只用在確定內容可信的場合,否則會有 XSS 風險。
五、{{#prop}}{{/prop}} 標籤
這對標籤最強大,同時肩負 if-else、for-each 與動態渲染三種能力,而且內部可以再嵌套任何標籤。
1)if-else 渲染
只有當屬性存在、值不為 falsy(null、undefined、NaN、0、false、空字串),且不為空陣列時,標籤間的內容才會輸出:
<script id="tpl2" type="text/html"> -{{#prop}}content{{/prop}}- </script> <script> var tpl2 = document.getElementById('tpl2').innerHTML.trim(); Mustache.parse(tpl2); //測試falsy值 console.log(Mustache.render(tpl2, {prop: ''}));//-- console.log(Mustache.render(tpl2, {prop: 0}));//-- console.log(Mustache.render(tpl2, {prop: null}));//-- console.log(Mustache.render(tpl2, {prop: undefined}));//-- console.log(Mustache.render(tpl2, {prop: false}));//-- console.log(Mustache.render(tpl2, {prop: NaN}));//-- //測試空數組 console.log(Mustache.render(tpl2, {prop: []}));//-- //測試不存在的屬性 console.log(Mustache.render(tpl2, {prop2: true }));//-- //測試function console.log(Mustache.render(tpl2, { prop: function () { } }));//-- console.log(Mustache.render(tpl2, { prop: function () { return false; } }));//-- console.log(Mustache.render(tpl2, { prop: function() { return []; } }));//-- //測試簡單對像 console.log(Mustache.render(tpl2, {prop: {name: 'jason'}}));//-content- //測試日期對像 console.log(Mustache.render(tpl2, {prop: new Date()}));//-content- //測試boolean number string console.log(Mustache.render(tpl2, {prop: true}));//-content- console.log(Mustache.render(tpl2, {prop: 1.2}));//-content- console.log(Mustache.render(tpl2, {prop: 'yes'}));//-content- //測試返回非falsy,非空數組的function console.log(Mustache.render(tpl2, { prop: function () { return 'it\'s a fun' } }));//-content- </script>
值得留意的是屬性為函式時,mustache 會先呼叫它,再用回傳值判斷;若回傳 falsy 或空陣列,內容一樣不顯示。
2)for-each 渲染
屬性是非空陣列時,標籤間的內容會依陣列長度迭代,而且當元素是物件時,該物件會成為這一輪的渲染上下文,因此內部可以直接用 {{name}} 取屬性:
<script id="tpl2" type="text/html"> -{{#prop}}{{name}},{{/prop}}- </script> <script> var tpl2 = document.getElementById('tpl2').innerHTML.trim(); Mustache.parse(tpl2); console.log(Mustache.render(tpl2, {prop: [{name: 'jason'}, {name: 'frank'}]}));//-jason,frank,- </script>
回傳陣列的函式同樣會走 for-each:
<script> console.log(Mustache.render(tpl2, { prop: function(){ return [{name: 'jason'}, {name: 'frank'}]; } }));//-jason,frank,- </script>
3)動態渲染
屬性是函式、而它的回傳值「又是函式」時,mustache 會再呼叫一次,並傳入兩個參數:text 是原始模板內容,render 是內部的渲染函式。你可以在裡面自訂任何渲染邏輯,回傳值一樣依 {{prop}} 的規則處理:
<script id="tpl2" type="text/html"> -{{#prop}}content{{/prop}}- </script> <script> var tpl2 = document.getElementById('tpl2').innerHTML.trim(); Mustache.parse(tpl2); console.log(Mustache.render(tpl2, { prop: function(){ return function (text, render) { return "<b>" + render(text) + "</b>"; }; } }));//-<b>content</b>- </script>
這個機制讓你能做出「自訂標籤」之類的進階用法。
六、{{^prop}}{{/prop}} 標籤
邏輯與上面那對相反:屬性不存在、為 falsy、或為空陣列時才輸出內容。
<script id="tpl2" type="text/html"> -{{^prop}}content{{/prop}}- </script> <script> var tpl2 = document.getElementById('tpl2').innerHTML.trim(); Mustache.parse(tpl2); //測試falsy值 console.log(Mustache.render(tpl2, {prop: ''}));//-content- console.log(Mustache.render(tpl2, {prop: 0}));//-content- console.log(Mustache.render(tpl2, {prop: null}));//-content- console.log(Mustache.render(tpl2, {prop: undefined}));//-content- console.log(Mustache.render(tpl2, {prop: false}));//-content- console.log(Mustache.render(tpl2, {prop: NaN}));//-content- // 測試空數組 console.log(Mustache.render(tpl2, {prop: []}));//-content- // 測試不存在的屬性 console.log(Mustache.render(tpl2, {prop2: true}));//-content- //測試function console.log(Mustache.render(tpl2, { prop: function () { } }));//-content- console.log(Mustache.render(tpl2, { prop: function () { return false; } }));//-content- console.log(Mustache.render(tpl2, { prop: function () { return []; } }));//-content- //測試簡單對像 console.log(Mustache.render(tpl2, {prop: {name: 'jason'}}));//-- //測試日期對像 console.log(Mustache.render(tpl2, {prop: new Date()}));//-- // 測試非空數組 console.log(Mustache.render(tpl2, {prop: [{name: 'jason'},{name: 'tom'}]}));//-- //測試boolean number string console.log(Mustache.render(tpl2, {prop: true}));//-- console.log(Mustache.render(tpl2, {prop: 1.2}));//-- console.log(Mustache.render(tpl2, {prop: 'yes'}));//-- //測試返回非falsy,非空數組的function console.log(Mustache.render(tpl2, { prop: function () { return 'it\'s a fun' } }));//-- //測試返回function的function console.log(Mustache.render(tpl2, { prop: function () { return function(text,render){ return '<b>' + render(text) +'</b>' } } }));//-- </script>
七、渲染上下文
mustache 內部維護一個「上下文堆疊」。渲染開始時把資料來源物件壓入堆疊;遇到 {{#prop}} 且該屬性是物件、非空物件陣列,或函式回傳上述兩者時,就把該物件(或陣列元素)設為當前上下文並壓疊,標籤結束後再彈出、恢復外層上下文。由於標籤可多層嵌套,同一時間可能有多層上下文。
解析標籤時,mustache 會從最上層開始逐層往下找同名屬性,找到就採用。
<script id="tpl2" type="text/html"> -{{#person}}{{#student}}{{#address}}address: {{home}},age: {{age}}{{/address}}{{/student}}{{/person}}- </script> <script> var tpl2 = document.getElementById('tpl2').innerHTML.trim(); var obj2 = { age: 20, person: { student: { address: { home: 'xxxxx' } } } }; console.log(Mustache.render(tpl2, obj2));//-address: xxxxx,age: 20- </script>
渲染 {{#address}} 時,當前上下文已變成 obj2.person.student.address,所以 {{home}} 直接命中;而 {{age}} 在該層找不到,就往外層找,一直到 obj2 才找到,於是輸出 20。
不想建立新上下文的話,也可以直接用點路徑遞歸取值:
<script id="tpl2" type="text/html"> -address: {{person.student.address.home}},age: {{age}}- </script> <script> var tpl2 = document.getElementById('tpl2').innerHTML.trim(); var obj2 = { age: 20, person: { student: { address: { home: 'xxxxx' } } } }; console.log(Mustache.render(tpl2, obj2));//-address: xxxxx,age: 20- </script>
這兩種寫法各有適用時機:上下文嵌套適合反覆使用的區塊,點路徑適合只取一兩個深層值。以上就是 mustache.js 的常用知識整理,涵蓋了日常開發幾乎一定會碰到的部分,希望對大家有所幫助。
- 上一篇文章: 效能優化筆記:JavaScript 迴圈與條件語句
- 下一篇文章: JavaScript 效能優化:腳本的載入與執行