動手做一個 JavaScript 放大鏡:原理、比例計算與完整程式碼
編輯:關於JavaScript
電商商品頁幾乎都有放大鏡功能:滑鼠移過縮圖,右側即時顯示局部放大。本文拆解它的原理與實作,包含最容易出錯的比例換算。
先定義四個區域
- A:放大鏡(跟著滑鼠移動的小方塊)
- B:小圖片容器
- C:大圖片的可視區域(裁切視窗)
- D:大圖片本身
滑鼠應該位於放大鏡正中央,因此滑鼠座標與放大鏡位置的關係是:
clientX = A.offsetLeft + B.offsetLeft + A.offsetWidth / 2;
clientY = A.offsetTop  + B.offsetTop  + A.offsetHeight / 2;
反過來,若已知滑鼠位置,要算出放大鏡 A 的左上角,就必須減去半個放大鏡的寬高:
var left = ev.clientX - demo.offsetLeft - small.offsetLeft - glass.offsetWidth / 2;
var top  = ev.clientY - demo.offsetTop  - small.offsetTop  - glass.offsetHeight / 2;
關鍵:移動比例
A 與 D 是同步運動的。當 A 的右邊界移動到與 B 的右邊界重合時,D 也應該剛好移動到與 C 的右邊界重合。由此可得比例關係:
percent = (D.offsetWidth - C.offsetWidth) / (B.offsetWidth - A.offsetWidth);也就是「大圖可移動的距離」除以「放大鏡可移動的距離」。有了這個比例,大圖的位移就是 -percent * left(負號是因為大圖要往反方向移動)。
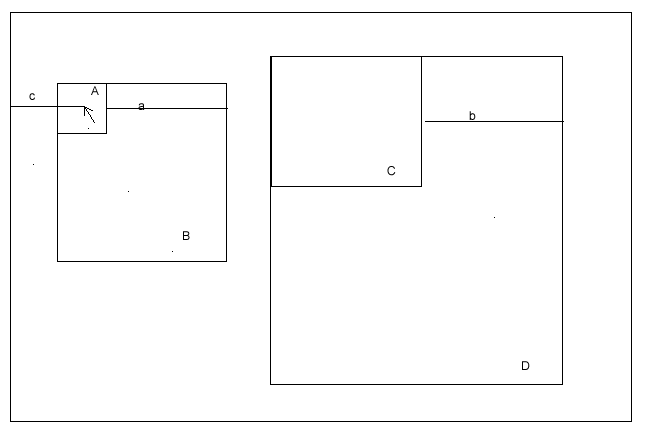
HTML 結構
<html>
<head>
<meta http-equiv="Content-Type" content="text/html; charset=UTF-8" />
<title>放大鏡效果</title>
<style>
* { margin: 0; padding: 0; }
#demo { position: relative; margin: 30px 50px; width: 1000px; height: 600px; border: 1px solid #000; }
#zhezhao {
  position: absolute; z-index: 2; background: red;
  width: 402px; height: 402px; left: 20px; top: 20px; opacity: 0;
}
#small { position: absolute; width: 402px; height: 402px; left: 20px; top: 20px; border: 1px solid #000; z-index: 1; }
#small img { position: absolute; }
#big {
  position: relative; top: 20px; left: 460px;
  width: 500px; height: 500px; border: 1px solid #000;
  overflow: hidden; display: none; z-index: 1;
}
#big img { position: absolute; }
#glass { position: absolute; width: 100px; height: 100px; opacity: 0.3; background: orange; display: none; }
</style>
</head>
<body>
<div id="demo">
  <div id="zhezhao"></div>
  <!-- IE 下滑鼠移到放大鏡上時,瀏覽器不認為滑鼠同時在小圖的 div 上,
       因此加一層透明遮罩來承接事件 -->
  <div id="small">
    <img src="images/small.png" alt="">
    <div id="glass"></div>
  </div>
  <div id="big">
    <img src="images/big.jpg" alt="">
  </div>
</div>
</body>
</html>
這裡有個實務細節值得注意:#zhezhao 是一層 opacity 為 0 的遮罩。在 IE 中,當滑鼠移到 #glass 上時,瀏覽器不認為事件仍然發生在小圖容器上,會導致 mousemove 中斷。加一層 z-index 更高的透明遮罩承接事件,就能避開這個問題。
JavaScript 邏輯
<script>
window.onload = function () {
  var demo    = document.getElementById('demo');
  var small   = document.getElementById('small');
  var big     = document.getElementById('big');
  var glass   = document.getElementById('glass');
  var image   = big.getElementsByTagName('img')[0];
  var zhezhao = document.getElementById('zhezhao');

  zhezhao.onmouseover = function () {
    glass.style.display = 'block';
    big.style.display = 'block';
  };

  zhezhao.onmouseout = function () {
    glass.style.display = 'none';
    big.style.display = 'none';
  };

  // 注意區分 clientX、offsetLeft、left 三者
  zhezhao.onmousemove = function (ev) {
    var left = ev.clientX - demo.offsetLeft - small.offsetLeft - glass.offsetWidth / 2;
    var top  = ev.clientY - demo.offsetTop  - small.offsetTop  - glass.offsetHeight / 2;

    // 邊界約束,避免放大鏡跑出小圖範圍
    if (left < 0) {
      left = 0;
    } else if (left > small.offsetWidth - glass.offsetWidth) {
      left = small.offsetWidth - glass.offsetWidth;
    }
    if (top < 0) {
      top = 0;
    } else if (top > small.offsetHeight - glass.offsetHeight) {
      top = small.offsetHeight - glass.offsetHeight;
    }

    glass.style.left = left + 'px';
    glass.style.top  = top + 'px';

    var percent = (image.offsetWidth - big.offsetWidth) / (small.offsetWidth - glass.offsetWidth);
    image.style.left = -percent * left + 'px';
    image.style.top  = -percent * top  + 'px';
  };
};
</script>
實作要點整理
- 座標換算:clientX 是相對視埠的,必須扣掉各層容器的 offsetLeft/offsetTop 才能得到相對小圖容器的位置。
- 邊界鉗制:放大鏡不能超出小圖範圍,超出時要夾在 0 與 (容器 − 放大鏡) 之間。
- 比例同步:大圖位移 = 比例 × 放大鏡位移,方向相反。
- 事件承接:透明遮罩層是處理舊版 IE 事件目標判斷的必要手段。
把這幾點掌握好,替換成行動版的 touchmove 事件、或加上平滑過渡,都能很快改寫出來。