本文分享一款極簡風格的滑動門選單。滑鼠移到主選單上,下方內容會跟著切換。這個示範最大的價值不在外觀,而在於它把整个行為封裝成一個 tabMenu 類別,並示範了如何讓同一頁出現多組樣式不同的選單。
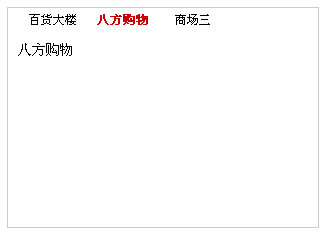
線上示範:https://demo.jb51.net/js/2015/js-css-jdhd-menu-style-codes/
自己實作 Class.create 與 Object.extend
在 ES6 的 class 出現之前,這兩個小工具是組織程式碼的標配:
var Class = {
  create: function(){
    return function(){ this.initialize.apply(this, arguments); };
  }
};

Object.extend = function(destination, source){
  for (var property in source) destination[property] = source[property];
  return destination;
};

var tabMenu = Class.create();
Class.create() 的巧思是回傳一個匿名函式,並在該函式裡呼叫 this.initialize.apply(this, arguments)。於是後續只要掛上 prototype.initialize,new tabMenu(...) 就會自動執行初始化——這正是 Prototype.js 的經典寫法。
核心:兩組樣式設定
tabMenu.prototype = {
  initialize: function(container, selfOpt, otherOpt){
    this.container = $(container);

    // 選用中頁籤的樣式
    var selfOptions = Object.extend({
      fontWeight:"bold", fontSize:"12px", color:"#FFBC44"
    }, selfOpt || {});

    // 其他頁籤的樣式
    var otherOptions = Object.extend({
      fontWeight:"normal", fontSize:"12px", color:"#666"
    }, otherOpt || {});

    // 過濾空白節點:只保留 element 類型
    for (var i = 0, length = this.container.childNodes.length, objs = [];
         i < length; i++){
      if (this.container.childNodes[i].nodeType == 1) objs.push(this.container.childNodes[i]);
    }

    var tabArray = objs[0].getElementsByTagName("li");
    var divArray = [];
    for (i = 0, length = objs[1].childNodes.length; i < length; i++){
      if (objs[1].childNodes[i].nodeType == 1) divArray.push(objs[1].childNodes[i]);
    }
    ...
  }
}
這個設計有兩個亮點。第一,樣式透過參數傳入,因此同一個類別可以產生外觀完全不同的多組選單,只要呼叫時給不同的 selfOpt / otherOpt。第二,用 nodeType == 1 過濾空白文字節點——這是很多人會漏掉的細節:HTML 裡的換行與縮排會產生文字節點,若不過濾,childNodes 的 index 就會跟 tabArray 對不上,導致點第一個頁籤卻顯示第三個內容。
切換邏輯
for (i = 0, length = tabArray.length; i < length; i++){
  tabArray[i].length = length;        // 把總數與自己的 index 掛在元素上
  tabArray[i].index  = i;

  tabArray[i].onmouseover = function(){
    // 先把所有頁籤還原成「其他」樣式
    for (var j = 0; j < this.length; j++){
      tabArray[j].style.backgroundPosition = "-" + tabArray[j].offsetWidth + "px 0";
      for (var property in selfOptions)
        tabArray[j].firstChild.style[property] = otherOptions[property];
    }
    // 再把當前頁籤設為「選用」樣式
    this.style.backgroundPosition = "0 0";
    for (var property in selfOptions)
      this.firstChild.style[property] = selfOptions[property];

    // 隱藏全部內容,只顯示對應那一塊
    for (j = 0; j < this.length; j++) divArray[j].style.display = "none";
    divArray[this.index].style.display = "block";
  }
}
把 length 與 index 直接掛在 DOM 元素上,是類別能保持精簡的關鍵——this 在事件觸發時指向被 hover 的 li,而 this.length 與 this.index 就提供了迴圈上限與自身位置,不必再靠閉包傳值。這種寫法在今天可以用 dataset 取代,語意更清楚。
另外注意 backgroundPosition = "-" + offsetWidth + "px 0":這是精靈圖的位移技巧,用元素自身的寬度當偏移量,因此頁籤寬度改了也不必改 JS。
呼叫方式
var tab1 = new tabMenu("tab_container1",
  { fontSize:"12px", color:"#c80000", fontWeight:"bolder" },   // 選用中
  { fontWeight:"normal", color:"#000000" });                    // 其他
CSS 部分同樣用了精靈圖:
.cls_tab_nav_li{
  background:url() no-repeat -70px 0;    /* 三狀態圖,先停在「其他」的位置 */
  width:70px; height:24px; line-height:24px;
  float:left; display:inline; overflow:hidden;
  text-align:center; cursor:pointer;
}
.cls_tab_nav_li_first{ font-weight:bolder; background-position:0px 0px; }
.cls_tab_body{ border-top:none; min-height:175px; padding:10px; height:175px; }
.cls_div{ display:none; font-size:14px; }
還有一行容易被忽略的 document.execCommand("BackgroundImageCache", false, true),包在 try/catch 裡。這是 IE 特有的 hack,用來避免 hover 切換背景圖時的短暫閃白(IE 會在第一次顯示時才去抓圖)。今天完全不需要,看到可以刪掉。
現代化對照
同樣的功能用 ES6 寫會短很多:
class TabMenu {
  constructor(container, activeStyle, idleStyle){
    this.root = document.querySelector(container);
    this.tabs = [...this.root.querySelectorAll('li')];
    this.panels = [...this.root.children[1].children];
    this.activeStyle = activeStyle;
    this.idleStyle = idleStyle;
    this.tabs.forEach((tab, i) => {
      tab.addEventListener('mouseenter', () => this.select(i));
      tab.addEventListener('focus',      () => this.select(i));  // 鍵盤可用
    });
    this.select(0);
  }
  select(i){
    this.tabs.forEach((t, n) => Object.assign(t.style, n === i ? this.activeStyle : this.idleStyle));
    this.panels.forEach((p, n) => p.hidden = (n !== i));
  }
}
差異不只是語法:新版用 hidden 屬性取代 style.display、加上 focus 事件讓鍵盤也能操作、用解構賦值過濾節點而不必手寫 nodeType 判斷。這些都是原範例值得補上的部分。
- 上一篇文章: 用 JavaScript 在前端產生名片與網址 QR Code
- 下一篇文章: 用 myFocus 函式庫實作各種 Tab 選項卡切換效果