bootstrap-fileinput 原始碼:https://github.com/kartik-v/bootstrap-fileinput
bootstrap-fileinput 線上 API:https://plugins.krajee.com/file-input
bootstrap-fileinput Demo 展示:https://plugins.krajee.com/file-basic-usage-demo
這個插件主要處理圖片上傳相關的操作。原本我的 Excel 匯入功能用的是 Uploadify,但該方案依賴 Flash 控制項,在 Chrome 這類瀏覽器上相當麻煩,因此決定換成更通用的上傳插件。這次先對基於 Bootstrap 的前端框架做升級,把 Uploadify 替換掉,這樣各瀏覽器的上傳體驗就能保持一致。
一般情況下,只要引入下面兩個檔案,插件就能正常運作:
bootstrap-fileinput/css/fileinput.min.css bootstrap-fileinput/js/fileinput.min.js
若是基於 ASP.NET MVC,可以在 BundleConfig.cs 中統一加入引用,掛到 Bundles 集合即可。
//添加對bootstrap-fileinput控件的支持 css_metronic.Include("~/Content/MyPlugins/bootstrap-fileinput/css/fileinput.min.css"); js_metronic.Include("~/Content/MyPlugins/bootstrap-fileinput/js/fileinput.min.js"); js_metronic.Include("~/Content/MyPlugins/bootstrap-fileinput/js/locales/zh.js");
頁面上只需要一行 HTML 就能完成基本宣告。
<input id="excelFile" type="file">
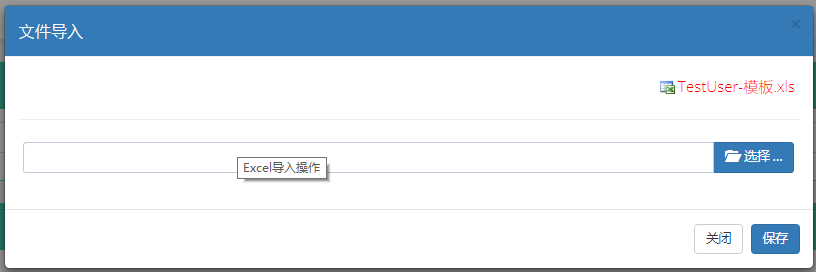
Excel 匯入的介面如下。
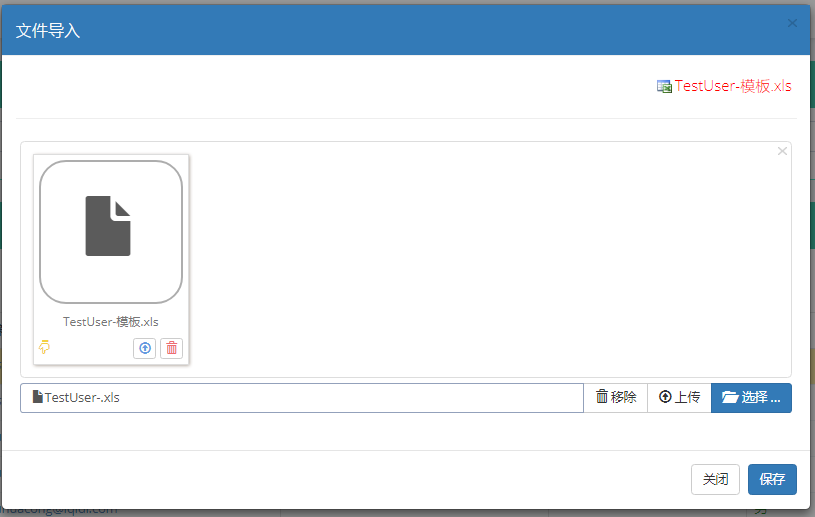
選好檔案後,就能看到 Excel 的檔案清單。
上傳完成後,資料會直接呈現在彈跳層的清單中,這裡用 Bootstrap-table 來做展示。
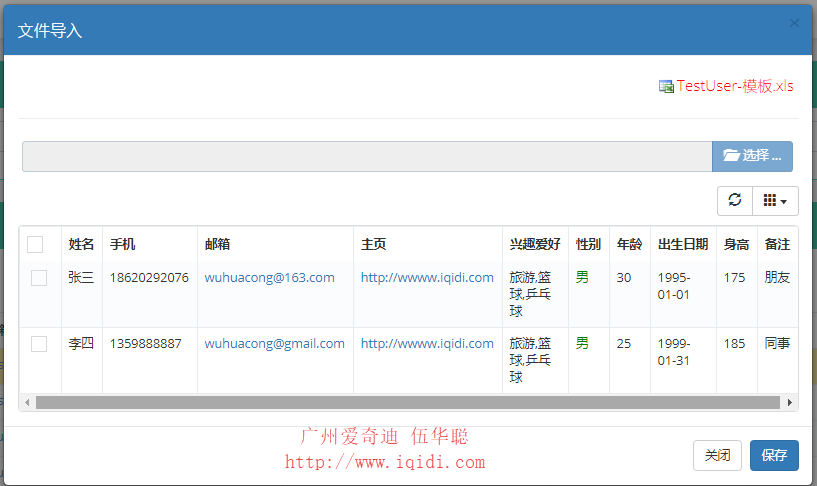
如此一來 Excel 的記錄就成功預覽出來了。勾選需要的資料後按儲存提交到伺服器,就完成了 Excel 資料真正寫入資料庫的處理。
2、Excel 匯入介面的詳細實作
實際的匯入介面 HTML 如下。
<!--導入數據操作層--> <div id="import" class="modal fade bs-modal-lg" tabindex="-1" role="dialog" aria-labelledby="myModalLabel" aria-hidden="true"> <div class="modal-dialog modal-lg"> <div class="modal-content"> <div class="modal-header bg-primary"> <button type="button" class="close" data-dismiss="modal" aria-hidden="true"></button> <h4 class="modal-title">文件導入</h4> </div> <div class="modal-body"> <div style="text-align:right;padding:5px"> <a href="~/Content/Template/TestUser-模板.xls" rel="external nofollow" onclick="javascript:Preview();"> <img alt="測試用戶信息-模板" src="~/Content/images/ico_excel.png" /> <span style="font-size:larger;font-weight:200;color:red">TestUser-模板.xls</span> </a> </div> <hr/> <form id="ffImport" method="post"> <div title="Excel導入操作" style="padding: 5px"> <input type="hidden" id="AttachGUID" name="AttachGUID" /> <input id="excelFile" type="file"> </div> </form> <!--數據顯示表格--> <table id="gridImport" class="table table-striped table-bordered table-hover" cellpadding="0" cellspacing="0" border="0"> </table> </div> <div class="modal-footer"> <button type="button" class="btn btn-default" data-dismiss="modal">關閉</button> <button type="button" class="btn btn-primary" onclick="SaveImport()">保存</button> </div> </div> </div> </div>
至於 bootstrap fileinput 的各種屬性,這裡改用 JS 初始化,方便日後統一管理與調整。
//初始化Excel導入的文件 function InitExcelFile() { //記錄GUID $("#AttachGUID").val(newGuid()); $("#excelFile").fileinput({ uploadUrl: "/FileUpload/Upload",//上傳的地址 uploadAsync: true, //異步上傳 language: "zh", //設置語言 showCaption: true, //是否顯示標題 showUpload: true, //是否顯示上傳按鈕 showRemove: true, //是否顯示移除按鈕 showPreview : true, //是否顯示預覽按鈕 browseClass: "btn btn-primary", //按鈕樣式 dropZoneEnabled: false, //是否顯示拖拽區域 allowedFileExtensions: ["xls", "xlsx"], //接收的文件後綴 maxFileCount: 1, //最大上傳文件數限制 previewFileIcon: '<i class="glyphicon glyphicon-file"></i>', allowedPreviewTypes: null, previewFileIconSettings: { 'docx': '<i class="glyphicon glyphicon-file"></i>', 'xlsx': '<i class="glyphicon glyphicon-file"></i>', 'pptx': '<i class="glyphicon glyphicon-file"></i>', 'jpg': '<i class="glyphicon glyphicon-picture"></i>', 'pdf': '<i class="glyphicon glyphicon-file"></i>', 'zip': '<i class="glyphicon glyphicon-file"></i>', }, uploadExtraData: { //上傳的時候,增加的附加參數 folder: '數據導入文件', guid: $("#AttachGUID").val() } }) //文件上傳完成後的事件 .on('fileuploaded', function (event, data, previewId, index) { var form = data.form, files = data.files, extra = data.extra, response = data.response, reader = data.reader; var res = data.response; //返回結果 if (res.Success) { showTips('上傳成功'); var guid = $("#AttachGUID").val(); //提示用戶Excel格式是否正常,如果正常加載數據 $.ajax({ url: '/TestUser/CheckExcelColumns?guid=' + guid, type: 'get', dataType: 'json', success: function (data) { if (data.Success) { InitImport(guid); //重新刷新表格數據 showToast("文件已上傳,數據加載完畢!"); //重新刷新GUID,以及清空文件,方便下一次處理 RefreshExcel(); } else { showToast("上傳的Excel文件檢查不通過。請根據頁面右上角的Excel模板格式進行數據錄入。", "error"); } } }); } else { showTips('上傳失敗'); } }); }
這段邏輯大致是:把上傳端點設為 /FileUpload/Upload,並設定各項插件參數,uploadExtraData 放的是一併提交的額外參數(也就是後端 controller 要接收的欄位)。接著
.on('fileuploaded', function (event, data, previewId, index) {
這個回調負責處理上傳後的動作。若上傳回傳成功,就再一次呼叫 ajax 去檢查 Excel 的欄位是否符合規範,端點如下:
url: '/TestUser/CheckExcelColumns?guid=' + guid,
如果檢查結果也是成功的,就把 Excel 的記錄取出來預覽,同時清空 fileinput,方便下次上傳。
if (data.Success) { InitImport(guid); //重新刷新表格數據 showToast("文件已上傳,數據加載完畢!"); //重新刷新GUID,以及清空文件,方便下一次處理 RefreshExcel(); } else { showToast("上傳的Excel文件檢查不通過。請根據頁面右上角的Excel模板格式進行數據錄入。", "error"); }
其中 RefreshExcel 負責更新附加參數的值。如果少了這一步,附加參數會一直是舊的 GUID,後續處理就會出問題。
//重新更新GUID的值,並清空文件 function RefreshExcel() { $("#AttachGUID").val(newGuid()); $('#excelFile').fileinput('clear');//清空所有文件 //附加參數初始化後一直不會變化,如果需要發生變化,則需要使用refresh進行更新 $('#excelFile').fileinput('refresh', { uploadExtraData: { folder: '數據導入文件', guid: $("#AttachGUID").val() }, }); }
而 InitImport 則是去抓取預覽資料並渲染到 Bootstrap-table 上的部分。
//根據條件查詢並綁定結果 var $import; function InitImport(guid) { var url = "/TestUser/GetExcelData?guid=" + guid; $import = $('#gridImport').bootstrapTable({ url: url, //請求後台的URL(*) method: 'GET', //請求方式(*) striped: true, //是否顯示行間隔色 cache: false, //是否使用緩存,默認為true,所以一般情況下需要設置一下這個屬性(*) pagination: false, //是否顯示分頁(*) sidePagination: "server", //分頁方式:client客戶端分頁,server服務端分頁(*) pageNumber: 1, //初始化加載第一頁,默認第一頁,並記錄 pageSize: 100, //每頁的記錄行數(*) pageList: [10, 25, 50, 100], //可供選擇的每頁的行數(*) search: false, //是否顯示表格搜索 strictSearch: true, showColumns: true, //是否顯示所有的列(選擇顯示的列) showRefresh: true, //是否顯示刷新按鈕 minimumCountColumns: 2, //最少允許的列數 clickToSelect: true, //是否啟用點擊選中行 uniqueId: "ID", //每一行的唯一標識,一般為主鍵列 queryParams: function (params) { }, columns: [{ checkbox: true, visible: true //是否顯示復選框 }, { field: 'Name', title: '姓名' }, { field: 'Mobile', title: '手機' }, { field: 'Email', title: '郵箱', formatter: emailFormatter }, { field: 'Homepage', title: '主頁', formatter: linkFormatter }, { field: 'Hobby', title: '興趣愛好' }, { field: 'Gender', title: '性別', formatter: sexFormatter }, { field: 'Age', title: '年齡' }, { field: 'BirthDate', title: '出生日期', formatter: dateFormatter }, { field: 'Height', title: '身高' }, { field: 'Note', title: '備注' }], onLoadSuccess: function () { }, onLoadError: function () { showTips("數據加載失敗!"); }, }); }
最後是按下儲存後,由 JS 把勾選的資料整理好提交到後端。
//保存導入的數據 function SaveImport() { var list = [];//構造集合對象 var rows = $import.bootstrapTable('getSelections'); for (var i = 0; i < rows.length; i++) { list.push({ 'Name': rows[i].Name, 'Mobile': rows[i].Mobile, 'Email': rows[i].Email, 'Homepage': rows[i].Homepage, 'Hobby': rows[i].Hobby, 'Gender': rows[i].Gender, 'Age': rows[i].Age, 'BirthDate': rows[i].BirthDate, 'Height': rows[i].Height, 'Note': rows[i].Note }); } if (list.length == 0) { showToast("請選擇一條記錄", "warning"); return; } var postData = { 'list': list };//可以增加其他參數,如{ 'list': list, 'Rucanghao': $("#Rucanghao").val() }; postData = JSON.stringify(postData); $.ajax({ url: '/TestUser/SaveExcelData', type: 'post', dataType: 'json', contentType: 'application/json;charset=utf-8', traditional: true, success: function (data) { if (data.Success) { //保存成功 1.關閉彈出層,2.清空記錄顯示 3.刷新主列表 showToast("保存成功"); $("#import").modal("hide"); $(bodyTag).html(""); Refresh(); } else { showToast("保存失敗:" + data.ErrorMessage, "error"); } }, data: postData }); }
3、後端 controller 程式碼解析
上面的 JS 涉及四個 MVC 端點:Upload、CheckExcelColumns、GetExcelData、SaveExcelData,以下分別說明。
檔案上傳的 controller 方法如下。
/// <summary> /// 上傳附件到服務器上 /// </summary> /// <param name="fileData">附件信息</param> /// <param name="guid">附件組GUID</param> /// <param name="folder">指定的上傳目錄</param> /// <returns></returns> [AcceptVerbs(HttpVerbs.Post)] public ActionResult Upload(string guid, string folder) { CommonResult result = new CommonResult(); HttpFileCollectionBase files = HttpContext.Request.Files; if (files != null) { foreach (string key in files.Keys) { try { #region MyRegion HttpPostedFileBase fileData = files[key]; if (fileData != null) { HttpContext.Request.ContentEncoding = Encoding.GetEncoding("UTF-8"); HttpContext.Response.ContentEncoding = Encoding.GetEncoding("UTF-8"); HttpContext.Response.Charset = "UTF-8"; // 文件上傳後的保存路徑 string filePath = Server.MapPath("~/UploadFiles/"); DirectoryUtil.AssertDirExist(filePath); string fileName = Path.GetFileName(fileData.FileName); //原始文件名稱 string fileExtension = Path.GetExtension(fileName); //文件擴展名 //string saveName = Guid.NewGuid().ToString() + fileExtension; //保存文件名稱 FileUploadInfo info = new FileUploadInfo(); info.FileData = ReadFileBytes(fileData); if (info.FileData != null) { info.FileSize = info.FileData.Length; } info.Category = folder; info.FileName = fileName; info.FileExtend = fileExtension; info.AttachmentGUID = guid; info.AddTime = DateTime.Now; info.Editor = CurrentUser.Name;//登錄人 result = BLLFactory<FileUpload>.Instance.Upload(info); if (!result.Success) { LogTextHelper.Error("上傳文件失敗:" + result.ErrorMessage); } } #endregion } catch (Exception ex) { result.ErrorMessage = ex.Message; LogTextHelper.Error(ex); } } } else { result.ErrorMessage = "fileData對象為空"; } return ToJsonContent(result); }
上傳處理完畢後回傳一個通用的 CommonResult,方便前端做統一判斷。
而檢查 Excel 欄位是否符合規範,做法就是比對實際欄位與預先定義好的欄位清單是否一致。
//導入或導出的字段列表 string columnString = "姓名,手機,郵箱,主頁,興趣愛好,性別,年齡,出生日期,身高,備注"; /// <summary> /// 檢查Excel文件的字段是否包含了必須的字段 /// </summary> /// <param name="guid">附件的GUID</param> /// <returns></returns> public ActionResult CheckExcelColumns(string guid) { CommonResult result = new CommonResult(); try { DataTable dt = ConvertExcelFileToTable(guid); if (dt != null) { //檢查列表是否包含必須的字段 result.Success = DataTableHelper.ContainAllColumns(dt, columnString); } } catch (Exception ex) { LogTextHelper.Error(ex); result.ErrorMessage = ex.Message; } return ToJsonContent(result); }
GetExcelData 則是把 Excel 內容轉成 List<TestUserInfo>,這樣前端就能方便地操作各個屬性。
/// <summary> /// 獲取服務器上的Excel文件,並把它轉換為實體列表返回給客戶端 /// </summary> /// <param name="guid">附件的GUID</param> /// <returns></returns> public ActionResult GetExcelData(string guid) { if (string.IsNullOrEmpty(guid)) { return null; } List<TestUserInfo> list = new List<TestUserInfo>(); DataTable table = ConvertExcelFileToTable(guid); if (table != null) { #region 數據轉換 int i = 1; foreach (DataRow dr in table.Rows) { bool converted = false; DateTime dtDefault = Convert.ToDateTime("1900-01-01"); DateTime dt; TestUserInfo info = new TestUserInfo(); info.Name = dr["姓名"].ToString(); info.Mobile = dr["手機"].ToString(); info.Email = dr["郵箱"].ToString(); info.Homepage = dr["主頁"].ToString(); info.Hobby = dr["興趣愛好"].ToString(); info.Gender = dr["性別"].ToString(); info.Age = dr["年齡"].ToString().ToInt32(); converted = DateTime.TryParse(dr["出生日期"].ToString(), out dt); if (converted && dt > dtDefault) { info.BirthDate = dt; } info.Height = dr["身高"].ToString().ToDecimal(); info.Note = dr["備注"].ToString(); info.Creator = CurrentUser.ID.ToString(); info.CreateTime = DateTime.Now; info.Editor = CurrentUser.ID.ToString(); info.EditTime = DateTime.Now; list.Add(info); } #endregion } var result = new { total = list.Count, rows = list }; return ToJsonContent(result); }
SaveExcelData 是最終的寫入環節,重點是把集合放進交易後寫入資料庫。
/// <summary> /// 保存客戶端上傳的相關數據列表 /// </summary> /// <param name="list">數據列表</param> /// <returns></returns> public ActionResult SaveExcelData(List<TestUserInfo> list) { CommonResult result = new CommonResult(); if (list != null && list.Count > 0) { #region 采用事務進行數據提交 DbTransaction trans = BLLFactory<TestUser>.Instance.CreateTransaction(); if (trans != null) { try { //int seq = 1; foreach (TestUserInfo detail in list) { //detail.Seq = seq++;//增加1 detail.CreateTime = DateTime.Now; detail.Creator = CurrentUser.ID.ToString(); detail.Editor = CurrentUser.ID.ToString(); detail.EditTime = DateTime.Now; BLLFactory<TestUser>.Instance.Insert(detail, trans); } trans.Commit(); result.Success = true; } catch (Exception ex) { LogTextHelper.Error(ex); result.ErrorMessage = ex.Message; trans.Rollback(); } } #endregion } else { result.ErrorMessage = "導入信息不能為空"; } return ToJsonContent(result); }
這幾個方法的寫法其實相當有規律,不必一個個手寫,用 Database2Sharp 這類程式碼產生工具批量生成即可,能明顯提升開發效率並降低出錯機率。
整個 Excel 匯入的流程與程式碼都已經列出,理解邏輯之後就不難掌握細節。
總結
以上就是這次分享的完整流程,希望對你有所幫助。有疑問歡迎留言討論。
- 上一篇文章: webpack 2 與模組打包新手指南
- 下一篇文章: ES6 新增資料結構 WeakSet 用法詳解