用 jQuery 做出滑鼠移入顯示提示框的兩種效果
編輯:JQuery特效代碼
滑鼠移過時浮出提示框,是很常見的互動手法。這裡整理兩個不同思路的實例:一個是菜單的動畫式說明框,一個是沿著游標顯示使用者資料的浮層。
一、菜單滑入動畫提示
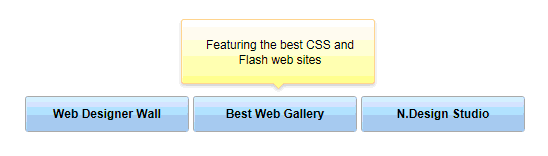
做法是在每個 li 裡放一個 em 當提示層,用 hover() 控制它的透明度與 top 值,做出向上浮出的效果。需要自行準備 jquery.js、按鈕圖片與提示框圖片。
<!DOCTYPE>
<html>
<head>
<meta http-equiv="Content-Type" content="text/html; charset=UTF-8" />
<title>Animated Menu Hover 1</title>
<script type="text/javascript" src="jquery.js"></script>
<script type="text/javascript">
$(document).ready(function () {
    $(".menu li").hover(function () {
        $(this).find("em").animate({ opacity: "show", top: "-75" }, "slow");
    }, function () {
        $(this).find("em").animate({ opacity: "hide", top: "-85" }, "fast");
    });
});
</script>

<style type="text/css">
body { margin: 10px auto; width: 570px; font: 75%/120% Arial, Helvetica, sans-serif; }
.menu { margin: 100px 0 0; padding: 0; list-style: none; }
.menu li { padding: 0; margin: 0 2px; float: left; position: relative; text-align: center; }
.menu a {
    padding: 14px 10px; display: block; color: #000000; width: 144px;
    text-decoration: none; font-weight: bold;
    background: url('背景圖片1') no-repeat center center;
}
.menu li em {
    background: url('背景圖片2') no-repeat;
    width: 180px; height: 45px; position: absolute;
    top: -85px; left: -15px; text-align: center;
    padding: 20px 12px 10px; font-style: normal; z-index: 2; display: none;
}
</style>
</head>
<body>
<ul class="menu">
    <li>
        <a href="https://www.cnblogs.com">Web Designer Wall</a>
        <em>A wall of design ideas, web trends, and tutorials</em>
    </li>
    <li>
        <a href="https://www.cnblogs.com">Best Web Gallery</a>
        <em>Featuring the best CSS and Flash web sites</em>
    </li>
    <li>
        <a href="https://www.cnblogs.com">N.Design Studio</a>
        <em>Blog and design portfolio of WDW designer, Nick La</em>
    </li>
</ul>
</body>
</html>
關鍵在於 em 用絕對定位掛在 li 上方,配合 li 的 position:relative 作為定位基準;top 從 -85 動到 -75,就有向上滑出的錯覺。
二、滑過使用者名稱顯示資料卡
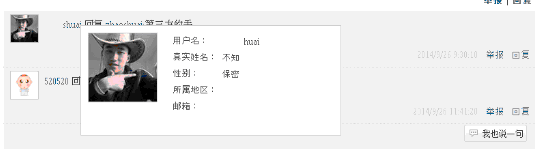
這個效果拆成三塊:浮層的定位、以 Ajax 異步取資料、以及 onmouseover/onmouseout 兩個事件的切換。
最容易忽略的一點是:不要替每個使用者名稱各綁一個浮層。頁面上只放一個浮層,滑到誰身上就定位到誰旁邊,因此它必須是绝对定位。
(1) HTML 結構
<div class="blockdiv" id="blockdiv">
    <div class="pic">
        <img src="../../Users/images/899.png" id="imguserhead" />
    </div>
    <div class="box">
        <table width="220" border="0" style="overflow: hidden; text-overflow: ellipsis; white-space: nowrap">
            <tr><td style="width: 70px;">用戶名:</td><td><label id="lblusername"></label></td></tr>
            <tr><td>真實姓名:</td><td><label id="lblrealname"></label></td></tr>
            <tr><td>性別:</td><td><label id="sex"></label></td></tr>
            <tr><td>所屬地區:</td><td><label id="lbladdress"></label></td></tr>
            <tr><td>郵箱:</td><td><label id="lblemall"></label></td></tr>
        </table>
        <div style="text-align: left; color: green; line-height: 40px; height: 30px;
                    display: none;" id="messagediv">正在加載中...</div>
    </div>
</div>
(2) 樣式
#blockdiv {
    width: 380px; height: 160px; float: left; display: none;
    border: 1px solid #ccc; position: absolute; z-index: 1;
    opacity: 0.1; background: white;
}
.pic {
    width: 100px; height: 100px; border: 1px solid #ccc;
    border-radius: 10px; float: left; margin: 10px; overflow: hidden;
}
.box {
    width: 240px; height: 140px; margin: 10px 0 10px 10px; float: left;
    overflow: hidden; text-overflow: ellipsis; white-space: nowrap;
}
(3) 記錄游標座標
為了精準定位,先在頁面放兩個隱藏欄位保存游標位置:
<input type="hidden" id="pagex" />
<input type="hidden" id="pagey" />
jQuery(document).ready(function ($) {
    $(document).mousemove(function (e) {
        document.getElementById("pagex").value = e.pageX;   // 相對於文件左緣
        document.getElementById("pagey").value = e.pageY;   // 相對於文件上緣
    });
});
這裡要用 pageX/pageY 而不是 clientX/clientY,因為浮層是絕對定位在文件座標系上,用 clientX 在捲動後會偏移。
(4) 移入與移出
function ShowInfo(username) {
    $("#blockdiv").css({
        "display": "block",
        "left": document.getElementById('pagex').value,
        "top": document.getElementById('pagey').value
    });
    $("#messagediv").css("display", "block");
    $.getJSON("../ashx/GetUserInfo.ashx?name=" + username, function (data) {
        if (data != null) {
            $("#lblusername").html(data[0].User_Count);
            $("#lblrealname").html(data[0].User_name);
            $("#sex").html(data[0].User_Sex);
            $("#lbladdress").html(data[0].User_Address);
            $("#lblemall").html(data[0].User_Email);
            if (data[0].User_HeadImg != null && data[0].User_HeadImg != "") {
                $("#imguserhead").attr("src", "../../Users/" + data[0].User_HeadImg.toString().substring(3));
            } else {
                $("#imguserhead").attr("src", "../../Users/images/900.png");
            }
            $("#messagediv").css("display", "none");
        } else
            $("#messagediv").html("未加載到數據!");
    });
}

function HiddenInfo() {
    $("#blockdiv").css({ "display": "none" });
    $("#lblusername").html("");
    $("#lblrealname").html("");
    $("#sex").html("");
    $("#lbladdress").html("");
    $("#lblemall").html("");
}
(5) 掛到元素上
<a class="showuserinfo"
   onmouseover="ShowInfo('<%#Eval("Response_Person") %>')"
   onmouseout="HiddenInfo()">
   滑鼠滑過顯示提示框
</a>
如果資料量不大,也可以把使用者資料直接渲染進頁面再顯示,省下一次請求;但資料量大或需要即時性時,這套 Ajax 的做法會更合適。另外記得在滑鼠快速掠過多個名字時,舊的回呼可能晚到而蓋掉新內容,必要時可以加個序號比對。
希望這篇對大家的 jQuery 開發有幫助。
- 上一篇文章: jQuery 中判斷元素是否存在的正確方式
- 下一篇文章: jQuery change() 用法解析與範例