動手寫一個 jQuery 提示框(Tip)外掛
編輯:JQuery特效代碼
相信很多人對 jQuery 都是「拿來主義」——沒辦法,誰讓它太紅,各種外掛幾乎都能滿足需求。但這畢竟不是長久之計,古人云:「授之以魚,不如授之以漁」。本文就帶你從零打造一個可配置的提示框外掛。
先回顧 jQuery 外掛機制
寫外掛其實沒想像中深奧。透過 jQuery.fn.extend 就能擴充方法:
// 添加 check 和 uncheck 外掛
jQuery.fn.extend({
  check: function() {
    return this.each(function() { this.checked = true; });
  },
  uncheck: function() {
    return this.each(function() { this.checked = false; });
  }
});
// 使用
$("input[type=checkbox]").check();
$("input[type=radio]").uncheck();
需求與用法
我們要做的是:滑鼠移到某元素上時彈出一個提示框(例如顯示微信二維碼),移出時隱藏。使用方式與其他外掛一致:
var t = $(".weixin").Tip({
  title: '微信掃一掃',
  content: '<img src="img/weixin.jpg" width="160px" height="160px;">',
  html: true,
  direction: 'bottom'
});
t.bind({
  mouseover: function(){ t.Tip("show"); },
  mouseout:  function(){ t.Tip("hide"); }
});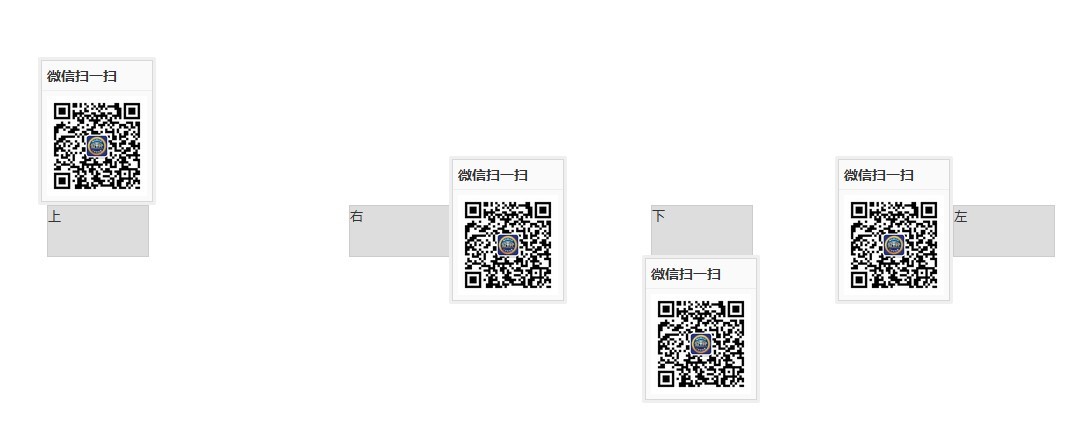
可配置的選項包括:title(標題)、content(內容)、direction(相對於目標元素的彈出方向)、html(內容是否為 HTML)以及 template(提示框模板)。
核心實作
外掛以構造函式封裝,透過 prototype 定義 show、hide、getTip 等方法。show 時先建立提示框節點、填入標題與內容,append 到 body,再依 direction(top/left/bottom/right)計算定位座標:
!function($){
  var Tip = function(element, options){
    this.init(element, options);
  }
  Tip.prototype = {
    constructor: Tip,
    init: function(element, options){
      this.element = $(element);
      this.options = $.extend({}, this.defaultOptions, options);
    },
    show: function() {
      if (!this.tip) {
        this.tip = this.getTip();
        var title = this.tip.find("h3"),
            container = this.tip.find(".tip-container");
        title.text(this.options.title);
        if (this.options.html) {
          container.html(this.options.content);
        } else {
          container.text(this.options.content);
        }
        $("body").append(this.tip);

        var eLeft = this.element.offset().left,
            eTop = this.element.offset().top,
            eWidth = this.element.innerWidth(),
            eHeight = this.element.innerHeight(),
            tipw = this.tip[0].offsetWidth,
            tiph = this.tip[0].offsetHeight,
            top, left;
        switch(this.options.direction) {
          case 'top':
            top = eTop - tiph;
            left = (eLeft - tipw/2) + eWidth/2;
            this.tip.css({top: top, left: left});
            break;
          case 'left':
            top = (eTop - tiph/2) + eHeight/2;
            left = eLeft - tipw;
            this.tip.css({top: top, left: left});
            break;
          case 'bottom':
            top = eTop + eHeight;
            left = (eLeft - tipw/2) + eWidth/2;
            this.tip.css({top: top, left: left});
            break;
          case 'right':
            top = (eTop - tiph/2) + eHeight/2;
            left = eLeft + eWidth;
            this.tip.css({top: top, left: left});
            break;
        }
      } else {
        this.tip.css({display:'block'});
      }
    },
    hide: function() {
      this.getTip().css({display:"none"});
    },
    getTip: function() {
      return this.tip ? this.tip : $(this.options.template);
    },
    defaultOptions: {
      title: '', content: '', direction: 'bottom', html: false,
      template: '<div class="tip"><div class="tip-inner"><h3></h3><div class="tip-container"></div></div></div>'
    }
  }
  $.fn.Tip = function(option) {
    return this.each(function(){
      var e = $(this),
          data = e.data('tip'),
          options = typeof option == "object" && option;
      if (!data) e.data("tip", new Tip(this, options));
      if (typeof option == 'string') data[option]();
    });
  }
}(window.jQuery);
這裡有幾個值得學習的設計:用 $.extend 合併預設值與自訂選項;用 e.data('tip') 把實例快取在元素上,避免重複建立;用「傳字串呼叫方法、傳物件初始化」的常見模式(如 t.Tip("show")),讓同一個外掛既能初始化又能控制行為。最後搭配少許 CSS 完成外觀:
.tip { position: absolute; padding: 3px; background: #efefef; border-radius: 2px; top: 0; left: 0; }
.tip .tip-inner { background: #fafafb; border: 1px solid #d8d8d8; }
.tip .tip-inner h3 { font-size: 14px; padding: 5px; border-bottom: 1px solid #eee; }
.tip .tip-inner .tip-container { padding: 5px; }
從無到有寫完這個外掛,你對 jQuery 外掛的封裝思路應該會有全新的認識——它其實一點也不神秘。
- 上一篇文章: 自己動手寫一個 jQuery 手風琴選單插件
- 下一篇文章: jQuery Ajax 全域封裝實戰:跨域判斷、統一回傳格式與錯誤攔截