頭像上傳幾乎一定要附裁切功能,否則使用者上傳一張 4000px 的照片,頭像框裡只會看到一片模糊的皮膚。原理其實不難:前端讓使用者框選,取得四個數值,後端按比例放大後再切。
裁切的數學原理
前台展示的圖片通常被縮小過(例如寬 400px),但原始檔可能是 1200px。所以使用者在前台選出的座標必須換算回原圖座標:
N = 原圖尺寸 / 前台展示尺寸

X = X × 原圖寬 / 前圖寬
Y = Y × 原圖高 / 前圖高
W = W × 原圖寬 / 前圖寬
H = H × 原圖高 / 前圖高
只要把這四個換算後的值送到後端,後端就能精準切出使用者想要的那一塊。
一、前端 JSP 結構
<div id="cutImage" style="display: none;">
  <div class="bigImg" style="float: left;">
    <img id="srcImg" src="" width="400px" height="270px"/>
  </div>
  <div id="preview_box" class="previewImg">
    <img id="previewImg" src="" width="120px"/>
  </div>

  <div>
    <form action="" method="post" id="crop_form">
      <input type="hidden" id="bigImage" name="bigImage"/>
      <input type="hidden" id="x" name="x" />
      <input type="hidden" id="y" name="y" />
      <input type="hidden" id="w" name="w" />
      <input type="hidden" id="h" name="h" />
      <P><input type="button" value="確認" id="crop_submit"/></P>
    </form>
  </div>
</div>
四個 hidden 欄位就是運送座標的管道。樣式上要注意:大圖與小圖都必須固定寬高(寫死 width 與 height 屬性),因為後端的放大換算依賴這個比例。
二、下載並準備 jCrop
從 https://deepliquid.com/content/Jcrop.html 下載,解壓後可看到三個資料夾與一個 index.html:/css 放樣式、/demo 放範例、/js 放核心腳本。實際只需要三個檔案:jquery.Jcrop.css、jquery.Jcrop.js 與 jQuery.js。
三、初始化與預覽
// 裁剪圖像
function cutImage(){
  $("#srcImg").Jcrop({
    aspectRatio : 1,              // 固定 1:1,頭像用
    onChange    : showCoords,
    onSelect    : showCoords,
    minSize     : [200, 200]
  });

  // 響應 onChange / onSelect,把座標寫進 hidden 欄位並更新預覽
  function showCoords(obj) {
    $("#x").val(obj.x);
    $("#y").val(obj.y);
    $("#w").val(obj.w);
    $("#h").val(obj.h);

    if (parseInt(obj.w) > 0) {
      // 預覽縮放比例 = 預覽區尺寸 / 裁切尺寸
      var rx = $("#preview_box").width()  / obj.w;
      var ry = $("#preview_box").height() / obj.h;

      $("#previewImg").css({
        width     : Math.round(rx * $("#srcImg").width())  + "px",
        height    : Math.round(rx * $("#srcImg").height()) + "px",
        marginLeft: "-" + Math.round(rx * obj.x) + "px",
        marginTop : "-" + Math.round(ry * obj.y) + "px"
      });
    }
  }
}
預覽的原理是「放大 + 負位移」:把整張圖按比例放大後,用負的 margin 把選取區域推到可視範圍內,剛好露出裁切框中的內容。
關鍵提醒:使用 jCrop 前一定要先執行 $("").Jcrop() 做預初始化,否則不會有效果。另外還有另一種寫法,把生成的控制物件存起來,後續操作會方便很多:
var api = $.Jcrop('#cropbox',{
  onChange    : showPreview,
  onSelect    : showPreview,
  aspectRatio : 1
});
四、後端 Action:接收座標並裁切
/**
 * 裁剪頭像
 */
public String cutImage(){
  /* 獲取參數 x, y, w, h, bigImage */
  HttpServletRequest request = (HttpServletRequest)
      ActionContext.getContext().get(ServletActionContext.HTTP_REQUEST);
  int x = Integer.valueOf(request.getParameter("x"));
  int y = Integer.valueOf(request.getParameter("y"));
  int w = Integer.valueOf(request.getParameter("w"));
  int h = Integer.valueOf(request.getParameter("h"));
  String bigImage = request.getParameter("bigImage");

  // 取檔名與正式路徑
  String[] imageNameS = bigImage.split("/");
  String imageName = imageNameS[imageNameS.length - 1];
  String imagePath = getSavePath() + "\\" + imageName;

  // 切割
  ImageCut imageCut = new ImageCut();
  imageCut.cutImage(imagePath, x, y, w, h);

  // 更新使用者頭像
  UserBean userBean = (UserBean) request.getSession().getAttribute("userBean");
  userBean.setUserPhoto(bigImage);
  UserCenterService centerService = new UserCenterService();
  centerService.updatePhoto(userBean);
  request.getSession().setAttribute("userBean", userBean);

  return "updatePhoto";
}
五、影像處理工具類
public class ImageCut {
  /**
   * 圖片切割
   * @param imagePath 原圖地址
   * @param x 目標切片 X 軸起點
   * @param y 目標切片 Y 軸起點
   * @param w 目標切片 寬度
   * @param h 目標切片 高度
   */
  public void cutImage(String imagePath, int x, int y, int w, int h){
    try {
      Image img;
      ImageFilter cropFilter;

      // 讀取源圖像
      BufferedImage bi = ImageIO.read(new File(imagePath));
      int srcWidth  = bi.getWidth();
      int srcHeight = bi.getHeight();

      // 若原圖大於切片尺寸才進行切割
      if (srcWidth >= w && srcHeight >= h) {
        Image image = bi.getScaledInstance(srcWidth, srcHeight, Image.SCALE_DEFAULT);

        // 依前台展示尺寸(400 × 270)換算回原圖座標
        int x1 = x * srcWidth  / 400;
        int y1 = y * srcHeight / 270;
        int w1 = w * srcWidth  / 400;
        int h1 = h * srcHeight / 270;

        cropFilter = new CropImageFilter(x1, y1, w1, h1);
        img = Toolkit.getDefaultToolkit().createImage(
                new FilteredImageSource(image.getSource(), cropFilter));
        BufferedImage tag = new BufferedImage(w1, h1, BufferedImage.TYPE_INT_RGB);
        Graphics g = tag.getGraphics();
        g.drawImage(img, 0, 0, null);
        g.dispose();
        ImageIO.write(tag, "JPEG", new File(imagePath));
      }
    } catch (IOException e) {
      e.printStackTrace();
    }
  }
}
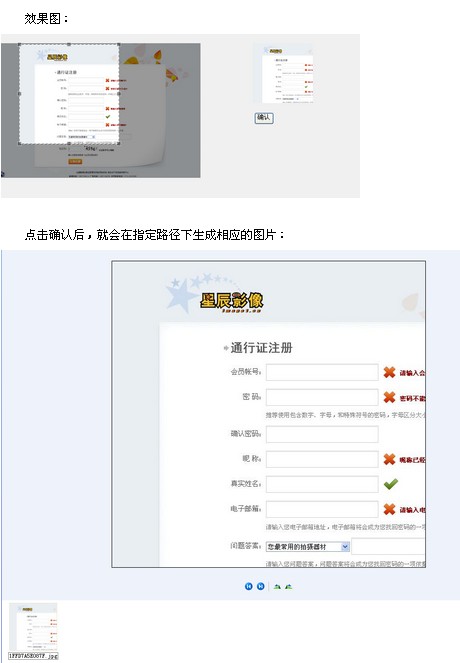
實作上的補充
那段 x * srcWidth / 400 就是前面數學原理的程式化,其中 400 與 270 是前台大圖的固定尺寸,若你的版面不同請一併替換——這是最容易出錯的地方,建議把它抽成常數或設定值。
另外原範例直接把裁切結果寫回原檔(ImageIO.write(tag, "JPEG", new File(imagePath))),這在正式環境是危險的:使用者還沒按確認前不該動到原圖,而且一旦裁壞就無法復原。實務上請寫入另一個檔名(例如加時間戳),並保留原檔。
最後提醒兩點安全事項: reception 端務必對 x/y/w/h 做範圍檢查(避免負值或超出圖片邊界導致例外),並確認 bigImage 的路徑經過白名單驗證,否則可能形成路徑穿越漏洞。
- 上一篇文章: jQuery 對各類表單元件取值與設值對照
- 下一篇文章: 可拖曳排序的清單,並把順序存回資料庫