jWizard:強大的 jQuery 向導式表單控件使用介紹
編輯:JQuery特效代碼
這裡我不貼目前專案的程式碼,而是直接引用作者的範例,因為改動不大,稍作調整就能滿足我們自身的需求。
先說說什麼是「向導式開發」——其實很簡單,就是讓使用者完成一個步驟後點擊「下一步」,如此逐步引導。這樣做能顯著提升使用者體驗。
範例一:最簡單的向導
1.1 身為 jQuery 插件,當然要先引入 jQuery 與 jQuery UI 相關類庫:
<!-- jquery ui theme -->
<link rel="stylesheet" href="/path/to/jquery-ui.css" />
<!-- required CSS basics -->
<link rel="stylesheet" href="/path/to/jWizard.base.css" />
<!-- jQuery 本體 -->
<script type="text/javascript" src="/path/to/jquery.js"></script>
<!-- 至少需要 widget factory -->
<script type="text/javascript" src="/path/to/jquery-ui.js"></script>
<!-- 插件本身 -->
<script type="text/javascript" src="/path/to/jWizard.min.js"></script>
1.2 接著撰寫 HTML,非常簡單:
<form id="wizard-form" class="jWizard">
<fieldset>
<legend>Beginning</legend>
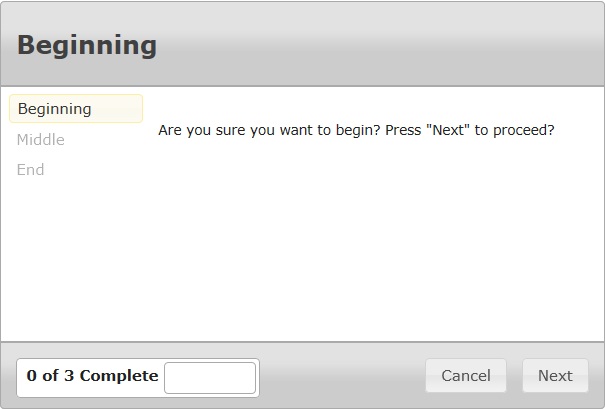
<p>Are you sure you want to begin? Press "Next" to proceed?</p>
</fieldset>
<fieldset>
<legend>Middle</legend>
<p>Are you sure you want to?</p>
<p>You can still go back. Or press "Next" again to confirm.</p>
</fieldset>
<fieldset>
<legend>End</legend>
<p>Done, click "Finish" to end</p>
</fieldset>
</form>
<!-- 也可以是帶 title 屬性的 div -->
<div id="wizard-div" class="jWizard">
<div title="Beginning">
<p>Are you sure you want to begin? Press "Next" to proceed?</p>
</div>
<div title="Middle">
<p>Are you sure you want to?</p>
<p>You can still go back. Or press "Next" again to confirm.</p>
</div>
<div title="End">
<p>Done, click "Finish" to end</p>
</div>
</div>
你可以依需求增加 div,但別忘了為最外層加上 title 值。
1.3 以 JavaScript 呼叫:
$(".jWizard").jWizard({
menuEnable: true,
counter: {
enable: true,
progressbar: true
},
effects: { enable: true }
});
完成以上基本步驟,效果如下:
範例二:為 next 綁定事件
在實際專案中,若單純在頁面放一個 button 觸發 JavaScript,雖能满足基本功能,卻會損害使用者體驗。因此我們可以把上傳檔案、驗證等操作都整合進「下一步」事件中,讓頁面更簡潔、操作更直覺。
以下重點說明 jWizard 的事件機制:
var $w = $("#events-test");
$w.validate({ errorClass: "ui-state-error-text" });
$w
.jWizard({
buttons: {
cancelType: "reset", //點擊"Cancel"時觸發的動作
finishType: "submit" //最後一步點擊"finish"時觸發的動作(提交)
},
cancel: function(event, ui) {
$w.jWizard("firstStep"); //點擊Cancel時回到第一步
},
previous: function(event, ui) {
// if(ui.currentStepIndex==7){return false;} 可據此禁止返回上一頁
},
next: function(event, ui) {
// 可在此控制下一步的條件,例如未上傳檔案則 return false
},
finish: function(event, ui) {
alert("Thank you!");
}
})
.bind("jwizardchangestep", function (event, ui) {
// 表單驗證的事件處理
if (ui.type !== "manual") {
var $currentStep = $w.find(".jw-step:eq(" + ui.currentStepIndex + ")"),
$inputs = $currentStep.find("input:text");
if ($inputs.length > 0 && !$inputs.valid()) {
$currentStep.find("label.error").effect("highlight");
return false;
}
}
})
.bind("jwizardchangestep", function (event, ui) {
// 自訂導航邏輯
if (ui.type !== "manual") {
switch (ui.currentStepIndex) {
case 0:
if ($("#agree").is(":not(:checked)")) {
$("#agree").parent().effect("pulsate");
return false;
}
break;
case 2:
if ($("#username").val() != "") {
event.nextStepIndex = 4;
return false;
}
break;
}
}
});
其中 ui 物件的結構為:{ type: "previous|next|first|last|manual", currentStepIndex: [int], nextStepIndex: [int] }。透過 nextStepIndex,我們可以在使用者即將進入某一步驟前攔截並自訂流程,例如顯示摘要或跳過特定步驟。
以上就是我在使用 jWizard 過程中的一點心得,若有需要可下載完整插件源碼深入研究,也歡迎一起交流、共同進步。
具體效果可參考官方展示頁面。
- 上一篇文章: jQuery 中 jqGrid 分頁功能的實現代碼詳解
- 下一篇文章: 純 jQuery 打造無限級聯下拉框插件(含 AJAX 快取優化)