這個範例示範如何把普通的核取方塊換成以圖片呈現的樣式,讓勾選狀態用圖示表達,視覺上更活潑。先看效果:
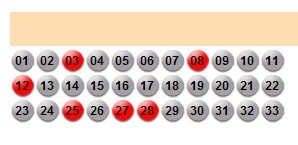
HTML
<asp:CheckBoxList ID="CheckBoxList1" runat="server" RepeatDirection="Horizontal" RepeatLayout="Flow" Width="280px">
<asp:ListItem>01</asp:ListItem>
<asp:ListItem>02</asp:ListItem>
...(依此類推到 33)<br>
</asp:CheckBoxList>
JavaScript(外掛本體)
(function($){
$.fn.imagecheckbox = function(options) {
var defaults = {
checked: "images/radio.gif",
unchecked: "no_images/radio.gif",
css: "on",
hide_radios_checkboxes: false
};
var opt = $.extend(defaults, options);
this.each(function(){
var obj = $(this);
var type = obj.attr('type');
var id = obj.attr('id');
if(!opt.hide_radios_checkboxes){ obj.css('display','none'); }
if(obj.attr('checked')){
$("label[for='" + id + "']").attr('class',opt.css);
}else{
$("label[for='" + id + "']").attr('class','out');
}
$("label[for='" + id + "']").click(function(){
$("#" + id).trigger("click");
if($(this).attr('class') == opt.css){ $(this).attr('class', 'out'); }
else { $(this).attr('class', opt.css); }
});
});
}
})(jQuery);
使用方式(含 CSS)
<script type="text/javascript" src="/scripts/imagetick.js"></script>
<script type="text/javascript">
$(function(){
$("input[type='checkbox']").imagecheckbox({
checked: "/images/red.gif",
onchecked: "/images/no_check.gif",
css: "on"
});
});
</script>
<style type="text/css">
label{display:inline-block;width:25px;height:22px;padding-top:3px;text-align:center;font:800 12px/150% arial;position:relative;left:-210px;}
.on{background:url(/images/red.gif) no-repeat;}
.out{background:url(/images/no_check.gif) no-repeat;}
</style>
運作原理是:把原生核取方塊隱藏起來,改用 label 承載背景圖;點擊 label 時觸發對應核取方塊的 click,並在 on 與 out 兩個 class 之間切換,藉此呈現勾選與未勾選的樣子。
- 上一篇文章: 解決 jQuery easyUI 在 UpdatePanel 內失效的問題
- 下一篇文章: JqZoom 放大鏡外掛使用心得