HTML 5 Web Sockets 應用初探(3)
編輯:CSS詳解
第六步:JavaScript
首先把代碼放進 jQuery 的 document.ready 函數,再檢查用戶瀏覽器是否支援 Web Socket。若不支援,就加上一個指向 Chrome 頁面下載的鏈接。
- $(document).ready(function() {
- if(!("WebSocket" in window)){
- $('#chatLog, input, button, #examples').fadeOut("fast");
- $('<p>Oh no, you need a browser that supports Web Sockets...</p>').appendTo('#container');
- }else{
- connect();
- function connect(){
- //the connect function code is below
- }
- }
- });
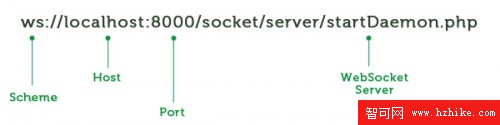
若瀏覽器支援 Web Socket,我們就執行 connect() 函數。這裡是核心功能,我們要開始建立 open、close 與 receive 事件,並定義服務器的 URL。
- var socket;
- var host = "ws://localhost:8000/socket/server/startDaemon.php";
你可能會注意到 URL 裡怎麼沒有 http?是的,這是 Web Socket URL,使用不同的協議。
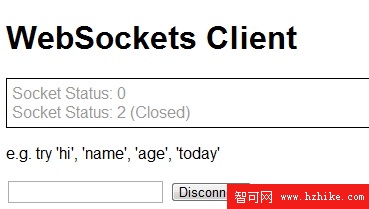
接著完成 connect() 函數。把代碼放進 try/catch 塊,這樣出問題時能讓用戶知道。我們建立 Web Socket 並把信息傳給 message() 函數,同時建立 onopen、onmessage 與 onclose。這裡為用戶提供了端口狀態,雖非必需,但方便調試。
- CONNECTING = 0
- OPEN = 1
- CLOSED = 2
- function connect(){
- try{
- var socket = new WebSocket(host);
- message('<p class="event">Socket Status: '+socket.readyState);
- socket.onopen = function(){
- message('<p class="event">Socket Status: '+socket.readyState+' (open)');
- }
- socket.onmessage = function(msg){
- message('<p class="message">Received: '+msg.data);
- }
- socket.onclose = function(){
- message('<p class="event">Socket Status: '+socket.readyState+' (Closed)');
- }
- } catch(exception){
- message('<p>Error'+exception);
- }
- }
message() 函數很簡單,它把要展示給用戶的文字填進 chat log 容器,我們在 socket 事件函數中為段落標籤建立適當的 class。
- function message(msg){
- $('#chatLog').append(msg+'</p>');
- }
目前的成果:你已建立 HTML/CSS 模板、建立 Web Socket 連接,並能透過連接更新用戶進度。
第七步:發送數據
我們需要監聽用戶按下鍵盤的事件並運行 send 函數,13 便是回車鍵對應的 ASCII 碼。
- $('#text').keypress(function(event) {
- if (event.keyCode == '13') {
- send();
- }
- });
send() 函數如下:
- function send(){
- var text = $('#text').val();
- if(text==""){
- message('<p class="warning">Please enter a message');
- return ;
- }
- try{
- socket.send(text);
- message('<p class="event">Sent: '+text)
- } catch(exception){
- message('<p class="warning"> Error:' + exception);
- }
- $('#text').val("");
- }
這些額外的代碼還負責檢測用戶是否空白輸入、清空輸入框,並執行 message() 函數。
- 上一篇文章: HTML 5 Web Sockets 應用初探(4)
- 下一篇文章: HTML 5 Web Sockets 應用初探(2)