傳統的平面商品列表很難抓住用戶的注意力,但如果能在展示環節加入合適的 3D 元素,效果往往會有意想不到的提升。本文順勢把 perspective 和 transform: translateZ 的用法再強化一遍。
效果預覽

先說明一下:這個創意並非原創,成形於 w3cplus 上的一篇文章,本文重點在於拆解實現方法。
熱身:用 CSS3 畫一個正方體
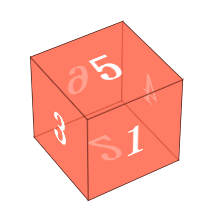
在沒有 CSS3 的的年代,想畫出這樣一個立方體幾乎是天方夜談。
HTML 結構
<body>
<div class="wapper">
  <div class="cube">
    <div class="side front">1</div>
    <div class="side back">6</div>
    <div class="side right">4</div>
    <div class="side left">3</div>
    <div class="side top">5</div>
    <div class="side bottom">2</div>
  </div>
</div>
</body>
div.wapper 是這個效果的舞台,也就是設置 perspective 的元素。這裡有個容易忽略的細節:如果多個元素共享同一個舞台,那麼從同一視線觀察它們時,每個元素呈現的透視角度是不同的——就像站在一排傾斜 45 度的門前,每一扇門相對於你視線的角度都不一樣。
div#cube 代表整個立方體,六個 div 分別對應六個面。
組裝思路
給 div#cube 加上 transform-style: preserve-3d,然後讓六個面各自旋轉並平移。初始狀態下所有面都重疊在同一平面上,接著:
- front:沿 Z 軸向前移動半個邊長,即 translateZ(50px)
- back:先繞 Y 軸旋轉 180 度讓文字朝外,再 translateZ(50px)。由於此時已經轉過 180 度,這個「向前」實際上是朝遠離觀察者的方向
- 其餘四個面:分別繞 X 軸或 Y 軸旋轉 ±90 度,然後同樣 translateZ(50px)
CSS
.wapper {
  margin: 100px auto 0;
  width: 100px;
  height: 100px;
  -webkit-perspective: 1200px;
  font-size: 50px;
  font-weight: bold;
  color: #fff;
}
.cube {
  position: relative;
  width: 100px;
  -webkit-transform: rotateX(-40deg) rotateY(32deg);
  -webkit-transform-style: preserve-3d;
}
.side {
  text-align: center;
  line-height: 100px;
  width: 100px;
  height: 100px;
  background: rgba(255, 99, 71, 0.6);
  border: 1px solid rgba(0, 0, 0, 0.5);
  position: absolute;
}
.front  { -webkit-transform: translateZ(50px); }
.top    { -webkit-transform: rotateX(90deg)  translateZ(50px); }
.right  { -webkit-transform: rotateY(90deg)  translateZ(50px); }
.left   { -webkit-transform: rotateY(-90deg) translateZ(50px); }
.bottom { -webkit-transform: rotateX(-90deg) translateZ(50px); }
.back   { -webkit-transform: rotateY(-180deg) translateZ(50px); }
想調整視覺上的透視強度,直接改 perspective 的數值就行。
回到商品展示
理解了立方體,商品卡就沒有難度了:只需要兩個面,一個放圖片,一個放介紹。初始時讓介紹面繞 X 軸旋轉 90 度藏在背面,鼠標懸停時讓整個盒子繞 X 軸轉 90 度,介紹就翻上來了。
HTML
<!DOCTYPE html>
<html>
<head>
<title></title>
<meta charset="utf-8">
<link href="css/reset.css" rel="stylesheet" type="text/css">
</head>
<body>
<ul id="content">
  <li>
    <div class="wrapper">
      <img src="images/a.png">
      <span class="information">
        <strong>Contact Form</strong>
        The easiest way to add a contact form to your shop.
      </span>
    </div>
  </li>
  <li>
    <div class="wrapper">
      <img src="images/b.jpeg">
      <span class="information">
        <strong>Contact Form</strong>
        The easiest way to add a contact form to your shop.
      </span>
    </div>
  </li>
  <li>
    <div class="wrapper">
      <img src="images/c.png">
      <span class="information">
        <strong>Contact Form</strong>
        The easiest way to add a contact form to your shop.
      </span>
    </div>
  </li>
</ul>
</body>
</html>
CSS
<style type="text/css">
body { font-family: Tahoma, Arial; }
#content { margin: 100px auto 0; }
#content li, #content .wrapper, #content li img, #content li span {
  width: 310px;
  height: 100px;
}
#content li {
  cursor: pointer;
  -webkit-perspective: 4000px;
  width: 310px;
  height: 100px;
  float: left;
  margin-left: 60px;
}
#content .wrapper {
  position: relative;
  -webkit-transform-style: preserve-3d;
  -webkit-transition: -webkit-transform .6s;
}
#content li img {
  top: 0;
  border-radius: 3px;
  box-shadow: 0px 3px 8px rgba(0, 0, 0, 0.3);
  position: absolute;
  -webkit-transform: translateZ(50px);
  -webkit-transition: all .6s;
}
#content li span {
  background: -webkit-gradient(linear, left top, left bottom,
    color-stop(0%, rgba(236, 241, 244, 1)),
    color-stop(100%, rgba(190, 202, 217, 1)));
  text-shadow: 1px 1px 1px rgba(255, 255, 255, 0.5);
  position: absolute;
  -webkit-transform: rotateX(-90deg) translateZ(50px);
  -webkit-transition: all .6s;
  display: block;
  top: 0;
  text-align: left;
  border-radius: 15px;
  font-size: 12px;
  padding: 10px;
  width: 290px;
  height: 80px;
  box-shadow: none;
}
#content li span strong {
  display: block;
  margin: .2em 0 .5em 0;
  font-size: 20px;
  font-family: "Oleo Script";
}
#content li:hover .wrapper { -webkit-transform: rotateX(95deg); }
#content li:hover img {
  box-shadow: none;
  border-radius: 15px;
}
#content li:hover span {
  box-shadow: 0px 3px 8px rgba(0, 0, 0, 0.3);
  border-radius: 3px;
}
為什麼要多一層 div.wrapper
CSS 部分前面已經分析過,這裡補充一個設計上的考量:每個商品外層都包了一個 div.wrapper,乍看有些多餘,其實不然。我們希望每件商品都以各自正常的 90 度翻轉,因此不能讓所有商品共享同一個舞台。於是給每個 wrapper 單獨設置 transform-style: preserve-3d,並在每個 li 上分別設置 perspective,最終的翻轉動畫則作用於各自的 div.wrapper 之上。
順帶一提,:hover 時把角度設為 95deg 而非 90deg,是為了避免翻轉到恰好垂直時出現「消失」的視覺斷點,這個小技巧在製作翻牌類效果時很值得借鑑。
- 上一篇文章: HTML5 + CSS3 打造 3D 旋轉木馬相冊
- 下一篇文章: HTML5 + WebSocket 實現多文件並發上傳實例